

The yarn has started to gather across my knees, and the little fish shape is beginning to show beneath the afternoon light. Each pull of the hook makes a soft, familiar sound, the kind that belongs beside a mug of coffee and a quiet room. This Crochet Fish Pencil Case Pattern PDF makes a small project feel playful without asking you to hurry, and the finished pouch is useful enough to keep near your desk or tuck into a school bag.
Why Crochet Fish Pencil Case Pattern PDF Is So Soothing to Crochet
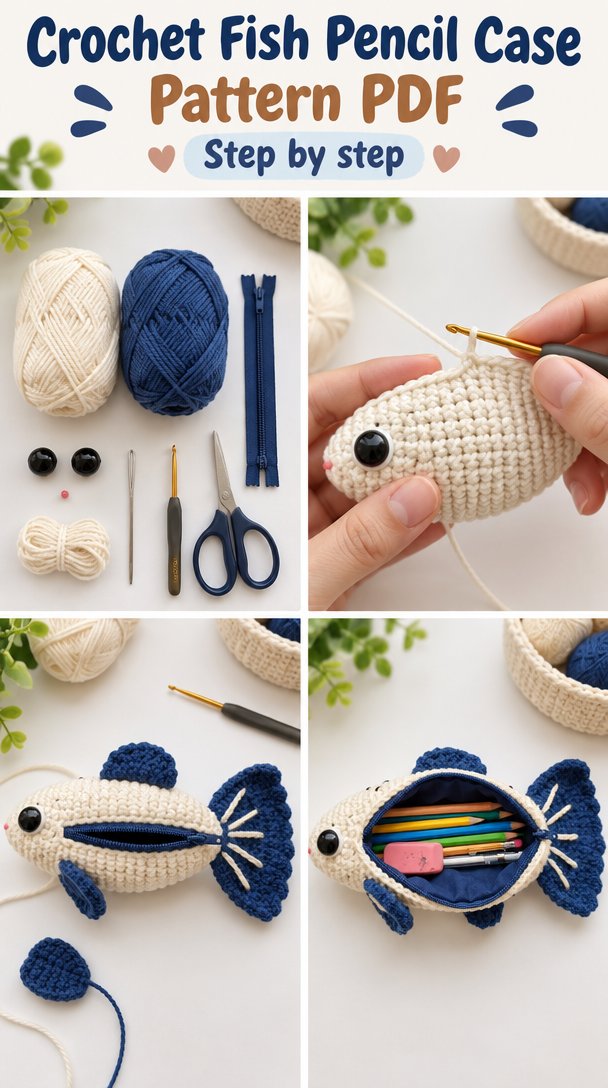
A small project gives your hands a clear place to settle. You work a few stitches, turn the fabric, and watch the shape grow without needing a whole evening or a large table. I made mine on the couch during a rainy evening, and the first rows curled until the fabric became heavy enough to lie flat across my lap.
The fish shape adds just enough interest. You get a little change in direction at the tail and a simple opening at the top, but most of the body follows a steady rhythm. That balance matters when you want your crochet to feel restful rather than demanding.
There is room for ordinary life around this project. Set it beside your yarn basket on the porch in summer, carry it to the armchair during a cool fall evening, or keep it near the kitchen table with a few pencils inside. Many people find crocheting calming because the repeated movements give the mind something gentle to follow, and a pencil case offers a satisfying finish line.
The fabric also feels good as it forms. Worsted weight yarn gives the case enough body to hold its shape, while half double crochet keeps the stitches low and even. After the first ten minutes, my hands warmed up and the yarn began sliding through my fingers more smoothly.
The Rhythm of This Crochet Project
This pencil case begins with a foundation chain, which is the starting row of chain stitches, and grows through simple half double crochet. A half double crochet, abbreviated hdc, sits between single crochet and double crochet in height, so it creates a firm fabric without making the project feel stiff.
The pattern uses US crochet terms. UK readers often find these posts too, and the same word can mean a different stitch there, so this note helps prevent confusion. You will also use a chain, abbreviated ch, which forms the foundation and the turning chain at the end of each row.
The body repeats across a stitch multiple of 2 stitches. That means you can resize the width by adding or removing 2 chains, while keeping the shape balanced. The construction stays approachable for a beginner, but the small tail and finishing details give an experienced crocheter something pleasant to do with their hands.
Plan on about 2 to 3 hours of crochet time, spread across several evenings if you like. The sewing at the tail and zipper area takes the most patience, and that part feels fiddly until you slow down and place each stitch carefully.
Pattern at a Glance
Keep this short overview nearby while you work.
- Skill level: Easy
- Finished size: 8 inches long by 3 inches tall (20 cm by 7.5 cm)
- Gauge: 14 hdc and 10 rows measure 4 inches (10 cm)
- Yarn: Worsted weight (weight 4, medium), about 150 yards total, or 0.9 of a 170-yard skein
- Hook size: H-8 (5.0 mm)
- Other supplies: Yarn needle, scissors, tape measure, one 7-inch zipper, optional stitch markers
- Stitch multiple: Any multiple of 2 stitches
- Estimated time: 2 to 3 hours
What You Need for This Project
- Worsted weight yarn, weight 4 medium, cotton or acrylic, about 150 yards total from a 170-yard skein (one skein is usually enough)
- H-8 (5.0 mm) crochet hook, with half a size up or down fine depending on your tension
- Yarn needle for sewing and weaving in the ends
- Small sharp scissors
- Tape measure
- One 7-inch zipper (a slightly shorter zipper can be swapped in if you adjust the opening)
- Two stitch markers, optional, to mark the first and last stitch
- Matching sewing thread and a hand-sewing needle for the zipper
I used a worsted weight cotton yarn for the sample because cotton gives the case a stable feel and handles frequent handling well. A cotton example is Lily Sugar’n Cream, but any smooth worsted weight yarn with about 170 yards per 100 g skein can work. Acrylic also works, although it may feel softer and less structured.
Make a small gauge swatch before you begin. Twenty minutes spent checking gauge can save you from finishing a pouch that will not hold the zipper comfortably. Work 14 hdc and 10 rows, then measure the center four inches (10 cm). If your fabric looks loose, try a smaller hook; if it feels tight, try a larger one.
You can safely substitute another worsted weight yarn, but check the fiber and the way it behaves. Cotton is a good choice for a pencil case because it resists stretching, while acrylic keeps the project affordable and easy to wash. Keep the yarn smooth enough for the zipper edge, and avoid a very fuzzy yarn that can catch in the teeth.
Step by Step
- Difficulty and size: This is an easy pattern worked in US terms. The stitch multiple is any multiple of 2 stitches, and the finished case measures about 8 inches long by 3 inches tall (20 cm by 7.5 cm).
- Make a foundation chain of 28 chains. A chain, or ch, forms a small loop as you pull the yarn through the loop on your hook. Keep this chain relaxed because a tight foundation chain can pull the fabric into a curve.
- Row 1: Skip the first 2 chains, then work 1 hdc in each remaining chain across. To make a half double crochet, yarn over, insert the hook, yarn over and pull up a loop, then yarn over and pull through all 3 loops on the hook. You will have 26 hdc.
- Chain 2 to turn. This turning chain brings your hook to the correct height for the next row and does not count as a stitch. Turn your work so the next row begins from the opposite side.
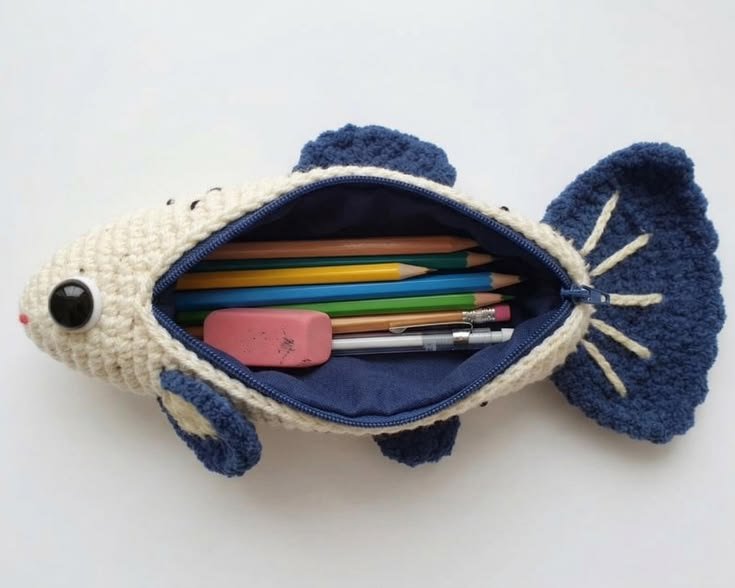
- Rows 2 through 18: Work 1 hdc in each stitch across, placing the first hdc in the first stitch beside the turning chain. Chain 2 and turn at the end of every row. Each row has 26 hdc.
- Watch the edges as you work. The top loops of the stitches look like small V shapes, and the first and last V can hide near the turning chain. If you finish a row and count only 25 stitches, look for a missed edge stitch before continuing.
- Do not worry if a mistake appears. Pull back one stitch at a time by gently removing the hook and tugging the working yarn, then place the hook back into the last secure loop. If you notice the problem several rows later, count from the edge, undo only as far as needed, and remake the row calmly.
- At the end of Row 18, fasten off, leaving a yarn tail about 18 inches long for sewing. Pull the tail through the final loop and gently tighten it. You now have one flat rectangle measuring about 8 inches by 6 inches (20 cm by 15 cm).
- Fold the rectangle in half with the right side facing inward. The right side, or RS, is the side you want to show on the finished case. The wrong side, or WS, faces outward while you sew.
- Use the yarn tail and a yarn needle to sew the two short side edges together with small whip stitches. Keep the top edge open for the zipper. Work through both fabric layers, and avoid pulling so tightly that the side edges pucker.
- Turn the pouch right side out and check the shape. If one side looks longer, gently adjust the seam before securing the yarn. Weave in the ends by passing the needle through several stitches on the wrong side, then trim the extra yarn.
- Pin or clip the zipper along the open edge. Hand sew it in place with matching sewing thread, taking small stitches through the zipper tape and the crochet fabric. A stitch marker can hold each end temporarily while you work.
- Open and close the zipper slowly to test it. If the slider catches, check for a loose strand near the teeth and tuck it toward the inside. Finish by weaving in every remaining yarn end so the inside feels tidy.
- Shape the case with your fingers. Cotton can be lightly dampened and blocked, meaning shaped and allowed to dry in place, but this small item usually needs only gentle smoothing. Let it dry flat if you dampen it.
Where This Piece Finds Its Place
The finished case works wherever a few small tools tend to gather. Keep pencils and a sharpener inside it on your desk, or use it for crochet hooks, stitch markers and a tiny tape measure. The fish shape also makes it easy to spot in a larger tote.
I like the way it looks in a basket beside the armchair, especially when the color echoes a nearby blanket. It can also travel to the porch in summer without taking up much room. For a holiday gift, fill it with colored pencils and a small sketchbook, then wrap it with simple paper and cotton ribbon.
You could make one for a child who enjoys drawing, but remember that the zipper and any added decorations need secure stitching. Small parts and long loose stitches can be unsafe for children under three, so keep this version for older children and adults unless you adapt it with care.
Care and Storage for Crochet Fish Pencil Case Pattern PDF
For a cotton case, hand wash it in cool or lukewarm water with a small amount of gentle detergent. You can also use a gentle machine cycle in a mesh bag, but hand washing puts less stress on the zipper and seams.
Press out water with a towel instead of twisting the pouch. Shape it and dry it flat, never hanging it wet, because the weight of the water can stretch the crochet and pull against the zipper. If the case needs blocking, smooth it into shape while damp and let it dry completely.
If you choose acrylic instead, wash it in cool or warm water on a gentle cycle and dry it flat or use low heat only if the yarn label allows it. Acrylic can melt under a hot iron, so never press it directly. Use steam from a distance or block it cold.
Store the case folded or lying flat somewhere breathable rather than hanging it by the zipper. Cotton does not need moth protection, but if you make a wool version, untreated wool can felt in warm agitation while superwash wool tolerates the washing machine more easily. Cedar or lavender can help protect stored wool, and keeping the leftover yarn with its label preserves the dye lot for future repairs.
Small Ways to Make It Your Own
Try a thicker yarn if you want a roomier pouch. Bulky yarn will enlarge the case and create a softer, more padded feel, but it may make the zipper edge harder to sew. A thinner yarn will create a smaller, lighter case with a more delicate drape, so measure the fabric before choosing the zipper.
Play with color blocking by working the first 9 rows in one shade and the next 9 rows in another. Carry the unused yarn only if the color changes line up neatly, or fasten off at each change to keep the inside smooth.
You can replace the half double crochet with single crochet, abbreviated sc, if you want a denser fabric. Single crochet makes shorter, firmer stitches, so the finished case may measure slightly differently and take a little longer to work.
Resize the case by changing the starting chain in multiples of 2. Add 4 chains for a wider pouch or remove 4 chains for a slimmer one, then work enough rows to reach the length you want. Measure before sewing because yarn, hook size and tension all affect the final dimensions.
A simple border can add a neat frame. Work one round of single crochet around the rectangle before sewing, placing 1 sc in each row end along the long edges and 1 sc in each stitch across the short edges. For gifting, choose a calm neutral for an adult, bright blocks for a school supply set, or a soft blue and cream combination for a beach-inspired summer pouch.
Frequently Asked Questions About Crochet Fish Pencil Case Pattern PDF
Can I use a different hook size for the Crochet Fish Pencil Case Pattern PDF?
Yes, you can use a different hook size if your tension needs it. The pattern calls for H-8 (5.0 mm), but an I-9 (5.5 mm) hook may help if your stitches feel tight, while a G-6 (4.0 mm) hook can make the fabric denser. Check your gauge and remember that the finished size may change.
What yarn can I substitute for the recommended worsted weight yarn?
Use another smooth worsted weight yarn, labeled weight 4 medium, with about 170 yards per 100 g skein. Cotton gives the pencil case structure, while acrylic makes a softer and often lighter pouch. Avoid very fuzzy yarn near the zipper, and make a gauge swatch before committing to the substitute.
What should I do if I find a mistake several rows later?
Undo only as far as the mistake and rebuild the stitches carefully. Remove the hook, pull the working yarn gently to release one stitch at a time, and place the hook back into the secure loop. Count from the edge after fixing it, because a missed stitch often shows up as a changed row count.
Is this pencil case pattern suitable for a beginner?
Yes, this project suits a beginner who knows how to chain and work half double crochet. The rectangle uses the same stitch across every row, and the only fiddly part involves sewing the zipper. Take your time at the edges, where the turning chain can make the first or last stitch easy to overlook.
How long does the Crochet Fish Pencil Case Pattern PDF take to make?
Plan on about 2 to 3 hours, including sewing and finishing. The crochet itself may take less time, while zipper placement adds a slower, careful stage. You can divide the work across several evenings, perhaps making the body one night and finishing the seams during a quiet weekend morning.
Does this pattern use US or UK crochet terms?
This pattern uses US crochet terms. In this version, half double crochet means the stitch made by yarning over, inserting the hook, pulling up a loop, then pulling through all 3 loops. UK terminology uses different names for several stitches, so check the abbreviation list if you usually follow UK patterns.
Take the Time You Need
Let the little fish take shape at the pace your hands choose. A missed stitch can be repaired, a row can be pulled back, and the finished pouch does not need to look factory perfect to be useful. Set it beside you, listen for the quiet click of the hook, and let the simple rhythm carry you through the work.
—META—
SEO Title: Crochet Fish Pencil Case Pattern PDF
Meta Description: Make a calm crochet fish pencil case with an easy US pattern, simple half double crochet, clear counts, and gentle finishing guidance.
Slug: crochet-fish-pencil-case-pattern
Category: Crochet Patterns
Tags: crochet pencil case, fish crochet, easy crochet, crochet pouch, us crochet terms
Image Alt Text: Crochet fish pencil case fabric worked in half double crochet
Finished crochet fish pouch with zipper and neat side seams
Hands crocheting the pencil case with worsted weight yarn
Pinterest Title: Crochet Fish Pencil Case Pattern
Pinterest Description: Make a playful fish pencil case with a calm, easy crochet rhythm. This small project suits quiet evenings and thoughtful handmade gifts.

Crochet Fish Pencil Case
- Total Time: 180 minutes
Description
Create a calming and playful crochet fish pencil case that is perfect for organizing small items like pencils or crochet hooks.
Materials
- Worsted weight yarn, weight 4 medium, about 150 yards total from a 170-yard skein
- H-8 (5.0 mm) crochet hook
- Yarn needle for sewing and weaving in the ends
- Small sharp scissors
- Tape measure
- One 7-inch zipper
- Two stitch markers (optional)
- Matching sewing thread
- Hand-sewing needle
Instructions
- Make a foundation chain of 28 chains.
- Row 1: Skip the first 2 chains, then work 1 hdc in each remaining chain across. You will have 26 hdc.
- Chain 2 to turn and turn your work.
- Rows 2 through 18: Work 1 hdc in each stitch across, placing the first hdc in the first stitch beside the turning chain. Chain 2 and turn at the end of every row.
- At the end of Row 18, fasten off, leaving a yarn tail about 18 inches long for sewing.
- Fold the rectangle in half with the right side facing inward.
- Use the yarn tail and a yarn needle to sew the two short side edges together with small whip stitches, keeping the top edge open for the zipper.
- Turn the pouch right side out and check the shape.
- Pin or clip the zipper along the open edge. Hand sew it in place with matching sewing thread.
- Open and close the zipper slowly to test it.
- Finish by weaving in every remaining yarn end.
Notes
Be careful with small parts and long loose stitches if giving to children under three. You can substitute yarn but check the fiber behavior.
- Preparation Time: 20 minutes
- Active Time: 120 minutes