

The late afternoon light catches the little flowers as they gather around your wrist, and the hook makes that soft, familiar pull through each loop. A Micro-Crochet Flower Bracelet grows slowly enough to notice, one small petal and neat joining stitch at a time, until the yarn becomes something you can wear or tuck into a gift box. I made mine beside a mug of coffee on a quiet Sunday, enjoying how the tiny rounds asked for attention without asking me to hurry.
Why This Piece Suits Slow Days
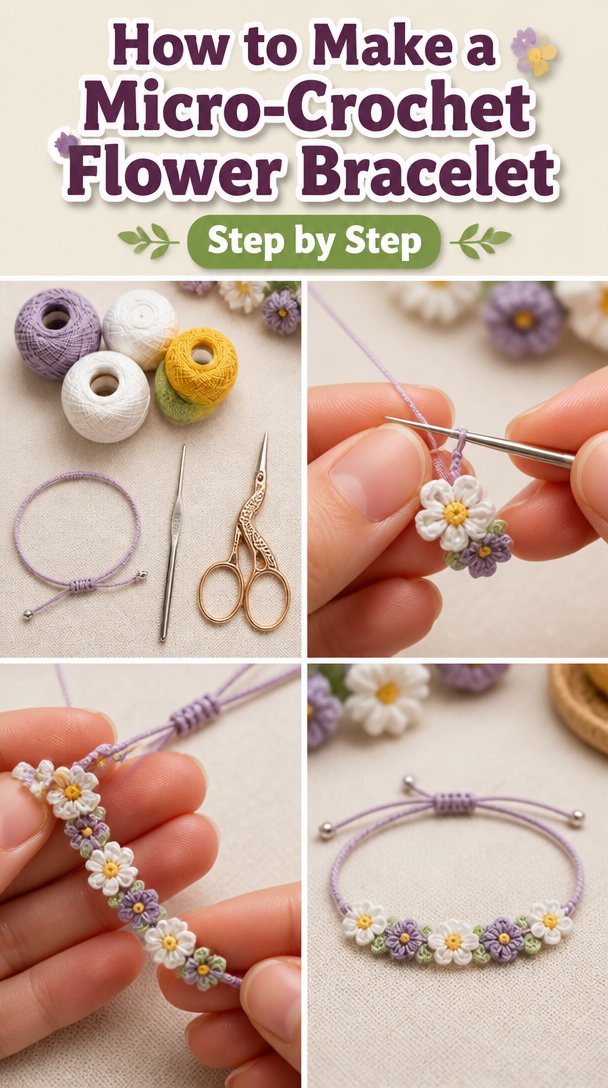
A small bracelet gives you a gentle place to rest your hands. You are not managing a large blanket across your lap or counting a long row that disappears into the distance. The flowers stay close, and each one offers a clear little finish line.
The first few rounds may feel fiddly, especially if you usually work with worsted weight yarn. After about ten minutes, my hands warmed up and the hook began to find its way through the loops more naturally. The quiet click of metal against a mug and the soft drag of cotton through my fingers made the project feel suited to a rainy evening on the couch.
This bracelet also travels well. You can keep the small yarn ball in a project bag beside the armchair, take it onto the front porch in summer, or work a flower while coffee brews. The piece does not demand a whole afternoon. It welcomes a few attentive minutes.
There is room for imperfection here. One flower in my first attempt had a slightly fuller petal because I pulled one loop a little loosely. I kept it. Tiny handmade differences give the finished bracelet a quiet, personal quality that a perfectly repeated machine-made piece would not have.
How Micro-Crochet Flower Bracelet Comes Together
This pattern uses small five-petal flowers joined into a narrow bracelet. The main stitch is single crochet, which creates a firm, tidy fabric and keeps the flower centers from becoming too loose. You will also use chains and slip stitches to shape the petals and connect the flowers.
For clarity, this pattern uses US crochet terms. UK readers often find these posts too, and the same word can mean a different stitch there. In this pattern, sc means single crochet, not the UK double crochet.
You will begin each flower with a magic ring, also called a magic circle. The ring lets you close the center neatly instead of leaving a hole. Five short chains form the petals, and single crochet stitches anchor those petals around the center.
The bracelet uses six flowers. Each flower has 25 single crochet stitches in its center round, with five petals built from chain spaces around it. The joining work is simple, though the small scale makes it a little fiddly. Plan on two to three evenings, or about 3 to 4 hours of relaxed crochet time.
Pattern at a Glance
Keep this small project nearby while you gather your yarn and settle into your first flower.
- Skill level: Easy, with small fiddly details
- Finished size: 7 inches (18 cm) long and 1.25 inches (3 cm) wide
- Gauge: 20 single crochet and 22 rows measure 4 inches (10 cm)
- Yarn: Cotton worsted weight (weight 4, medium), 85 yards total from one 2-ounce (57 g) skein
- Hook: H-8 (5.0 mm)
- Other supplies: Yarn needle, scissors, tape measure, and one stitch marker
- Stitch multiple: Each flower uses 5 petals, and each petal repeats over 5 center stitches
- Estimated time: 3 to 4 hours
Gathering Your Materials
- Cotton worsted weight yarn (weight 4, medium), about 85 yards from one 2-ounce (57 g) skein. Choose one color for the flowers or use two colors for alternating centers and petals.
- A US H-8 (5.0 mm) crochet hook. A half size up or down is fine depending on your tension, though the finished bracelet may become slightly larger or smaller.
- A yarn needle with a blunt tip for weaving in the ends.
- Small scissors for cutting yarn cleanly.
- One stitch marker, optional, for marking the first stitch of each round.
- A tape measure for checking the finished length and your gauge swatch.
I used smooth cotton because it holds the petal shape and handles ordinary washing better than a delicate fiber. A worsted weight cotton also gives the flowers enough body without making them stiff. Lily Sugar’n Cream is one familiar example of this kind of yarn, but any smooth cotton worsted weight yarn with about 85 yards available will work.
Make a small gauge swatch if you can spare twenty minutes. Crochet 20 single crochet stitches across and work 22 rows, then measure the center section. If it measures 4 inches (10 cm), your bracelet should land near the finished size. If your fabric feels loose and the flowers look floppy, try the H-8 (5.0 mm) hook with a firmer hand or go down half a size. If your foundation chain pulls tight, go up one hook size just for that chain.
For a substitution, choose another smooth yarn with a similar weight and avoid novelty yarns with eyelash fibers or uneven slubs. Acrylic can work, but it may feel warmer and less crisp than cotton. If you use wool, remember that untreated wool can felt with heat and agitation, while superwash wool tolerates machine washing more readily. The yarn matters less than a clear stitch structure and a fabric that feels comfortable against your skin.
Step by Step
- Difficulty and repeat: This is an easy pattern with a few small, fiddly joins. Each flower has 5 petals, and each petal repeats over 5 center stitches.
- Make a magic ring, also called a magic circle, by wrapping the yarn into a loop and working into its center. Chain 1, then work 5 single crochet stitches into the ring. Pull the yarn tail gently to close the center, but leave the ring flexible enough to adjust. You now have 5 sc.
- Mark the first single crochet with a stitch marker if that helps you see where the round begins. Slip stitch into the first sc to close the round. The center will look small and slightly cupped, which is just right.
- For the first petal, chain 5. A chain, abbreviated ch, is made by pulling a loop of yarn through the loop on your hook. Slip stitch into the next sc. A slip stitch, or sl st, moves you across the work without adding height.
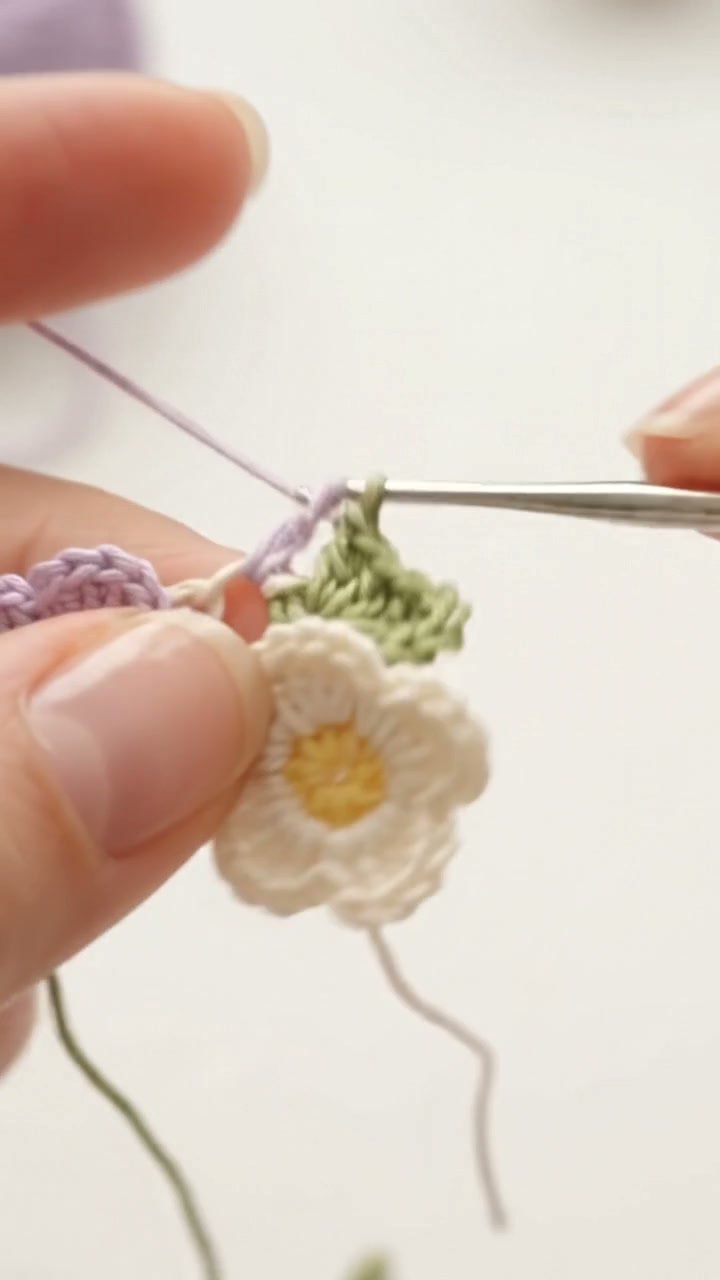
- Repeat the petal sequence around the center: chain 5, then slip stitch into the next sc. Continue until you have made 5 chain loops. Slip stitch into the first sc to finish the flower. You should see 5 small loops radiating from the center.
- Shape each petal with 1 single crochet, 1 half double crochet, 3 double crochet, 1 half double crochet, and 1 single crochet into the same chain loop. A half double crochet, or hdc, adds a little height between the low and tall stitches. A double crochet, or dc, creates the petal’s tallest point.
- Work the same petal shape into each of the remaining 4 chain loops. Keep the stitches relaxed inside each loop rather than pulling them tight. After the fifth petal, slip stitch into the first sc of the center to finish the flower. The flower has 25 petal stitches, five groups of five stitches.
- Cut the yarn, leaving an 8-inch (20 cm) tail. Pull the tail through the final loop, then use the yarn needle to weave in the end on the wrong side. The wrong side, or WS, is the back of the work. Keep the front, or right side (RS), facing you while you check the petal arrangement.
- Make five more flowers using the same instructions. For a simple color change, make three flowers in one color and three in another. You can also make all six flowers in one shade for a quieter bracelet.
- Arrange the flowers in a line with the petals overlapping slightly. Place the first flower’s final petal beside the next flower’s center. Use a yarn needle and a short length of matching yarn to sew through two center stitches on each flower. Tie the joining knot on the wrong side.
- Join the remaining flowers in the same way, checking the length against your wrist as you go. The finished bracelet should measure about 7 inches (18 cm) long and 1.25 inches (3 cm) wide. If you need more room, add one flower. If you need less, use five flowers and shorten the ties.
- Make the ties by cutting two 12-inch (30 cm) strands of yarn. Fold each strand in half and attach one folded strand to each end flower with a slip stitch or a small sewn loop. Braid or twist the loose strands gently, leaving enough length to tie the bracelet comfortably.
- Look over each flower for missed stitches before you trim the final tails. If a mistake appears several rows later, stop and find the last place where the stitch count changed. Pull back one petal at a time instead of tugging the whole flower apart. The yarn will usually loosen with a gentle reverse motion.
- Weave in every remaining end, passing the needle through the back of nearby stitches in two directions. Trim the tails close to the fabric. Cotton does not need wet blocking for this bracelet, but you may pin the petals lightly and mist them with cool water if they look uneven. Let the bracelet dry flat.
The first rows may curl until the flower gathers enough structure to settle. That small curl is normal. Once the petals fill the chain loops, the piece becomes easier to read, and the yarn starts to feel less like a strand and more like a little fabric in your hands.
Where This Piece Finds Its Place
The finished bracelet feels light enough for an ordinary day. Wear it with a summer dress on the porch, tie it around a favorite basket handle, or keep it beside the couch as a small accent for a reading corner. It also works as a cheerful addition to a gift box without taking over the rest of the present.
For a thoughtful gift, make the flowers in colors that echo someone’s favorite mug, garden pot, or quilt. Wrap the bracelet around a small card and write the care instructions on the back. A set of two, one for a friend and one for you, makes a quiet shared project even if you crochet them separately.
The bracelet also suits spring birthdays, a handmade addition to a holiday stocking, or a small thank-you tucked beside a bunch of grocery-store flowers. If you sell finished items, my own policy is simple: I sell only pieces I made myself and describe them honestly.
Caring for Your Crochet
This bracelet uses cotton worsted weight yarn, so hand wash it in cool water or place it in a mesh bag on a gentle, cold-water cycle. Use a small amount of mild detergent and avoid bleach, which can weaken the fibers and change the color.
Press out water with a towel instead of wringing the bracelet. Lay it flat to dry and reshape the petals while damp. Do not hang it wet, because the weight of the water can stretch the ties and pull the flowers out of line.
If the bracelet needs fresh shaping, pin the flowers flat and mist them lightly with cool water. Cotton tolerates gentle warmth, but avoid a hot iron directly on the stitches. Acrylic substitutions can melt under a hot iron, so block acrylic with cool water or steam from a distance instead.
Store the bracelet folded in a breathable fabric pouch or a shallow drawer rather than hanging it for long periods. Keep leftover yarn with its label so you still have the fiber information and dye lot if you decide to make another bracelet later. Cotton does not need moth protection, but cedar or lavender sachets can keep a storage drawer pleasant.
Small Ways to Make It Your Own
Try a slightly thinner cotton if you want a daintier bracelet. The flowers will be smaller and the fabric will drape more softly, but you may need a smaller hook to keep the centers tidy. A thicker yarn creates larger flowers and a bolder piece, though it may need more than 85 yards depending on the yarn.
Color blocking changes the mood without changing the pattern. Make the centers cream and the petals blue, alternate warm and cool flowers, or use one quiet neutral throughout. If you change colors, weave in the ends as you go so the back does not collect a nest of tails.
For firmer, smaller flowers, replace the double crochet stitches in each petal with single crochet. The petals will lose height and look more compact. If you want a taller flower, keep the double crochet and experiment with a treble crochet, or tr, in the center of each petal. A treble crochet makes a taller stitch, so use it sparingly and expect a more open shape.
Resize the bracelet by adding or removing whole flowers rather than cutting the flower repeat in half. Each flower adds about 1.15 inches (3 cm) to the length. You can also add a narrow single crochet border around a flower, though the extra round will make the bracelet wider and slightly stiffer.
For a gift variation, make three matching bracelets in different lengths for a parent, child, and grandparent, but check the fit carefully. Small parts and long loose stitches can be unsafe for children under three. Anything worn in a crib or car seat must stay snug and secure, with no loose ties or detachable pieces.
Frequently Asked Questions About Micro-Crochet Flower Bracelet
Can I use a different hook size for the Micro-Crochet Flower Bracelet?
Yes, you can use a different hook size, but it will change the flower size and the finished length. The pattern uses a US H-8 (5.0 mm) hook because it balances a firm cotton fabric with petals that still move gently. Try a G-6 (4.0 mm) hook for smaller, denser flowers or an I-9 (5.5 mm) hook for a softer, larger bracelet.
What yarn can I substitute for the cotton?
Choose a smooth worsted weight (weight 4, medium) yarn with about 85 yards available. Cotton gives the clearest petals and handles washing well, but a smooth acrylic yarn can substitute if you prefer easy care. Avoid fuzzy or highly textured yarn because it can hide the center stitches. Check the label and make a small flower first before committing to all six.
What should I do if I find a mistake several rows later?
Pull back only as far as the mistake instead of undoing the whole project. Find the last petal or center round that looks correct, then gently reverse the stitches one at a time. If the error does not affect the bracelet’s shape, you may leave it. Handmade flowers can carry a small difference without looking wrong.
Is this bracelet suitable for a beginner?
Yes, this project suits a beginner who knows how to make a chain and single crochet. The small petals feel fiddly at first, but each flower repeats the same sequence. Count the five chain loops before shaping the petals, and use a stitch marker for the first center stitch if the round feels hard to see.
How long does the bracelet take to crochet?
Plan on about 3 to 4 hours, spread across two or three relaxed evenings. Your time may vary with hand tension, color changes, and how quickly you sew the flowers together. The first flower usually takes the longest because you are learning the petal rhythm. The later flowers tend to move more smoothly once your hands remember the sequence.
Does this pattern use US or UK crochet terms?
This pattern uses US crochet terms. That means sc is single crochet, hdc is half double crochet, and dc is double crochet. UK patterns use different names for several of the same-looking stitches, so check the terminology before beginning if you usually follow UK instructions.
Take the Time You Need
Let the bracelet stay small and unhurried. Notice the yarn sliding through your fingers, the little pause before each petal, and the way a loose strand becomes something you can hold. You do not need to make every flower identical. A steady rhythm and a little patience are enough.
—META—
SEO Title: Micro-Crochet Flower Bracelet Pattern
Meta Description: Make a delicate Micro-Crochet Flower Bracelet with calm, clear steps, cotton yarn, gentle care advice, and simple ideas for gifting.
Slug: micro-crochet-flower-bracelet
Category: Crochet Patterns
Tags: crochet bracelet, flower crochet, beginner crochet, cotton crochet, handmade gifts
Image Alt Text: Close-up of small crochet flowers joined into a bracelet
A crochet hook and cotton yarn beside a finished flower
Six colorful crochet flowers arranged for a bracelet
Pinterest Title: Micro-Crochet Flower Bracelet
Pinterest Description: Make a small flower bracelet with cotton yarn and a gentle, easy-to-follow pattern. A peaceful handmade gift for any season.

Micro-Crochet Flower Bracelet
- Total Time: 260 minutes
Description
Create a delicate Micro-Crochet Flower Bracelet using cotton yarn and simple crochet techniques. This project is perfect for relaxed crafting and makes a lovely handmade gift.
Materials
- Cotton worsted weight yarn (weight 4, medium), about 85 yards from one 2-ounce (57 g) skein.
- A US H-8 (5.0 mm) crochet hook.
- A yarn needle with a blunt tip for weaving in the ends.
- Small scissors for cutting yarn cleanly.
- One stitch marker (optional) for marking the first stitch of each round.
- A tape measure for checking the finished length and your gauge swatch.
Instructions
- Make a magic ring and chain 1. Work 5 single crochet stitches into the ring. Pull the yarn tail gently to close the center.
- Mark the first single crochet with a stitch marker if needed. Slip stitch into the first sc to close the round.
- For the first petal, chain 5 and slip stitch into the next sc. Repeat the petal sequence around the center until you have 5 chain loops.
- Slip stitch into the first sc to finish the flower. Shape each petal with 1 single crochet, 1 half double crochet, 3 double crochet, 1 half double crochet, and 1 single crochet into each chain loop.
- Work the same petal shape into the remaining 4 chain loops. After the fifth petal, slip stitch into the first sc of the center to finish the flower.
- Cut the yarn, leaving an 8-inch (20 cm) tail. Pull the tail through the final loop and weave in the end on the wrong side.
- Make five more flowers using the same instructions, optionally using different colors.
- Arrange the flowers in a line with overlapping petals. Use a yarn needle and matching yarn to sew through two center stitches on each flower to join them.
- Join the remaining flowers and check the bracelet length against your wrist. If needed, add or remove flowers.
- Make the ties by cutting two 12-inch (30 cm) strands of yarn. Fold each strand in half and attach to each end flower.
- Braid or twist the loose strands, leaving enough length to tie comfortably.
- Weave in every remaining end and trim the tails close to the fabric. Optionally pin petals lightly and mist with cool water to shape.
Notes
The finished bracelet feels light and can be worn casually or given as a thoughtful gift. Adjustments can be made for different styles or sizes.
- Preparation Time: 20 minutes
- Active Time: 240 minutes