

This post contains Amazon affiliate links. As an Amazon Associate I earn from qualifying purchases.
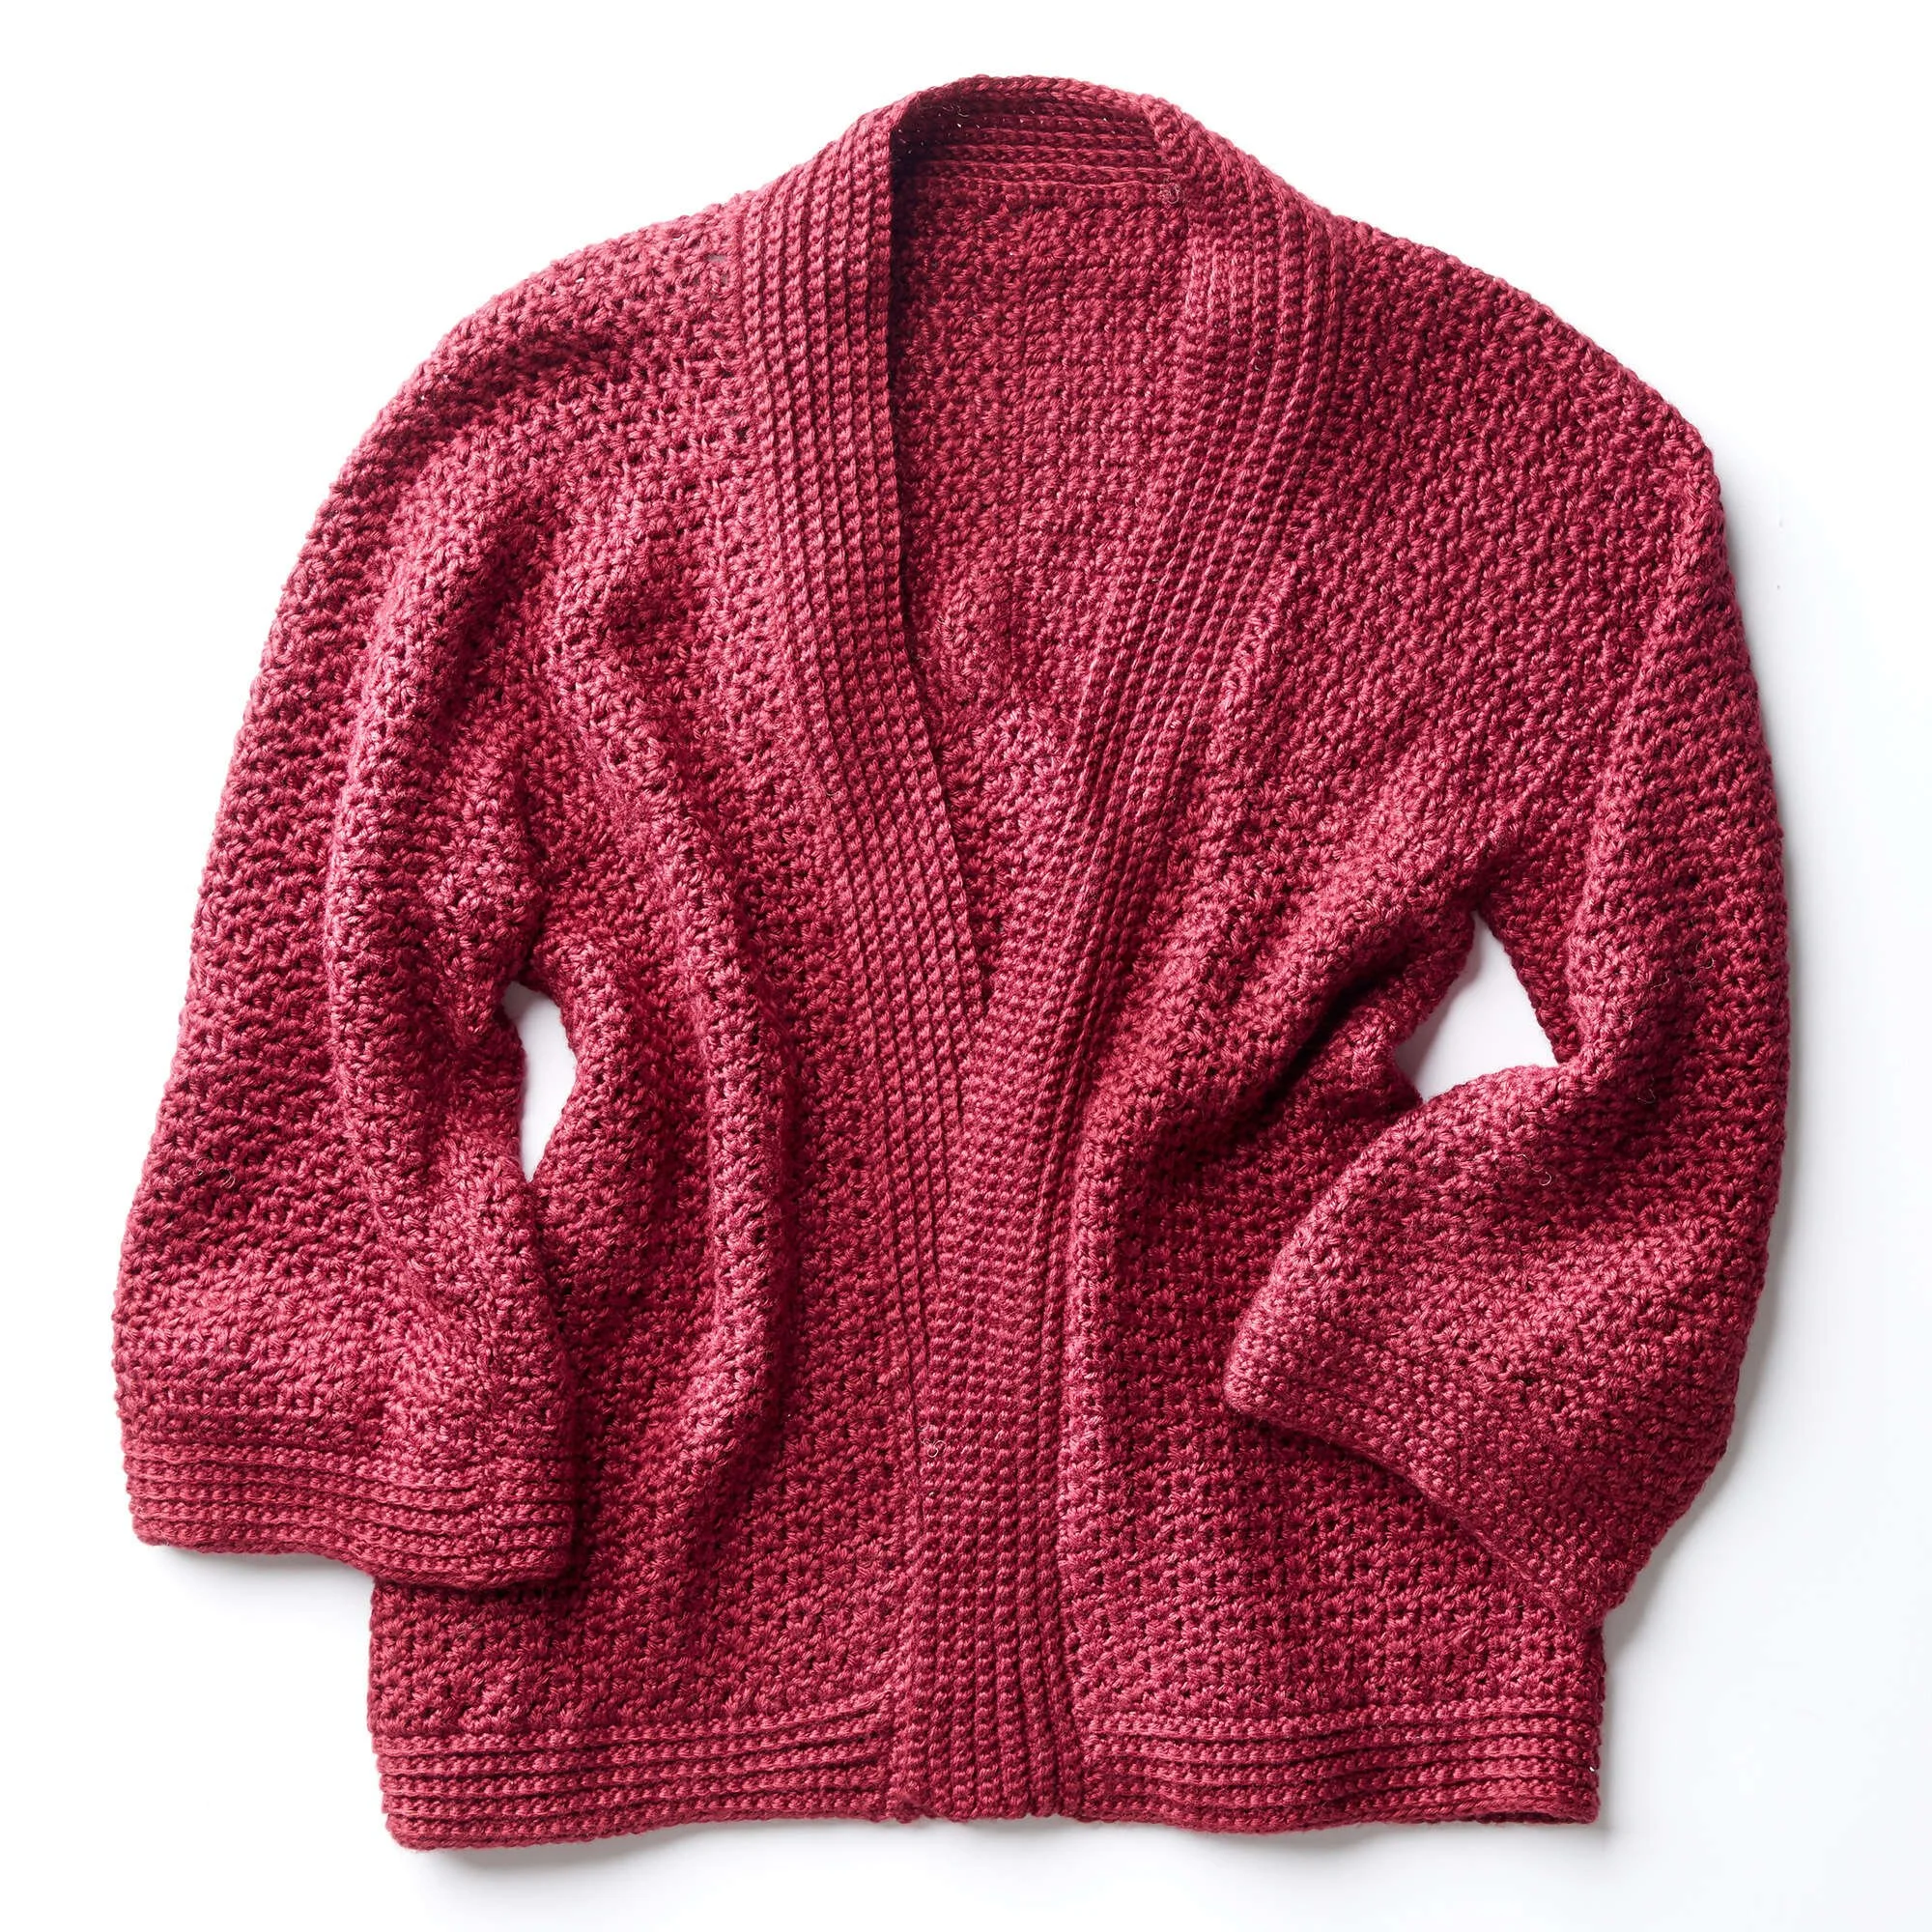
I love crochet garments that feel relaxed without looking unfinished, and this soft drape kimono jacket fits that description beautifully. Its open V-stitch fabric creates fluid movement, while the simple sleeve, yoke, cuff, and border construction makes it an approachable project for crocheters who want to try handmade clothing.
Why you’ll love this pattern
This crochet kimono jacket combines an easy repeating stitch with practical garment construction. The V-stitch gives the fabric an airy drape and helps the project progress steadily without complicated shaping.
You’ll also practice several useful skills:
- Working half double crochet stitches and V-stitches
- Reading measurements as the garment develops
- Using stitch markers to align separate pieces
- Creating a neat single crochet cuff
- Sewing seams and assembling a wearable garment
- Adding a clean bottom and front band
The pattern is especially suitable for crocheters with basic garment experience, although confident beginners can approach it slowly by checking measurements often. Its relaxed shape makes it a useful layering piece for cool evenings, travel, and casual outfits.
“The V-stitch made this jacket enjoyable to crochet, and the drape is even better after gentle blocking. Marking the yoke carefully made assembly much easier.”
How this crochet pattern comes together
The jacket is built from sleeve and yoke sections worked in an open V-stitch pattern. The left and right sections begin from a foundation chain, then extend through side shaping to create the body length.
After the main fabric reaches the specified measurement, each sleeve receives a short single crochet cuff worked through the back loops. Separate front and back pieces are made using the same stitch structure and measurements provided in the pattern.
Finally, the pieces are pinned and sewn together. A single crochet bottom band and front band finish the garment with a simple, polished edge.
The main techniques are chaining, half double crochet, single crochet, V-stitch construction, back-loop-only crochet, seaming, and working evenly around garment edges.
Materials you’ll need
- Patons® Silk Bamboo™ yarn
- U.S. E/4 3.5 mm crochet hook
- U.S. G/6 4 mm crochet hook
- Stitch markers
Use the larger 4 mm hook for the main fabric unless the instructions specify otherwise. Silk-bamboo yarn is known for a smooth feel and attractive drape, which suits this loose kimono style. Check the yarn label for care instructions and yardage requirements before beginning.
Choose a color that complements your wardrobe. A solid shade will highlight the V-stitch pattern, while a softly variegated colorway can add interest without requiring color changes.
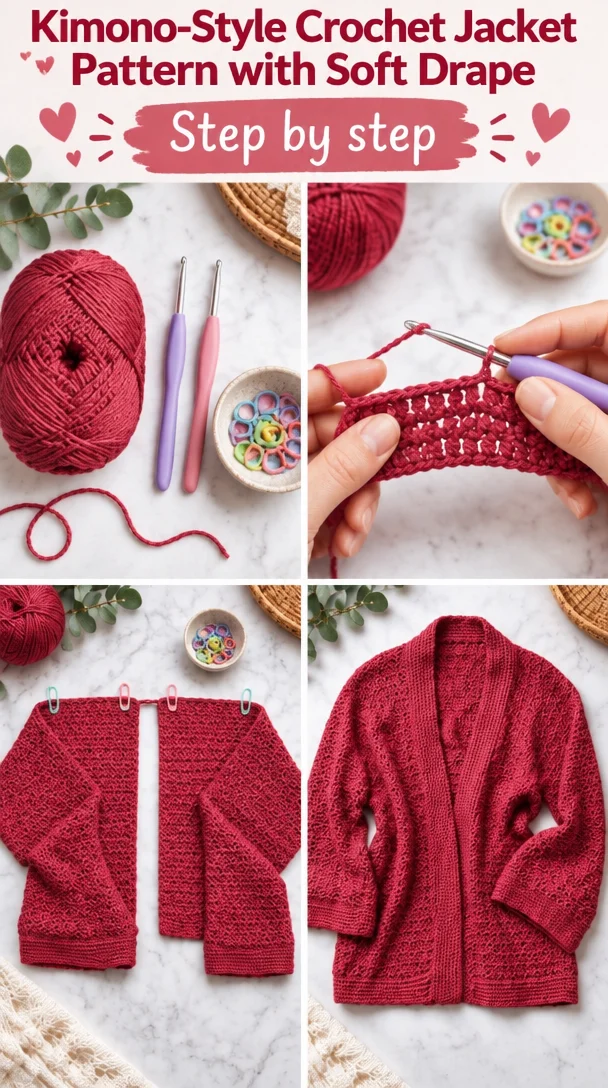
Step-by-step instructions
Before starting, remember that ch means chain, hdc means half double crochet, sc means single crochet, sl st means slip stitch, and V-st means V-stitch. In this pattern, a V-stitch is formed with 1 hdc, ch 1, and 1 hdc worked in the same space.
1. Work the left sleeve and yoke
With the larger hook, chain 48.
First row, right side: Work 1 hdc in the 3rd chain from the hook. Skip the next 2 chains, then work 1 hdc, ch 1, and 1 hdc in the next chain to form a V-stitch.
Repeat this sequence across the row until 3 chains remain. Skip the next 2 chains and work 1 hdc in the last chain.
Second row: Chain 2; this counts as 1 hdc. Work a V-stitch in the next ch-1 space. Repeat the V-stitch sequence across.
Continue working in this pattern until the piece measures 3½ inches. Place a stitch marker at the end of the final row.
2. Work the right sleeve and yoke
Join the yarn with a slip stitch to the first remaining loop of the foundation chain from the right sleeve.
First row: Chain 2. Skip the next 2 chains, then work a V-stitch in the next chain. Repeat across until 3 chains remain. Skip the next 2 chains and work 1 hdc in the last chain.
Second row: Chain 2; this counts as 1 hdc. Work a V-stitch in the next ch-1 space. Repeat across.
Continue until this section measures 3½ inches. Place a stitch marker at the end of the last row.
3. Shape the side of the right sleeve and yoke
Chain 45.
Work 1 hdc in the 3rd chain from the hook. Then work the following sequence 14 times:
- Skip the next 2 chains.
- Work a V-stitch in the next chain.
Skip the next hdc and work a V-stitch in the next ch-1 space. Repeat the V-stitch sequence across until the last hdc remains. Work 1 hdc in the last hdc. Turn.
Keep the foundation chain relaxed while crocheting into it. Pulling tightly can make this edge narrower than the rest of the garment.
4. Continue the left sleeve and yoke side
Chain 2; this counts as 1 hdc. Work a V-stitch in the next ch-1 space.
Repeat the V-stitch sequence across the row. Continue until the work from the marked row measures 17 inches.
Measure from the marked row rather than from the very beginning of the piece so the sleeve and yoke dimensions remain consistent.
5. Add the cuff
Chain 1. Work 1 sc in the next hdc across.
Second row: Chain 1. Working in back loops only, work 1 sc in each stitch across.
Repeat the second-row pattern until the cuff measures 2 inches. Fasten off.
Working through the back loops creates subtle horizontal ridges and gives the cuff a little more visual definition.
6. Make the front and back pieces
Repeat the construction for the front and back pieces as instructed. Follow the stated measurements and maintain the same V-stitch pattern.
Use the stitch markers to identify the corresponding sections during assembly. Before fastening off each piece, compare its measurements with the matching piece to catch tension differences early.
7. Assemble the garment
Pin the garment pieces together before sewing. Match the marked areas carefully.
Sew the side seams. Then assemble the sleeve and yoke pieces to the back and front pieces according to the markers.
Use a yarn needle and matching yarn for the seams. Keep the stitches firm but flexible so the seams do not become stiff or pucker.
8. Add the bottom band
Join the yarn at the bottom edge. Work sc evenly around the entire bottom edge. Avoid placing too many stitches, which can cause ruffling, or too few, which can pull the edge inward.
Fasten off and weave in the end securely.
9. Add the front band
Work sc evenly up one front edge, across the back neck, and down the opposite front edge to the bottom edge.
Fasten off. Gently shape the jacket and check that the band lies flat before completing final finishing.
Styling inspiration
Wear the finished kimono jacket over a simple tank top, dress, or lightweight blouse. Its open shape works well as a casual layering piece and can add texture to an otherwise plain outfit.
For a relaxed look, pair it with jeans and flat sandals. For a more polished outfit, choose a neutral yarn color and wear the jacket over a fitted dress. A longer necklace can complement the open front without competing with the V-stitch texture.
This jacket can also make a thoughtful handmade gift, provided the recipient’s preferred colors and approximate measurements are known.
How to care for your crochet project
Patons® Silk Bamboo™ should be cared for according to the instructions on the yarn label. In general, gentle handling is best for a drapey crochet garment.
- Use cool or lukewarm water unless the label says otherwise.
- Wash gently and avoid harsh agitation.
- Do not wring or twist the jacket.
- Press out excess water with a clean towel.
- Reshape the garment while damp.
- Dry it flat on a clean surface.
- Keep it away from direct heat and strong sunlight.
- Store it folded rather than hanging to help prevent stretching.
- Avoid storing it damp, as this can lead to odor or fiber damage.
If the finished jacket needs shaping, lightly block it to the desired dimensions. Pin the edges carefully without overstretching the fabric.
Helpful crochet tips
- Make a gauge swatch if you want the finished jacket to match the intended measurements closely.
- Check the first V-stitch row carefully. Missing a V-stitch can affect the width of every later row.
- Use stitch markers at the stated points so the front, back, sleeve, and yoke sections align during assembly.
- Keep your chain-2 turning chains consistent. Tight turning chains can make the side edges draw inward.
- Count the V-stitches periodically rather than waiting until the end of a section.
- Measure the fabric on a flat surface. Do not stretch it while checking the 3½-inch or 17-inch measurements.
- When working the cuff in back loops only, insert the hook under the loop farthest from you.
- Pin all pieces before sewing. This makes it easier to correct alignment before the seams are permanent.
- Work edge single crochet stitches evenly. Space them naturally along the edge instead of forcing a stitch into every visible gap.
- Weave in ends securely on the wrong side, then lightly block the garment to improve the drape and edge appearance.
Customize your project
You can personalize this crochet kimono jacket without changing its basic construction.
- Change the color: Choose cream, charcoal, navy, or a soft pastel for a versatile wardrobe piece.
- Use contrast edging: Work the cuff, bottom band, and front band in a coordinating shade. This changes the visual emphasis and requires a second yarn color.
- Adjust the length: Add or remove rows from the main body sections. Any length change will affect yarn requirements and the overall drape.
- Adjust the width: Modify the foundation chain carefully, preserving the stitch repeat and edge structure. A width adjustment can affect sleeve and yoke alignment.
- Add a decorative edge: A simple shell or picot edging could be added after the single crochet bands, but it may make the border more noticeable and use additional yarn.
- Choose a different fiber: A yarn with a different weight or fiber content can change the jacket’s thickness, drape, gauge, and care requirements. Always make a new gauge swatch.
- Add subtle embroidery: Small floral or geometric details can personalize a solid-color jacket without altering its construction.
Frequently asked questions
Is this crochet kimono jacket beginner-friendly?
It is best suited to an advanced beginner or intermediate crocheter. The stitch pattern is repetitive, but the project also involves measuring, shaping, seaming, and assembling multiple garment sections.
What stitch is used in the jacket?
The main fabric uses a V-stitch made with 1 hdc, ch 1, and 1 hdc in the same space. The cuffs and borders use single crochet, with the cuff worked through the back loops only for added texture.
Can I use a different hook size?
Yes, but changing hook size will affect gauge, finished measurements, fabric density, and yarn usage. A smaller hook generally creates a firmer, smaller fabric, while a larger hook creates a looser, more open fabric. Make a gauge swatch before substituting.
How can I make the jacket larger or smaller?
Adjust the foundation chain and the length of the main sections while preserving the stitch pattern. Because this is a garment, compare the pieces as you work and make sure the sleeve, yoke, front, and back sections remain balanced.
Why are my edges uneven?
Uneven edges often result from inconsistent turning chains, missed V-stitches, or accidentally working into spaces that should be skipped. Place a marker at important points and count the V-stitches regularly.
How do I stop the fabric from curling?
A small amount of curling can come from tension or the natural behavior of the yarn. Keep your tension relaxed, avoid pulling the turning chains tightly, and gently block the finished pieces before assembly.
How much yarn do I need?
The supplied instructions list Patons® Silk Bamboo™ yarn but do not provide a total yardage amount. Check the original pattern’s yarn quantity and compare it with the yardage on your chosen skeins before purchasing.
How should I wash the finished jacket?
Follow the care instructions on the Patons® Silk Bamboo™ label. Use gentle handling, avoid twisting, reshape the garment, and dry it flat to help preserve its drape.
Can I sell jackets made from this pattern?
The supplied pattern information does not state its licensing terms. Check the original designer or publisher’s usage policy before selling finished items made from the pattern.
Print
Crochet Soft Drape Kimono Jacket
Description
This crochet kimono jacket features an open V-stitch pattern for a relaxed and stylish look, perfect for layering in casual outfits.
Materials
- Patons® Silk Bamboo™ yarn
- U.S. E/4 3.5 mm crochet hook
- U.S. G/6 4 mm crochet hook
- Stitch markers
Instructions
- Work the left sleeve and yoke by chaining 48 and following the specified stitch pattern until it measures 3½ inches. Place a stitch marker at the end.
- Work the right sleeve and yoke by joining yarn and chaining 2. Continue with the V-stitch pattern until it measures 3½ inches and mark the end.
- Shape the right sleeve and yoke by chaining 45 and following the stitch pattern, ensuring the foundation chain is relaxed.
- Continue the left sleeve and yoke by chaining 2 and repeating the V-stitch sequence until it measures 17 inches from the marked row.
- Add the cuff by chaining 1 and working single crochets across, then continue with back loops only until the cuff measures 2 inches. Fasten off.
- Make the front and back pieces by repeating the construction and measurements according to the pattern, using stitch markers for alignment.
- Assemble the garment by pinning the pieces together and sewing the seams using a yarn needle.
- Add the bottom band by joining yarn and working single crochets evenly around the bottom edge. Fasten off.
- Add the front band by working single crochets along the front edges and back neck. Fasten off and shape the jacket.
Notes
Use a color that complements your wardrobe, and gentle handling is recommended for the yarn during washing.