

The finished pencil case rests lightly across my knees while the late afternoon light turns the yarn a soft cream and black. Each small pull of the hook through a loop makes a quiet, familiar sound, and the fabric grows beneath my hands without asking for much attention. This Pochacco Pencil Case Crochet Pattern has that gentle kind of rhythm: a simple rectangle, a little shaping, and a character-inspired face that comes together one calm stitch at a time. It makes a sweet home for pencils, crochet hooks, or the small treasures that collect in the bottom of a tote.
Why Pochacco Pencil Case Pattern Is So Soothing to Crochet
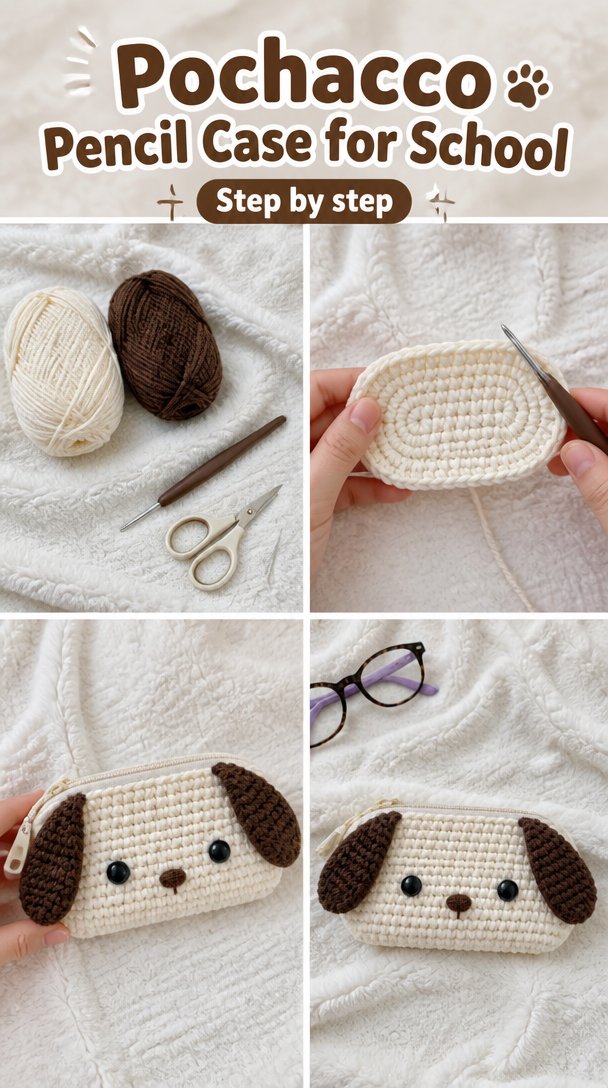
This is a small project, which gives it a welcome sense of proportion. You can carry it from the couch to the porch, pause when the coffee goes cold, and return without losing the thread of the work. The first rows may curl slightly, but once the fabric gains a little weight, it settles across your palm.
The main body uses half double crochet, a stitch that moves along more quickly than single crochet while still making a firm, useful fabric. You yarn over, pull up a loop, and draw through all three loops on the hook. That repeated motion feels steady after a few rows, almost like walking a familiar path.
I made the sample beside a yarn basket on a rainy evening, with a mug tucked just far enough away from my elbow. My hands warmed up after the first ten minutes. There is something pleasant about watching the black details appear against the pale body, especially when you do not hurry them.
The project also leaves room for ordinary imperfections. If a stitch goes missing, you can pull back a few loops, find the opening, and continue. A small pencil case does not demand a whole weekend or a perfectly silent house. It asks for a little yarn, a short stretch of attention, and a place to set it down.
How the Pochacco Pencil Case Pattern Comes Together
The case begins as a flat rectangle worked in rows of half double crochet. You fold the rectangle, seam the sides, and add a simple flap with a button closure. The face uses a few small embroidered details, so you do not need to manage complicated colorwork inside the body.
This pattern uses US crochet terms. UK readers often find these posts too, and the same word can mean a different stitch there, so please check the terminology before you begin. Here, hdc means half double crochet, and every abbreviation follows US usage.
The movement stays simple: chain a foundation chain, turn, work across the row, and repeat. A foundation chain is the first line of chains that supports the rest of the fabric. The turning chain lifts your work to the right height for the next row, while a stitch marker can help you identify the first stitch if your edges feel slippery.
Plan on about two to three relaxed evenings, or roughly four to six hours if you work steadily. The sewing and embroidered face are the fiddliest parts, not because they are difficult, but because small details reward slower hands.
Pattern at a Glance
Keep this small reference nearby while you work.
- Skill level: Easy, with basic seaming and embroidery
- Finished size: About 8 inches long by 3 inches tall (20 cm by 7.5 cm)
- Gauge: 14 half double crochet and 10 rows measure 4 inches (10 cm)
- Yarn: Worsted weight (weight 4, medium), about 180 total yards (165 m)
- Hook size: H-8 (5.0 mm)
- Other supplies: Yarn needle, scissors, tape measure, stitch marker, 1 small button, black embroidery thread
- Stitch multiple: Any multiple of 2 stitches, plus 1 extra chain for turning
- Estimated time: Four to six hours
What You Need for This Project
- Worsted weight yarn (weight 4, medium), cotton or cotton-blend, about 180 yards total, or about two 100 g skeins. Choose one main color and a small amount of black for the face. Lily Sugar’n Cream is one easy-to-find cotton example, though any yarn that meets the gauge will work.
- H-8 (5.0 mm) crochet hook. A half size up or down is fine depending on your tension.
- Yarn needle for sewing seams and weaving in the ends.
- Scissors.
- One stitch marker, optional, for marking the first stitch of a row.
- Tape measure.
- One small flat button, about 1/2 inch (1.3 cm), for the closure. You can swap in a snap or a short crocheted loop.
- Black embroidery thread or a small amount of black worsted weight yarn for the eyes, nose, and mouth.
- A small scrap of white yarn, optional, for tiny eye highlights.
The gauge is 14 half double crochet and 10 rows for 4 inches (10 cm). A swatch takes about twenty minutes, and that small pause can save you from making a case that feels too loose or too narrow. If your fabric looks open, try a smaller hook. If it feels stiff and measures small, try a larger hook.
You can safely substitute another worsted weight cotton or cotton blend, as long as the yarn gives you a firm fabric at the stated gauge. Acrylic also works, though it may feel softer and less crisp, and it can melt under a hot iron. Avoid mixing a stretchy yarn with a firm yarn in the same piece because the case may lose its shape.
Step by Step
- Difficulty and stitch multiple: This is an easy project using a stitch multiple of 2, plus 1 extra chain for turning. Gather your yarn, H-8 (5.0 mm) hook, yarn needle, scissors, tape measure, button, and black embroidery thread.
- Make a foundation chain of 29 chains. A chain, abbreviated ch, is made by pulling a loop through the loop already on your hook. This chain gives you 28 working stitches across the first row.
- Row 1: Work 1 half double crochet, abbreviated hdc, in the second chain from the hook and in each chain across. A half double crochet starts with a yarn over, then you pull up a loop and draw through all three loops. You will have 28 hdc.
- Rows 2 through 20: Chain 1, then turn. The chain 1 is your turning chain and does not count as a stitch. Work 1 hdc in each stitch across, keeping the edges relaxed. You will have 28 hdc in every row.
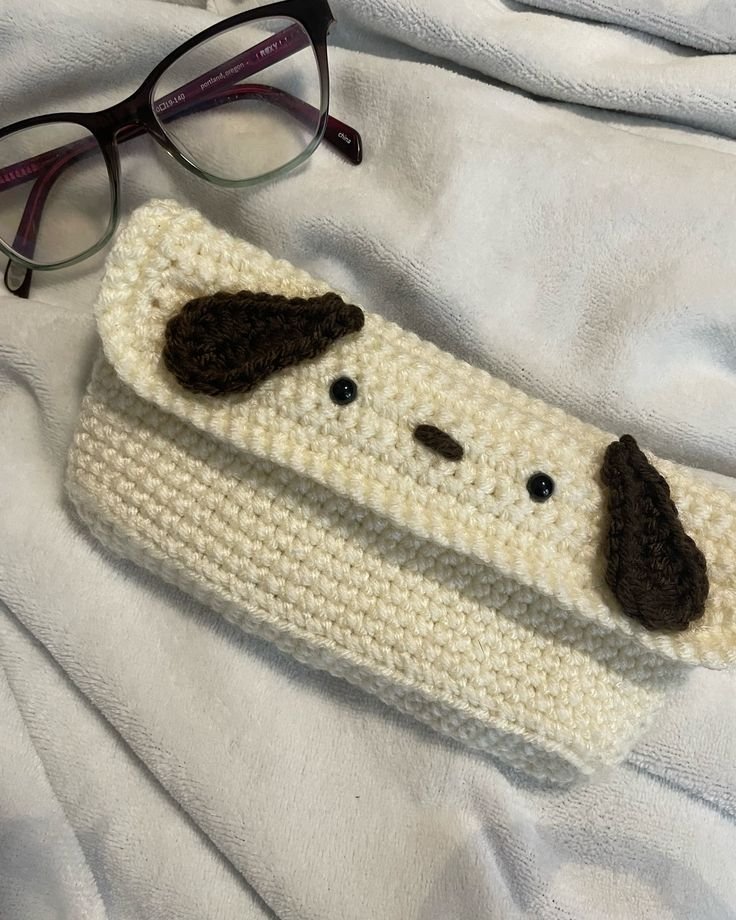
- Pause after Row 20 and measure the rectangle. It should measure about 8 inches wide by 8 inches tall (20 cm by 20 cm). If the first rows curled, lay the fabric flat with your hands rather than pulling hard on the edges.
- Fold the rectangle so the lower edge comes up to about 3 inches below the top edge. The folded section becomes the pocket, and the remaining top section becomes the flap. Use stitch markers, optional, to hold the side edges together.
- Seam both sides with the main-color yarn and a yarn needle. Use small whip stitches through the matching edge loops, stopping where the flap begins. Keep the seam firm but not tight so the opening does not pucker.
- Shape the flap by working across the top edge of the back section. Join the yarn at one corner with a slip stitch, abbreviated sl st. A slip stitch moves the yarn without adding height. Chain 1, then work 1 hdc in each of the 28 edge stitches across.
- Rows 2 through 4 of the flap: Chain 1 and turn. Work 1 hdc in each stitch across for 28 hdc. The fabric will begin to extend over the pocket, and the flap edge will soften as you handle it.
- Row 5 of the flap: Chain 1 and turn. Work 1 hdc in the first stitch, then decrease over the next two stitches. A decrease combines two stitches into one and gently narrows the edge. Continue across by working 1 hdc in the next 24 stitches, then decrease over the final two stitches. You will have 26 hdc.
- Rows 6 and 7 of the flap: Chain 1 and turn. Work 1 hdc in each stitch across for 26 hdc, then 24 hdc. On Row 7, decrease over the first two stitches, work 1 hdc in the next 20 stitches, and decrease over the last two stitches. You will have 22 hdc.
- Row 8 of the flap: Chain 1 and turn. Decrease over the first two stitches, work 1 hdc in the next 18 stitches, and decrease over the last two stitches. You will have 20 hdc. Fasten off, leaving a yarn tail long enough to weave in.
- Make the button loop. Attach the main yarn at the center of the flap edge with a sl st, chain 8, and slip stitch back into the same edge. Fasten off. Check that the loop fits comfortably around your button before you weave in the ends.
- Add the face with black embroidery thread. Place two small oval eyes about 1 inch apart, a tiny rounded nose between them, and a curved mouth below. Add short floppy ear lines near the upper corners if you like. Keep all knots secured on the wrong side.
- Check for mistakes before finishing. If you reach the end of a row and have one stitch too many, look for a stitch hiding beside the turning chain. If you have one too few, you may have skipped the last stitch. Pull back calmly to the last clear row, count again, and continue rather than forcing the edge.
- Weave in the ends with the yarn needle, passing each tail back and forth through several stitches before trimming. This is called weaving in the ends, and it keeps the seams from loosening. If your cotton looks a little uneven, block the case by lightly dampening it, shaping it flat, and letting it dry completely. Do not use a hot iron.
Where This Piece Finds Its Place
The finished case slips easily into a school bag, work tote, or the basket beside your armchair. I like it for crochet hooks because the soft cotton keeps them together without making the pouch bulky. It also holds colored pencils, short markers, charging cords, or the small collection of pens that usually rolls under a notebook.
On a summer porch, it can sit beside your current book and sunglasses. In the fall, tuck it into a holiday gift basket with a notebook and a packet of tea. A child may enjoy it as a pencil case, but remember that buttons and other small parts are unsafe for children under three. For a young child, embroider the face instead of adding a button, and keep every loose end firmly secured.
For gifting, fill it with a few pencils in colors that match the recipient’s favorite season. A small handwritten note tucked inside makes the simple handmade case feel personal without adding fuss.
Caring for the Pochacco Pencil Case
Because this pattern uses cotton or a cotton blend, wash the case by hand or on a gentle cycle with cold or warm water. Use a mild detergent and place it in a mesh bag if you use the washing machine. Press out extra water in a towel rather than twisting the fabric.
Dry the case flat and reshape the flap while it is damp. Never hang it wet, since the weight of the water can stretch the seams and pull the rectangle out of shape. If you block it, pin only as needed and let it dry fully before adding pencils or hooks.
Acrylic substitutions should also dry flat when possible. Acrylic can melt or become shiny under a hot iron, so use no direct heat. If you need to smooth acrylic, use steam from a distance or block it cold, with a cloth between the yarn and any warm surface.
Store the case folded or lying flat somewhere breathable rather than hanging it by the button loop. Cotton does not need moth protection, but if you make another version in wool, use cedar or lavender nearby and remember that untreated wool can felt in warm, agitated washing. Superwash wool tolerates machine washing better, though you should still follow the yarn label.
Keep leftover yarn with its label so you have the fiber information and dye lot. That little paper band can save time when you want to repair a seam or make a matching pouch later.
Small Ways to Make It Your Own
- Try a thicker or thinner yarn. A bulky yarn will make a larger, softer case with more drape, while a lighter yarn will create a smaller pouch with a finer texture. Change the hook to suit the yarn and measure as you go.
- Use color blocking for a quiet change. Work the lower pocket in one shade and the flap in another, or add two rows of black near the top for a simple contrast band.
- Swap half double crochet for single crochet if you want a denser fabric. Single crochet makes a firmer case and takes longer, so expect more rows and a slightly sturdier hand.
- Resize by adjusting the stitch multiple. Add or remove stitches in groups of 2, then keep the first row and later rows consistent. Measure the rectangle before seaming so the proportions remain comfortable.
- Add a simple border around the flap with single crochet. One round can tidy the edge, while a contrasting color can make the outline stand out. If you sell finished items, my policy is simple: I sell only pieces made from patterns that allow it and credit the designer when requested.
Frequently Asked Questions About the Pochacco Pencil Case Pattern
Can I use a different hook size for this pencil case?
Yes, you can use a different hook size, but your finished size and fabric will change. Try one half size smaller if the stitches look loose or stuffing-like gaps appear, even though this case does not need stuffing. Try one half size larger if your fabric feels stiff or your rectangle measures smaller than 8 inches by 8 inches.
What yarn can I substitute for the cotton?
Choose another worsted weight, weight 4, medium yarn with a similar yardage and a firm feel. Cotton, cotton blend, and some acrylic yarns work well. Check your gauge first because fiber changes the drape. Wool may soften nicely after blocking, but untreated wool can felt if you wash it with heat and agitation.
What should I do if I find a mistake several rows later?
First, set the work flat and compare the row where the mistake appears with the row above it. If the error affects the edge or stitch count, pull back to the last row that looks correct and redo it. If it sits in the middle and does not affect the shape, you may leave it. Small handmade marks often disappear into the finished fabric.
Is this pencil case suitable for a beginner?
Yes, this project suits a beginner who knows how to chain, turn, and work half double crochet. The rectangle is repetitive, while the side seams and embroidered face offer gentle practice with finishing. The flap shaping is the most fiddly section, but the stitch counts stay small and clear.
How long does the Pochacco Pencil Case Pattern take?
Plan on four to six hours, spread over two to three relaxed evenings. Your pace, yarn, and time spent on the face will affect the total. The crocheting itself moves steadily, while sewing the sides and placing the embroidered details may take longer than expected.
Does this pattern use US or UK crochet terms?
This pattern uses US crochet terms. The main stitch is US half double crochet, abbreviated hdc. UK patterns use the same words differently, so a UK half double crochet does not match the US half double crochet used here. Check the abbreviation list before beginning if you usually follow UK terminology.
Taking It Slow
Let the case take the time it takes. Set it beside your chair, listen for the quiet click of the hook, and allow a missed stitch to become a small pause instead of a problem. The rectangle will grow, the face will find its place, and your hands will learn the rhythm in their own steady way.
—META—
SEO Title: Pochacco Pencil Case Crochet Pattern
Meta Description: Make a calm Pochacco pencil case with simple half double crochet, gentle shaping, and clear US terms for a useful handmade pouch.
Slug: pochacco-pencil-case-crochet-pattern
Category: Crochet Patterns
Tags: crochet, pencil case, pochacco, easy crochet, handmade gifts
Image Alt Text: Crocheted Pochacco pencil case resting on a cozy lap
Close view of half double crochet rows and black embroidered face
Finished crochet pencil case with flap and button loop
Pinterest Title: Pochacco Pencil Case Crochet Pattern
Pinterest Description: Crochet a sweet pencil case with simple stitches and a gentle handmade feel. A small project for quiet evenings and thoughtful gifts.

Pochacco Pencil Case Crochet Pattern
- Total Time: 300 minutes
Description
This project creates a soothing and easy crochet pencil case inspired by Pochacco, ideal for holding pencils, crochet hooks, or small treasures.
Materials
- Worsted weight yarn (weight 4, medium), about 180 yards total, or about two 100 g skeins (main color and black for details)
- H-8 (5.0 mm) crochet hook
- Yarn needle for sewing seams and weaving in ends
- Scissors
- One stitch marker (optional)
- Tape measure
- One small flat button, about 1/2 inch (1.3 cm) for closure
- Black embroidery thread or a small amount of black worsted weight yarn for details
- A small scrap of white yarn (optional) for eye highlights
Instructions
- Make a foundation chain of 29 chains.
- Row 1: Work 1 half double crochet (hdc) in the second chain from the hook and in each chain across (28 hdc).
- Rows 2 through 20: Chain 1, turn. Work 1 hdc in each stitch across for 28 hdc.
- Pause after Row 20 and measure the rectangle. It should measure about 8 inches wide by 8 inches tall (20 cm by 20 cm).
- Fold the rectangle so the lower edge comes up to about 3 inches below the top edge.
- Seam both sides with the main-color yarn using small whip stitches, stopping where the flap begins.
- Shape the flap by working across the top edge of the back section: join yarn at one corner with a slip stitch, chain 1, and work 1 hdc in each of the 28 edge stitches across.
- Rows 2 through 4 of the flap: Chain 1 and turn. Work 1 hdc in each stitch across.
- Row 5: Chain 1 and turn. Work 1 hdc in the first stitch, then decrease over the next two stitches. Continue by working 1 hdc in the next 24 stitches, then decrease over the final two stitches.
- Continue shaping the flap through Rows 6 to 8, decreasing as instructed.
- Make the button loop by attaching the main yarn at the center of the flap edge with a slip stitch, chaining 8, and slip stitching back into the same edge.
- Add the face using black embroidery thread and make the desired details.
- Weave in the ends with the yarn needle.
Notes
Keep all knots secured on the wrong side. Check for mistakes before finishing. The project is suitable for beginners familiar with basic crochet techniques.
- Preparation Time: 20 minutes
- Active Time: 240 minutes