

Why Crochet Pencil Case Pattern for Calm Making Is So Soothing to Crochet
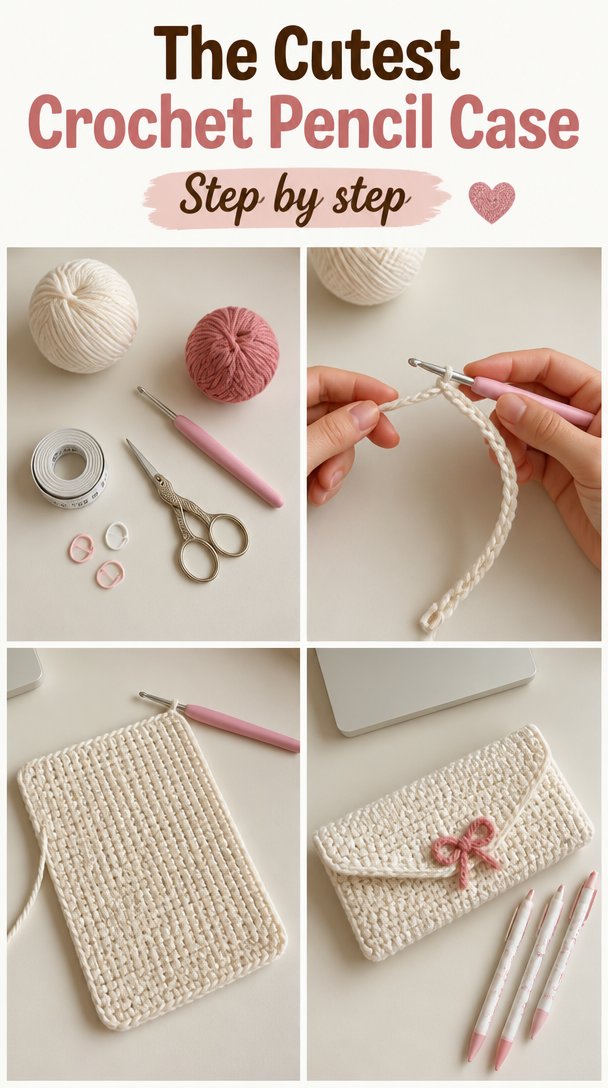
The pencil case grows quietly in your hands, one soft row at a time, while late afternoon light rests across the yarn basket. This Crochet Pencil Case Pattern for Calm Making uses a simple fabric, a steady rhythm, and just enough shaping to keep your attention gently nearby. I made mine at the kitchen table with coffee cooling beside my elbow, and the first rows curled until the fabric had enough weight to settle. It became the sort of small project that fits beside a rainy evening, a porch chair, or the quiet space before bed.
How Crochet Pencil Case Pattern for Calm Making Comes Together
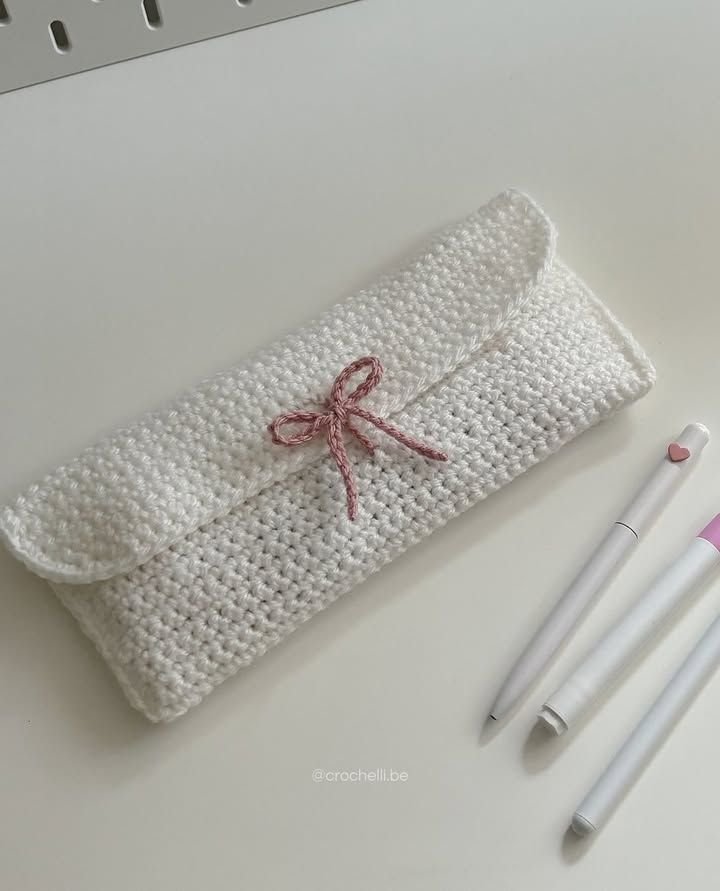
This pencil case begins as a flat rectangle worked in half double crochet. A half double crochet, or hdc, sits between single crochet and double crochet in height, so it grows at a comfortable pace without making a loose, holey fabric. Once the rectangle reaches the right length, you fold it, sew the sides, and add a simple button flap.
This pattern uses US crochet terms. UK readers often find these posts too, and the same word means a different stitch there, so please check your label or reference carefully before beginning. Here, a chain means ch, a slip stitch means sl st, a single crochet means sc, a half double crochet means hdc, and a double crochet means dc.
You will work into the foundation chain, which is the first row of chains that supports the fabric. The turning chain lifts your hook to the correct height at the beginning of each row. The movement feels steady once your hands warm up, usually after the first ten minutes.
Plan on two to three relaxed evenings, or about three to four hours if you work in one sitting. The pattern is beginner friendly, though sewing the sides evenly and placing the button flap takes a little patience. Nothing needs to happen quickly here.
Pattern at a Glance
Keep this small reference nearby while you work.
- Skill level: Easy, beginner friendly
- Finished size: 8 inches long by 3 inches wide (20 cm by 7.5 cm)
- Gauge: 14 hdc and 10 rows measure 4 inches (10 cm)
- Yarn: Worsted weight (weight 4, medium), about 90 yards total, or 53 g
- Hook size: H-8 (5.0 mm)
- Other supplies: Yarn needle, scissors, tape measure, one 1/2-inch button, optional stitch marker
- Stitch multiple: Any multiple of 2 stitches, plus 1 extra chain for the foundation chain
- Estimated time: Three to four hours, spread across two to three evenings
What You Need for This Project
- Worsted weight yarn (weight 4, medium), cotton, about 90 yards total, or 53 g. Choose a skein with about 170 yards per 100 g skein so you have plenty for the case and flap. A smooth cotton such as Lily Sugar’n Cream is one easy-to-find example.
- H-8 (5.0 mm) crochet hook. A half size up or down is fine depending on your tension.
- Yarn needle for sewing seams and weaving in the ends.
- Small sharp scissors.
- One 1/2-inch button for the closure, or a wooden button of a similar size.
- Stitch markers, optional, for marking the first stitch or flap placement.
- Tape measure for checking the rectangle and finished size.
Cotton suits this project because it gives the pencil case a firm shape and handles frequent washing well. The swatch takes about twenty minutes, but it tells you whether your fabric will feel tidy or too floppy. Make a small square in half double crochet, then measure 14 stitches and 10 rows across the center. If your swatch comes out larger, try a smaller hook. If it comes out smaller, try a larger hook.
You can substitute another worsted weight yarn, including a smooth acrylic or a cotton blend. The size may shift slightly, and acrylic will feel softer with more spring, but the stitch multiple stays the same. Avoid a fuzzy or loosely spun yarn because it makes the seams harder to see and may shed into the case. Keep in mind that acrylic can melt under a hot iron, so use cold blocking or steam from a distance if you ever shape an acrylic version.
Step by Step
-
Difficulty and repeat: This is an easy, beginner-friendly project. The main pattern uses half double crochet with a stitch multiple of 2, plus 1 extra chain for the foundation chain.
-
Make a slip knot and chain 29. The chain is the foundation chain, and each loop gives your first row somewhere to rest. Keep the chain relaxed rather than pulling it tight.
-
Row 1: Yarn over, insert your hook into the second chain from the hook, yarn over and pull up a loop, yarn over again, then pull through all three loops. That makes one half double crochet, or hdc. Work 1 hdc in each chain across, then chain 1 and turn. You will have 28 hdc.
-
Rows 2 through 20: Work 1 hdc in each stitch across. The first stitch goes into the base of the turning chain, not into the turning chain itself. Chain 1 and turn at the end of every row. Each row has 28 hdc, and the rectangle should measure about 8 inches by 5 inches (20 cm by 12.5 cm).
-
Pause and check the edges. Count the stitches at the end of a row by looking for the small V shapes along the top. If one stitch went missing, gently pull back the last few stitches until the edge is even, then work forward again. Pulling back calmly is part of the process, not a failure.
-
For the flap, continue from the last row without fastening off. Chain 1 and turn. Work 1 hdc in each of the first 14 stitches, then chain 1 and turn. You will now work across half the rectangle, with 14 hdc.
-
Flap rows 2 through 5: Work 1 hdc in each stitch across, chain 1, and turn. Keep the side edges straight and count 14 hdc at the end of every row. The flap will measure about 1 inch (2.5 cm) beyond the folded body after these rows.
-
Buttonhole row: Chain 1 and turn. Work 5 hdc, chain 3, skip 3 stitches, then work 6 hdc. The chain-3 space creates the buttonhole, and you will still have 14 stitches across when you count the 6 hdc after the space.
-
Final flap row: Chain 1 and turn. Work 6 hdc, then work 3 hdc into the chain-3 space, followed by 5 hdc. You now have 14 hdc. Fasten off, leaving a 20-inch tail for sewing the sides.
-
Fold the rectangle so the bottom edge meets the row where the flap begins. The flap should lie over the front, with the buttonhole centered. Use optional stitch markers to hold both side edges in place while you sew.
-
Thread the yarn needle with the long tail and sew one side from the bottom fold to the flap beginning. Use small, even stitches through both layers. Repeat on the other side with a fresh length of yarn, then knot securely inside the case.
-
Weave in the ends by running the yarn needle through several stitches in different directions. Trim the excess close to the fabric. Sew the button to the front of the case, lining it up with the buttonhole rather than relying only on a measurement.
-
Shape the case with your fingers and let it rest flat. Cotton often benefits from a light block: dampen it, smooth it to the finished measurements, and let it dry completely. Do not stretch the flap too far, and keep the buttonhole open while it dries.
Where This Piece Finds Its Place
The finished pencil case fits neatly in a school bag, desk drawer, project basket, or the side pocket of a larger tote. I like it beside the armchair with a few pencils, a small notebook, and the tape measure I am always misplacing. Its firm cotton fabric keeps the contents from disappearing into the bottom of a bag.
For a quiet seasonal gift, make one in a deep green, warm mustard, or soft blue and tuck in a pencil, a small notepad, and a handwritten note. It works for a teacher gift, a stocking, a birthday basket, or a little desk refresh before the first cool fall evenings arrive.
If you sell finished items, my policy is simple: I sell only pieces I have made myself and describe their materials honestly.
Caring for Your Crochet Pencil Case Pattern for Calm Making
Because this version uses cotton, wash it by hand or place it in a mesh bag on a gentle cycle with cold or warm water. Mild detergent works well. Avoid very hot water, which may shrink or distort the fabric, especially if the yarn contains a blend.
Press the water out gently in a towel and dry the pencil case flat. Do not hang it while wet because the weight can pull the seams and flap out of shape. If the case needs reshaping, smooth it by hand while damp and let it dry flat.
Cotton can usually tolerate gentle steam, but keep the iron from pressing directly on the stitches unless the yarn label allows it. A cool iron through a cloth is the safer choice. Acrylic substitutions need extra care because acrylic can melt under a hot iron, so block cold or use steam from a distance without touching the fabric.
Store the case folded or resting flat somewhere breathable rather than hanging it by the flap. Keep the leftover yarn with its label so you have the fiber information and dye lot if you need to repair the case later. Cotton does not need wool moth protection, but cedar or lavender nearby is still a pleasant choice for a general yarn basket.
Small Ways to Make It Your Own
Try a different yarn weight. A lighter yarn with a smaller hook makes a slimmer case with a softer drape. A bulky yarn makes a larger, more padded pouch, but you will need to shorten the foundation chain if the finished width grows beyond what you want.
Change the color rhythm. Work the body in one shade and the flap in another for a clear color-blocked look. You can also change colors every four rows, carrying the unused yarn neatly up the side and covering that edge with a simple border.
Use single crochet for a denser fabric. Single crochet, or sc, makes a shorter, firmer stitch than half double crochet. The pencil case will take more rows and feel less flexible, but it will hold its shape beautifully.
Resize by the stitch multiple. Add or remove chains in groups of 2, remembering the extra chain for the foundation chain. For a wider case, start with 35 chains instead of 29. Work more or fewer rows to change the length, then make the flap half as wide as the body.
Add a quiet border. After sewing the sides, join yarn with a slip stitch, or sl st, and work a round of single crochet around the flap edge. Keep the stitches loose around the buttonhole so the opening does not close.
You can also add a small embroidered initial or a fabric lining if you enjoy hand sewing. Avoid loose beads, long dangling threads, and small detachable parts if the case may reach a child under three.
Frequently Asked Questions About the Crochet Pencil Case Pattern for Calm Making
Can I use a different hook size for this crochet pencil case?
Yes, you can use a different hook size if your tension needs it. Start with H-8 (5.0 mm), then move down to G-6 (4.0 mm) for a firmer fabric or up to I-9 (5.5 mm) for a softer, slightly larger case. Check the gauge and remember that a smaller hook helps keep pencils from showing through gaps.
What yarn can I substitute for the cotton?
You can substitute another worsted weight yarn, such as a smooth acrylic or cotton blend, using about 90 yards or 53 g. Cotton gives the firmest shape and handles washing well, while acrylic creates a softer case with more spring. Choose a yarn with clear stitch definition and follow its care label.
What should I do if I find a mistake several rows later?
If the mistake does not affect the edge or the final size, you can leave it. If a stitch is missing and the side has narrowed, pull back one row at a time to the problem, place the hook through the live loop, and remake the row. This is usually quicker and neater than forcing the next row to compensate.
Is this pencil case suitable for a beginner?
Yes, this project suits a beginner who knows how to make a chain and a basic stitch. The main body repeats one half double crochet across every row. The only fiddly parts are counting the flap stitches, sewing the side seams evenly, and placing the buttonhole in the center.
How long does the crochet pencil case take to make?
Plan on three to four hours, spread across two to three evenings. Your time may change with tension, interruptions, and sewing speed. The body grows fairly quickly, while the buttonhole, seams, and weaving in the ends ask for slower attention.
Does this pattern use US or UK crochet terms?
This pattern uses US crochet terms. The main stitch is half double crochet, written as hdc. In UK terminology, that same name refers to a different stitch, so always check the pattern’s terminology note before beginning if you usually crochet with UK terms.
Taking It Slow
Let the little case take the time it needs. Notice the yarn sliding over your fingers, the quiet click of the hook, and the way a flat rectangle slowly becomes something useful. Many people find crocheting calming, and you do not need to make every row perfect to enjoy the steady work of making it.
—META—
SEO Title: Crochet Pencil Case Pattern for Calm Making
Meta Description: Make a calm crochet pencil case with cotton yarn, simple half double crochet, clear US terms, and a gentle step-by-step pattern.
Slug: crochet-pencil-case-pattern-calm-making
Category: Crochet Patterns
Tags: crochet pencil case, easy crochet, crochet gifts, slow making, cotton crochet
Image Alt Text: Crochet pencil case rectangle worked in cream cotton yarn
A half double crochet pencil case with button flap and yarn needle
Finished handmade crochet pencil case resting beside pencils
Pinterest Title: Calm Crochet Pencil Case Pattern
Pinterest Description: Make a simple cotton crochet pencil case with a steady half double crochet rhythm. A quiet, useful project for relaxed evenings and thoughtful gifts.

Crochet Pencil Case Pattern for Calm Making
- Total Time: 240 minutes
Description
This Crochet Pencil Case Pattern for Calm Making uses a simple fabric, a steady rhythm, and just enough shaping to keep your attention gently nearby.
Materials
- Worsted weight cotton yarn, about 90 yards total, or 53 g
- H-8 (5.0 mm) crochet hook
- Yarn needle for sewing seams and weaving in the ends
- Small sharp scissors
- One 1/2-inch button for the closure
- Optional stitch markers for marking the first stitch or flap placement
- Tape measure for checking the rectangle and finished size
Instructions
- Make a slip knot and chain 29.
- Row 1: Yarn over, insert your hook into the second chain from the hook, yarn over and pull up a loop, yarn over again, then pull through all three loops. Work 1 hdc in each chain across, then chain 1 and turn.
- Rows 2 through 20: Work 1 hdc in each stitch across. Chain 1 and turn at the end of every row.
- For the flap, chain 1 and turn. Work 1 hdc in each of the first 14 stitches, then chain 1 and turn.
- Flap rows 2 through 5: Work 1 hdc in each stitch across, chain 1, and turn.
- Buttonhole row: Chain 1 and turn. Work 5 hdc, chain 3, skip 3 stitches, then work 6 hdc.
- Final flap row: Chain 1 and turn. Work 6 hdc, then work 3 hdc into the chain-3 space, followed by 5 hdc. Fasten off, leaving a 20-inch tail for sewing the sides.
- Fold the rectangle so the bottom edge meets the row where the flap begins.
- Sew one side from the bottom fold to the flap beginning using small, even stitches through both layers.
- Weave in the ends by running the yarn needle through several stitches in different directions.
- Sew the button to the front of the case, lining it up with the buttonhole.
- Shape the case and let it rest flat.
Notes
Cotton suits this project because it gives the pencil case a firm shape and handles frequent washing well.