

This post contains Amazon affiliate links. As an Amazon Associate I earn from qualifying purchases.
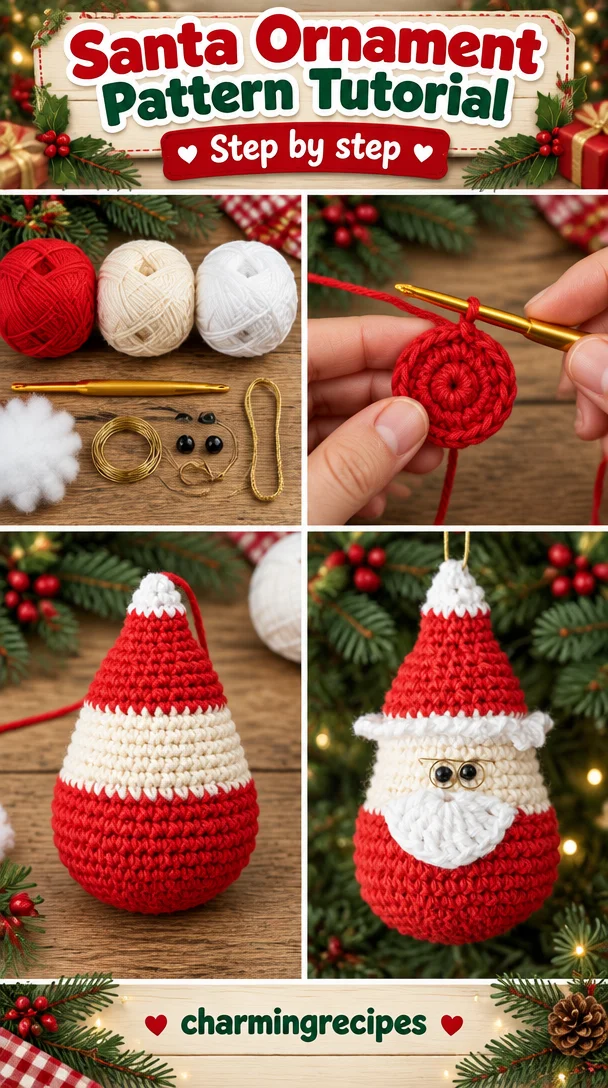
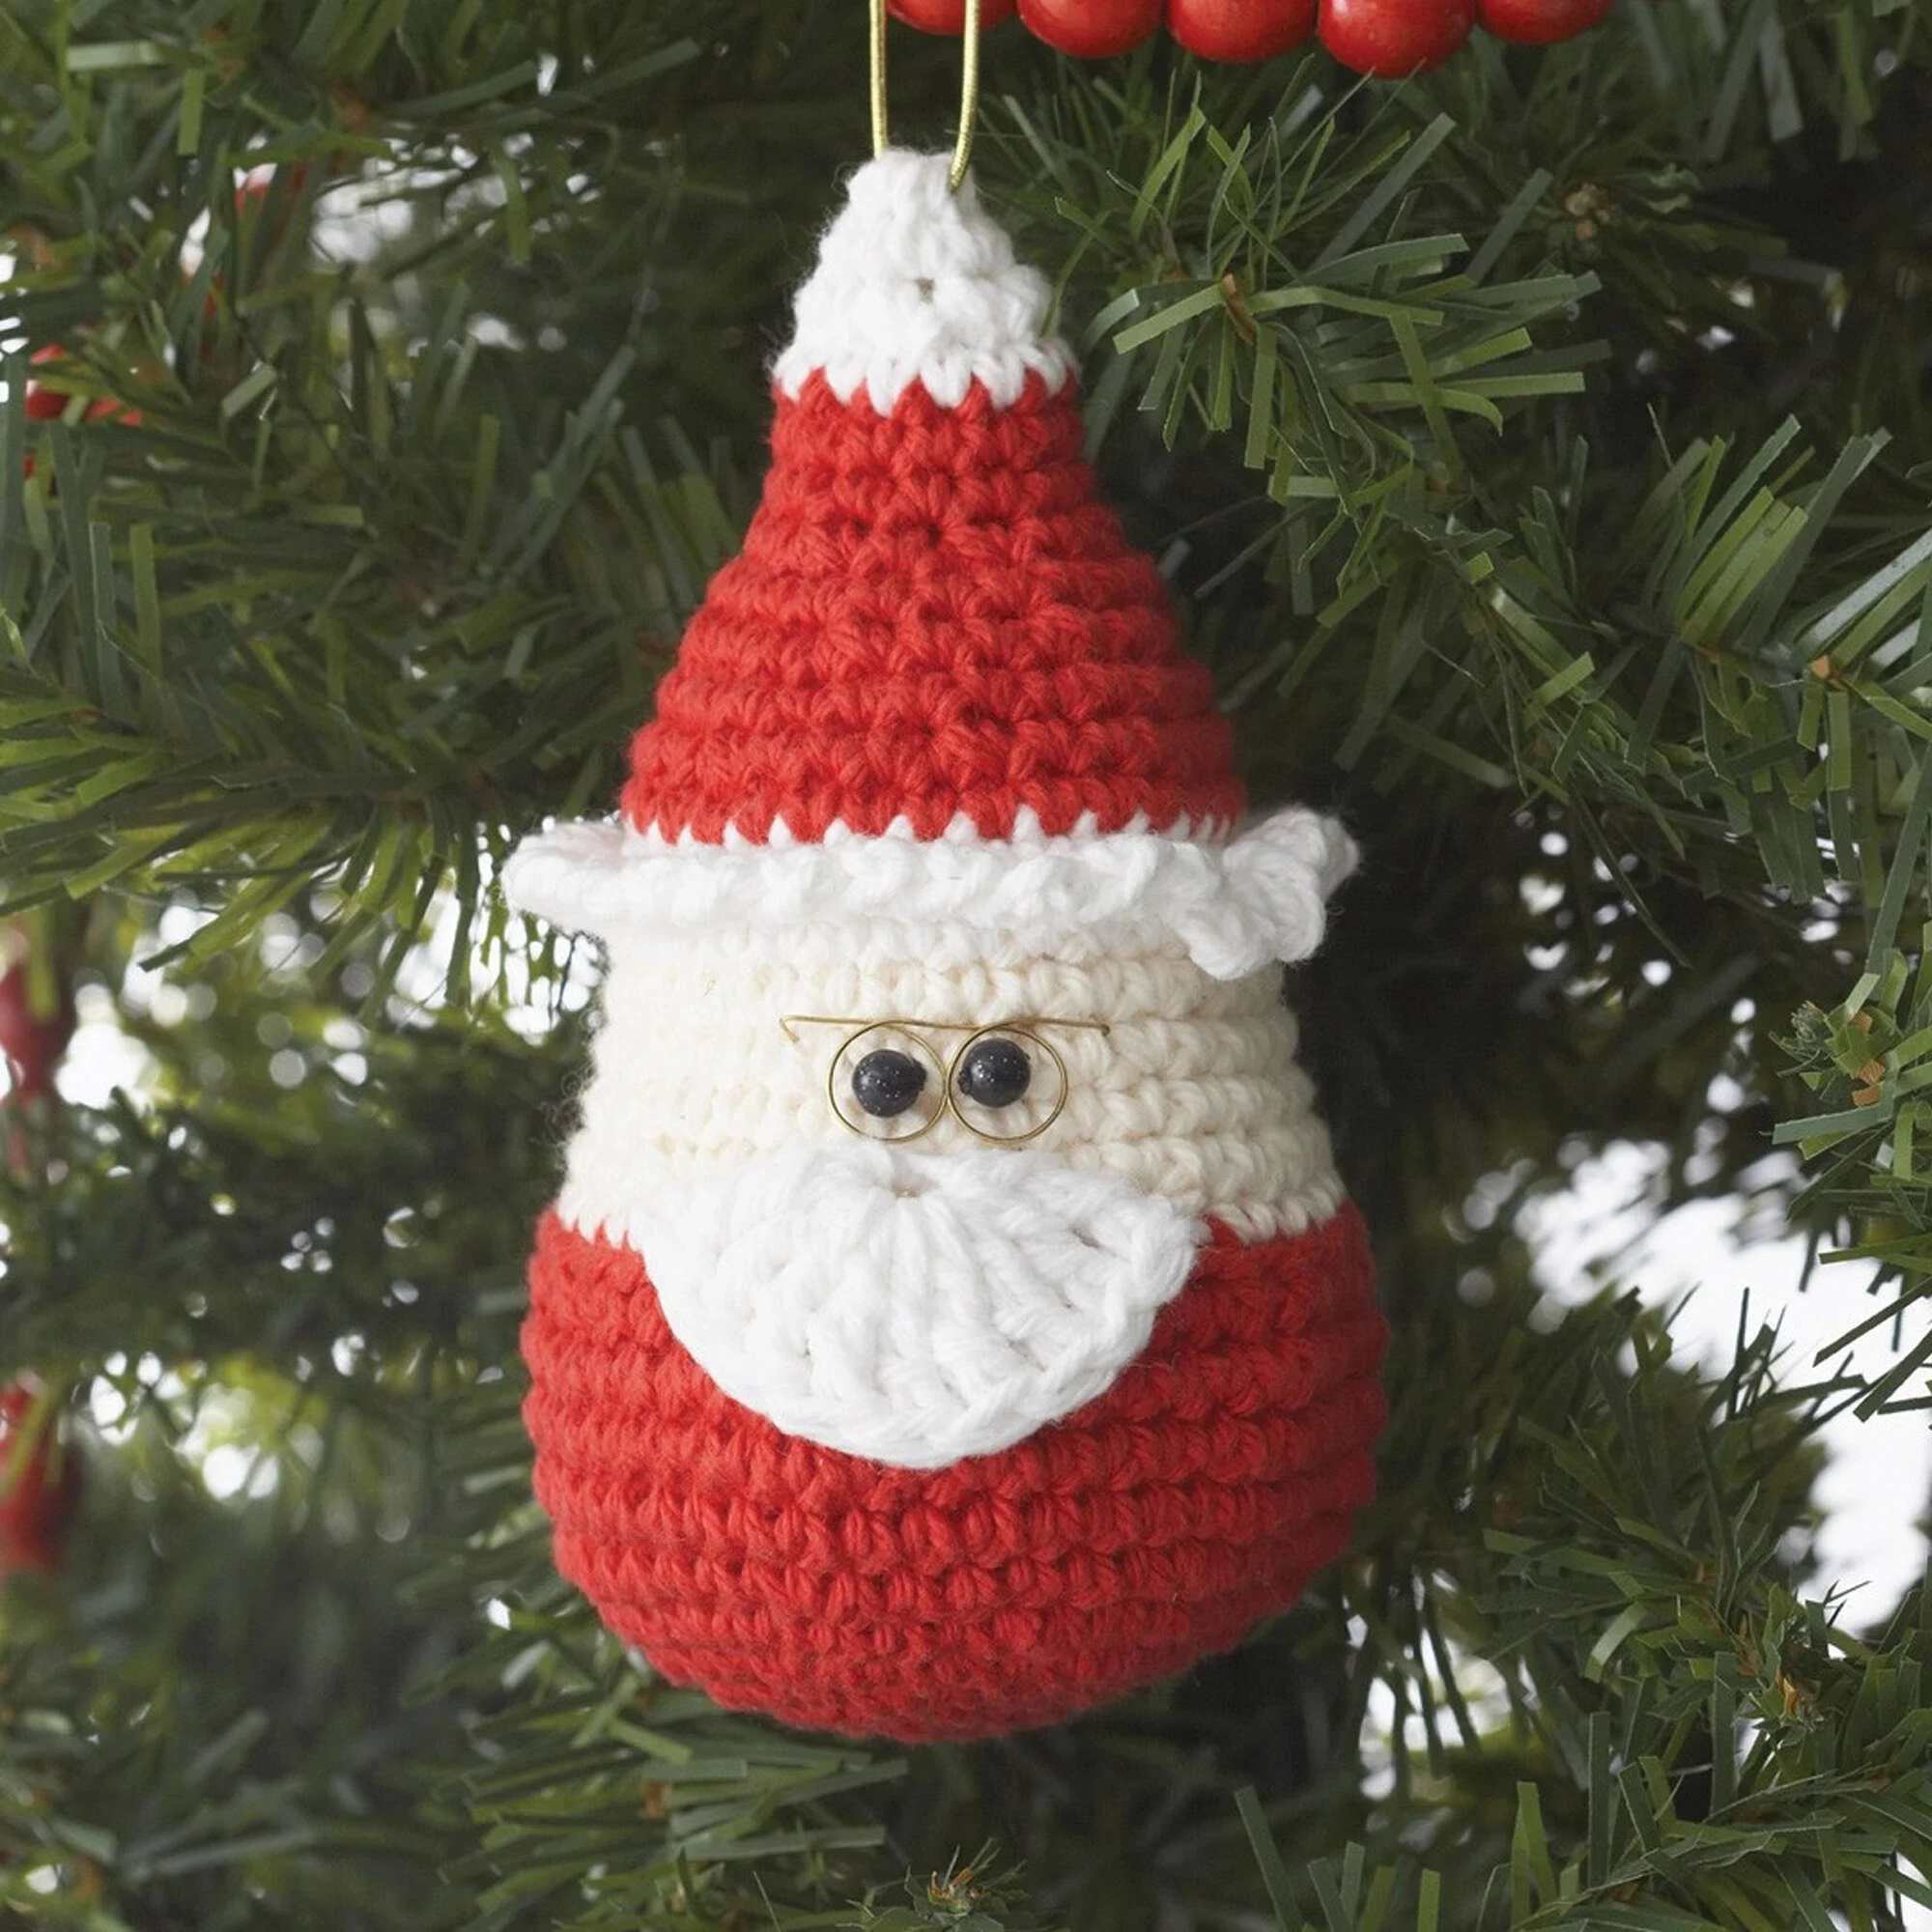
This cheerful crochet Santa ornament is worked in joined rounds, shaped with simple increases and decreases, then finished with a fluffy white beard, a looped hat trim, bead eyes, and little wire glasses. It makes a charming handmade addition to a Christmas tree, a thoughtful seasonal gift, or a fun project to bring out during the holiday craft season. The construction uses basic stitches, so it suits crocheters who are comfortable with single crochet and ready to practice shaping a small stuffed piece.
Why you’ll love this pattern
The ornament’s shape comes from straightforward increases and decreases in single crochet. That makes it a useful project for learning how to build a rounded form without sewing several body pieces together. The color changes create Santa’s face, hat, and trim as you crochet, while the beard and glasses add the details that give him character.
This is also a compact project with practical gift appeal. You can work on the body in short sessions, and the small size makes the ornament easy to store with your holiday decorations. Use it on a tree, tie it onto a wrapped present, or make one for a friend who collects handmade Christmas ornaments.
The pattern uses three specified colors of cotton yarn and a 3.5 mm crochet hook. Its simple stitch pattern gives you room to focus on neat joins, even tension, and secure finishing rather than complicated texture.
“The shaping was easy to follow, and adding the beard and glasses made the little Santa feel full of personality. I especially liked that I could work the body in joined rounds and finish the details separately.”
Pattern overview
You’ll crochet Santa as one rounded, stuffed piece, beginning at the top of the head with a short chain and increasing to make a wider section. After several plain rounds, decreases shape the face and body. The ecru section forms the face, white rounds create the beard area and hat trim, and red yarn forms the hat.
The main stitch is single crochet. You’ll also use chain stitches, slip stitches, single crochet decreases, and increases made by working two single crochets into one stitch. Several rounds are worked through the back loop only. This leaves the front loops available for the hat trim.
The beard is made separately from a short chain and tall stitches, then sewn onto Santa. The eyes are black beads, and a short length of gold craft wire forms the glasses. A ribbon loop completes the ornament for hanging.
This pattern is a good fit for a confident beginner who knows how to make basic crochet stitches and can follow joined rounds. Allow a few hours for the crochet and assembly, depending on your pace and experience; the wire glasses and small sewn details may take extra time.
Materials you’ll need
- Lily® Sugar’n Cream® yarn, 2.5 oz/70.9 g; 120 yds/109 m:
- Main Color (MC): Red (00095), 1 ball
- Contrast A: Soft Ecru (01004), 1 ball
- Contrast B: White (00001), 1 ball
- U.S. E/4 (3.5 mm) crochet hook
- Stuffing
- Gold craft wire for the glasses
- 2 black beads for the eyes
- Short length of ribbon for the hanging loop
The pattern names Lily® Sugar’n Cream®, a cotton yarn. Cotton tends to hold stitch definition well, which is helpful for a small shape with clear color sections. If you choose another yarn, aim for a similar thickness and use the recommended 3.5 mm hook as a starting point. A different fiber or yarn weight can change the ornament’s size, firmness, and amount of stuffing needed.
Choose beads that are securely attached and appropriate for your intended use. If the ornament will be handled by young children or pets, replace loose beads and wire with securely embroidered details, and keep small parts out of reach.
Step-by-step instructions
Abbreviations and notes
- ch: chain
- sc: single crochet
- sl st: slip stitch
- tr: treble crochet
- sc2tog: single crochet two stitches together; this is a decrease
- rep: repeat
- rem: remaining
- rnd: round
- yo: yarn over
- MC: Main Color, red
- A: Contrast A, soft ecru
- B: Contrast B, white
Work in joined rounds. At the end of a round, join with a slip stitch to the first single crochet when instructed. The starting chain does not count as a stitch. Keep track of the first stitch in each round with a stitch marker if that helps you maintain an even stitch count.
Santa body
-
With MC, chain 2.
-
Round 1: Work 6 sc in the second chain from the hook. Join with a sl st to the first sc. 6 sc.
-
Round 2: Ch 1. Work 2 sc in each sc around. Join with a sl st to the first sc. 12 sc.
-
Round 3: Ch 1. Work 2 sc in the next sc, then 1 sc in the next sc. Repeat from * around. Join with a sl st to the first sc. 18 sc.
-
Round 4: Ch 1. Work 1 sc in each of the next 2 sc, then 2 sc in the next sc. Repeat from * around. Join with a sl st to the first sc. 24 sc.
-
Round 5: Ch 1. Work 2 sc in the next sc, then 1 sc in each of the next 3 sc. Repeat from * around. Join with a sl st to the first sc. 30 sc.
-
Round 6: Ch 1. Work 1 sc in each of the next 2 sc. Work 2 sc in the next sc, then 1 sc in each of the next 4 sc. Repeat from * to the last 3 sc. Work 2 sc in the next sc, then 1 sc in each of the last 2 sc. Join with a sl st to the first sc. 36 sc.
-
Round 7: Ch 1. Work 2 sc in the next sc, then 1 sc in each of the next 5 sc. Repeat from * around. The original instructions do not specify a join at the end of this round; continue to Round 8 as written. 42 sc.
-
Rounds 8–10: Ch 1. Work 1 sc in each sc around. Join with a sl st to the first sc at the end of each round.
-
Round 11: Ch 1. Make a sc2tog over the next 2 sc, then work 1 sc in each of the next 5 sc. To make the decrease, draw up a loop in each of the next 2 stitches, yarn over, and draw through all 3 loops on the hook. Repeat from * around. Join with a sl st to the first sc. 36 sc.
-
Round 12: Change to A. Ch 1. Working in the back loops only, work 1 sc in each sc around. Join with a sl st to the first sc.
-
Round 13: Ch 1. Working through both loops, work 1 sc in each of the next 4 sc, then make a sc2tog. Repeat from * around. Join with a sl st to the first sc. 30 sc.
-
Rounds 14–16: Ch 1. Work 1 sc in each sc around. At the end of Round 16, join B with a sl st to the first sc.
-
Round 17: With B, ch 1. Work 1 sc in each sc around. Join with a sl st to the first sc.
-
Round 18: Ch 1. Working in the back loops only, work 1 sc in each sc around. Join MC with a sl st to the first sc.
-
Round 19: With MC, ch 1. Working through both loops, work 1 sc in each sc around. Join with a sl st to the first sc.
-
Round 20: Ch 1. Make a sc2tog, then work 1 sc in each of the next 3 sc. Repeat from * around. 24 sc.
-
Round 21: Ch 1. Work 1 sc in each sc around. Join with a sl st to the first sc.
-
Round 22: Ch 1. Work 1 sc in each of the next 2 sc, then make a sc2tog. Repeat from * around. Join with a sl st to the first sc. 18 sc.
-
Round 23: Ch 1. Work 1 sc in each sc around. Join with a sl st to the first sc.
-
Round 24: Ch 1. Make a sc2tog, then work 1 sc in the next sc. Repeat from * around. 12 sc.
-
Rounds 25–26: Ch 1. Work 1 sc in each sc around. At the end of Round 26, join B with a sl st to the first sc.
-
Round 27: With B, ch 1. Work 1 sc in each sc around. Join with a sl st to the first sc. Lightly stuff Santa. Add a small amount at a time so the shape stays rounded without stretching the stitches.
-
Round 28: Ch 1. Work sc2tog 6 times. Join with a sl st to the first sc. 6 sc.
-
Round 29: Ch 1. Work 1 sc in each sc around. Join with a sl st to the first sc. Fasten off. Thread the yarn through the remaining stitches, pull tightly to close the opening, and fasten securely.
Hat trim
- Join B with a sl st to the remaining front loop of the first sc of Round 18. Ch 3, then sl st in the remaining front loop of the next stitch. Repeat from * around. Ch 3, then join with a sl st in the same space as the first sl st. Fasten off.
Beard
- With B, ch 5. Work 9 tr in the fifth ch from the hook. Fasten off.
Finishing and assembly
-
Sew the beard to Santa at Round 13.
-
Sew the two black beads above the beard for the eyes. Position them evenly before fastening them securely.
-
Cut a 4 in [10 cm] length of gold craft wire. Twist it into glasses, following the intended glasses shape. Insert the wire ends into Santa.
-
Attach a short length of ribbon as a hanging loop.
Ways to use your finished project
Hang the Santa ornament on a Christmas tree, either among other handmade decorations or as a focal point on a smaller tree. Its ribbon loop also makes it easy to attach to a wreath, a garland, or a seasonal display where it can hang freely.
For gift giving, tie the ornament onto a wrapped present in place of a separate gift tag. It can also be included in a handmade holiday gift basket or given as a small keepsake to someone who enjoys collecting Christmas ornaments. If you make a few, use them to decorate a mantel or a tabletop branch arrangement.
When displaying it, keep the ornament away from open flames, heaters, and other hot surfaces. The craft wire, beads, and ribbon are small components, so place the finished piece where young children and pets cannot pull them off or chew on them.
How to care for your crochet project
The pattern specifies cotton yarn, but always check the care label on the yarn you actually use. For a small stuffed ornament with wire and beads, gentle spot cleaning is usually the safest choice. Dab a small stain with a clean cloth dampened with cool water and a little mild soap, then blot with a second clean cloth to remove soap residue.
Avoid soaking the ornament. Water can dampen the stuffing, and handling or squeezing the piece while wet may distort the shape or loosen the sewn-on details. If the ornament becomes wet, gently press it between towels without wringing, reshape it by hand, and let it air-dry completely before storing or hanging it again. Keep it away from direct heat while drying.
Store the ornament in a dry container with other seasonal decorations, ideally with enough room that the wire glasses do not get bent or crushed. Do not place heavy items on top of it. A separate small box or a padded compartment can help protect the beard, beads, and glasses between holiday seasons.
Helpful crochet tips
- Track the first stitch of each round. Joined rounds can make it easy to lose track of where the round begins. A stitch marker in the first sc gives you a clear reference point, especially while increasing or decreasing.
- Check the stitch count after shaping rounds. The listed totals help catch missed increases or decreases early. If the count is off, correct it before moving on; otherwise, the head and body may become uneven.
- Keep increases spaced as written. Working two sc into one stitch makes the piece wider. If you accidentally add extra increases, the body may ruffle; if you miss increases, it may cup or pull tight.
- Make decreases neatly. For sc2tog, draw up one loop in each of the next two stitches, then yarn over and pull through all three loops on the hook. Keep your tension steady so the decrease does not leave a large hole.
- Pay attention to the back-loop rounds. Rounds 12 and 18 use back loops only. Insert the hook under the back loop rather than both loops; the unused front loops are needed later for the decorative trim at Round 18.
- Join new colors carefully. Attach the new color at the joining point specified in the pattern. Leave enough yarn at each color change to weave the ends securely without pulling the fabric out of shape.
- Stuff lightly and gradually. Add small amounts of stuffing through the opening after Round 27. A very firm fill can stretch the stitches and make the decreases look strained. Gently roll the stuffing between your fingers to break up lumps before placing it inside.
- Plan the face before sewing. Pin or temporarily position the beard and beads before stitching them in place. This helps you judge spacing and keep Santa’s expression balanced.
- Secure small details well. Weave in yarn ends firmly, sew the beads with strong, secure stitches, and check that the wire ends are inserted and tucked safely. These details matter both for durability and handling.
Creative variations
- Change the hat color. Replace MC red with another festive shade, such as forest green, blue, or a traditional burgundy. The ornament will retain the same construction, but the overall look will change.
- Choose a different face or beard contrast. The pattern uses soft ecru for the face and white for the beard and trim. A warmer beige face or cream beard can create a softer, vintage-style appearance.
- Use embroidery instead of beads. Embroidered eyes are a useful option when you want to avoid small detachable parts. Sew the eyes securely before closing or finishing the body if that gives you easier access, while keeping their placement consistent with the beard.
- Make the glasses optional. Santa still reads clearly as a holiday character without glasses. You can omit them for a simpler look or use a small embroidered outline instead of wire.
- Personalize the beard. The beard is made separately, so you can use a different shade of white or cream. A thicker yarn may make it fuller, but it can also change the scale of the detail and may be harder to sew neatly onto the body.
- Adjust the ornament’s size with care. A thicker yarn and a larger hook will usually make a larger, softer piece; a thinner yarn and smaller hook will usually make a smaller, denser one. Either change may affect the amount of yarn and stuffing needed, and you should choose materials that still produce a fabric firm enough to hold the stuffing.
- Create a matching set. Make several Santas with different hat colors but the same face and beard shades. Keep the hook and yarn weight consistent if you want the ornaments to be similar in size.
Frequently asked questions
Is this Santa ornament suitable for beginners?
It is suitable for a confident beginner who knows single crochet, chain, and slip stitch, and is ready to practice increases, decreases, joined rounds, and basic assembly. If you are new to shaping, use stitch markers and check the stitch counts after the increase and decrease rounds.
What yarn works best for this pattern?
The listed yarn is Lily® Sugar’n Cream® cotton in red, soft ecru, and white. Cotton is a practical choice because it gives clear stitch definition. You can use another yarn, but a different weight or fiber may change the ornament’s finished size, firmness, and stuffing needs.
Can I use a different crochet hook?
The pattern calls for a U.S. E/4, 3.5 mm hook. If you substitute a hook, check the fabric as you work. It should be firm enough that the stuffing does not show through the stitches. A smaller hook will generally make a tighter, smaller piece, while a larger hook may make it looser and larger.
How long does it take to crochet the ornament?
The pattern does not give a completion time. The body is worked in single crochet rounds, followed by separate trim and beard details and several finishing steps. Your total time will depend on your pace, experience, and how long you spend attaching the features neatly.
How much yarn do I need?
The materials list specifies 1 ball each of red, soft ecru, and white Lily® Sugar’n Cream®. The pattern does not provide a separate yardage amount for each color, so use the listed ball quantities as the stated requirement.
Why is my ornament curling or ruffling?
A small amount of cupping can occur while shaping a rounded piece, but excess ruffling often means there are too many stitches or extra increases. Check the stitch count and make sure you are not crocheting into the joining slip stitch or counting the starting chain as a stitch. If the fabric pulls tight or cups sharply, check that you have not missed an increase.
How do I keep the rounds even?
Use the same tension throughout, mark the first stitch of each round, and join exactly as instructed. Count stitches after rounds with specified stitch totals, particularly the increase rounds at the start and the decrease rounds that shape the body.
Can I wash the finished Santa?
Because this ornament has stuffing, beads, ribbon, and craft wire, spot cleaning is usually preferable to washing the whole piece. Follow the yarn-label care instructions and handle it gently. If it gets damp, reshape it and let it dry completely before storage.
Can I sell ornaments made from this pattern?
The instructions provided do not state whether finished items may be sold. Check the original designer’s usage terms before selling finished ornaments, and do not assume that permission is granted just because you made the item yourself.
Print
Crochet Santa Ornament
Description
This cheerful crochet Santa ornament is worked in joined rounds, shaped with simple increases and decreases, then finished with a fluffy white beard, a looped hat trim, bead eyes, and little wire glasses. It makes a charming handmade addition to a Christmas tree, a thoughtful seasonal gift, or a fun project to bring out during the holiday craft season.
Materials
- Lily® Sugar’n Cream® yarn, Main Color red (00095), 1 ball
- Lily® Sugar’n Cream® yarn, Contrast A soft ecru (01004), 1 ball
- Lily® Sugar’n Cream® yarn, Contrast B white (00001), 1 ball
- U.S. E/4 (3.5 mm) crochet hook, 1
- Stuffing
- Gold craft wire for the glasses, 1
- 2 black beads for the eyes
- Short length of ribbon for the hanging loop
Instructions
- With MC, chain 2.
- Round 1: Work 6 sc in the second chain from the hook. Join with a sl st to the first sc. 6 sc.
- Round 2: Ch 1. Work 2 sc in each sc around. Join with a sl st to the first sc. 12 sc.
- Round 3: Ch 1. Work 2 sc in the next sc, then 1 sc in the next sc. Repeat from * around. Join with a sl st to the first sc. 18 sc.
- Round 4: Ch 1. Work 1 sc in each of the next 2 sc, then 2 sc in the next sc. Repeat from * around. Join with a sl st to the first sc. 24 sc.
- Round 5: Ch 1. Work 2 sc in the next sc, then 1 sc in each of the next 3 sc. Repeat from * around. Join with a sl st to the first sc. 30 sc.
- Round 6: Ch 1. Work 1 sc in each of the next 2 sc. Work 2 sc in the next sc, then 1 sc in each of the next 4 sc. Repeat from * to the last 3 sc. Work 2 sc in the next sc, then 1 sc in each of the last 2 sc. Join with a sl st to the first sc. 36 sc.
- Round 7: Ch 1. Work 2 sc in the next sc, then 1 sc in each of the next 5 sc. Repeat from * around. 42 sc.
- Rounds 8–10: Ch 1. Work 1 sc in each sc around. Join with a sl st to the first sc at the end of each round.
- Round 11: Ch 1. Make a sc2tog over the next 2 sc, then work 1 sc in each of the next 5 sc. Repeat from * around. Join with a sl st to the first sc. 36 sc.
- Round 12: Change to A. Ch 1. Working in the back loops only, work 1 sc in each sc around. Join with a sl st to the first sc.
- Round 13: Ch 1. Working through both loops, work 1 sc in each of the next 4 sc, then make a sc2tog. Repeat from * around. 30 sc.
- Rounds 14–16: Ch 1. Work 1 sc in each sc around. At the end of Round 16, join B with a sl st to the first sc.
- Round 17: With B, ch 1. Work 1 sc in each sc around. Join with a sl st to the first sc.
- Round 18: Ch 1. Working in the back loops only, work 1 sc in each sc around. Join MC with a sl st to the first sc.
- Round 19: With MC, ch 1. Working through both loops, work 1 sc in each sc around. Join with a sl st to the first sc.
- Round 20: Ch 1. Make a sc2tog, then work 1 sc in each of the next 3 sc. Repeat from * around. 24 sc.
- Round 21: Ch 1. Work 1 sc in each sc around. Join with a sl st to the first sc.
- Round 22: Ch 1. Work 1 sc in each of the next 2 sc, then make a sc2tog. Repeat from * around. Join with a sl st to the first sc. 18 sc.
- Round 23: Ch 1. Work 1 sc in each sc around. Join with a sl st to the first sc.
- Round 24: Ch 1. Make a sc2tog, then work 1 sc in the next sc. Repeat from * around. 12 sc.
- Rounds 25–26: Ch 1. Work 1 sc in each sc around. At the end of Round 26, join B with a sl st to the first sc.
- Round 27: With B, ch 1. Work 1 sc in each sc around. Join with a sl st to the first sc. Lightly stuff Santa.
- Round 28: Ch 1. Work sc2tog 6 times. Join with a sl st to the first sc. 6 sc.
- Round 29: Ch 1. Work 1 sc in each sc around. Join with a sl st to the first sc. Fasten off.
- Hat trim: Join B with a sl st to the remaining front loop of the first sc of Round 18. Ch 3, then sl st in the remaining front loop of the next stitch. Repeat from * around. Ch 3, then join with a sl st in the same space as the first sl st. Fasten off.
- Beard: With B, ch 5. Work 9 tr in the fifth ch from the hook. Fasten off.
- Finishing and assembly: Sew the beard to Santa at Round 13. Sew the two black beads above the beard for the eyes. Cut a 4 in [10 cm] length of gold craft wire. Twist it into glasses, following the intended glasses shape. Insert the wire ends into Santa. Attach a short length of ribbon as a hanging loop.
Notes
Choose beads that are securely attached and appropriate for your intended use. If the ornament will be handled by young children or pets, replace loose beads and wire with securely embroidered details, and keep small parts out of reach.