

The soft glimmer of light filtering through a window can transform a space, creating warmth and magic. Imagine a quiet afternoon, where the sun casts gentle rays, illuminating delicate shapes hanging in the breeze. Clear glue, rainbow colors, and glitter create translucent star decorations that catch the light beautifully in any window. These simple creations invite a sense of wonder into our everyday lives, encouraging a moment to pause, breathe, and appreciate the beauty around us.
The Heart Behind This DIY
Creating these star decorations is more than just a way to brighten a room. It becomes a connection to the present. As you mix colors and watch the vibrant hues blend together, you immerse yourself in the sensory experience of making. The smoothness of the glue, the soft sprinkle of glitter, and the visual delight of rainbow colors engage your senses fully. Engaging in a mindful activity like this allows time to slow down, inviting moments of reflection and serenity.
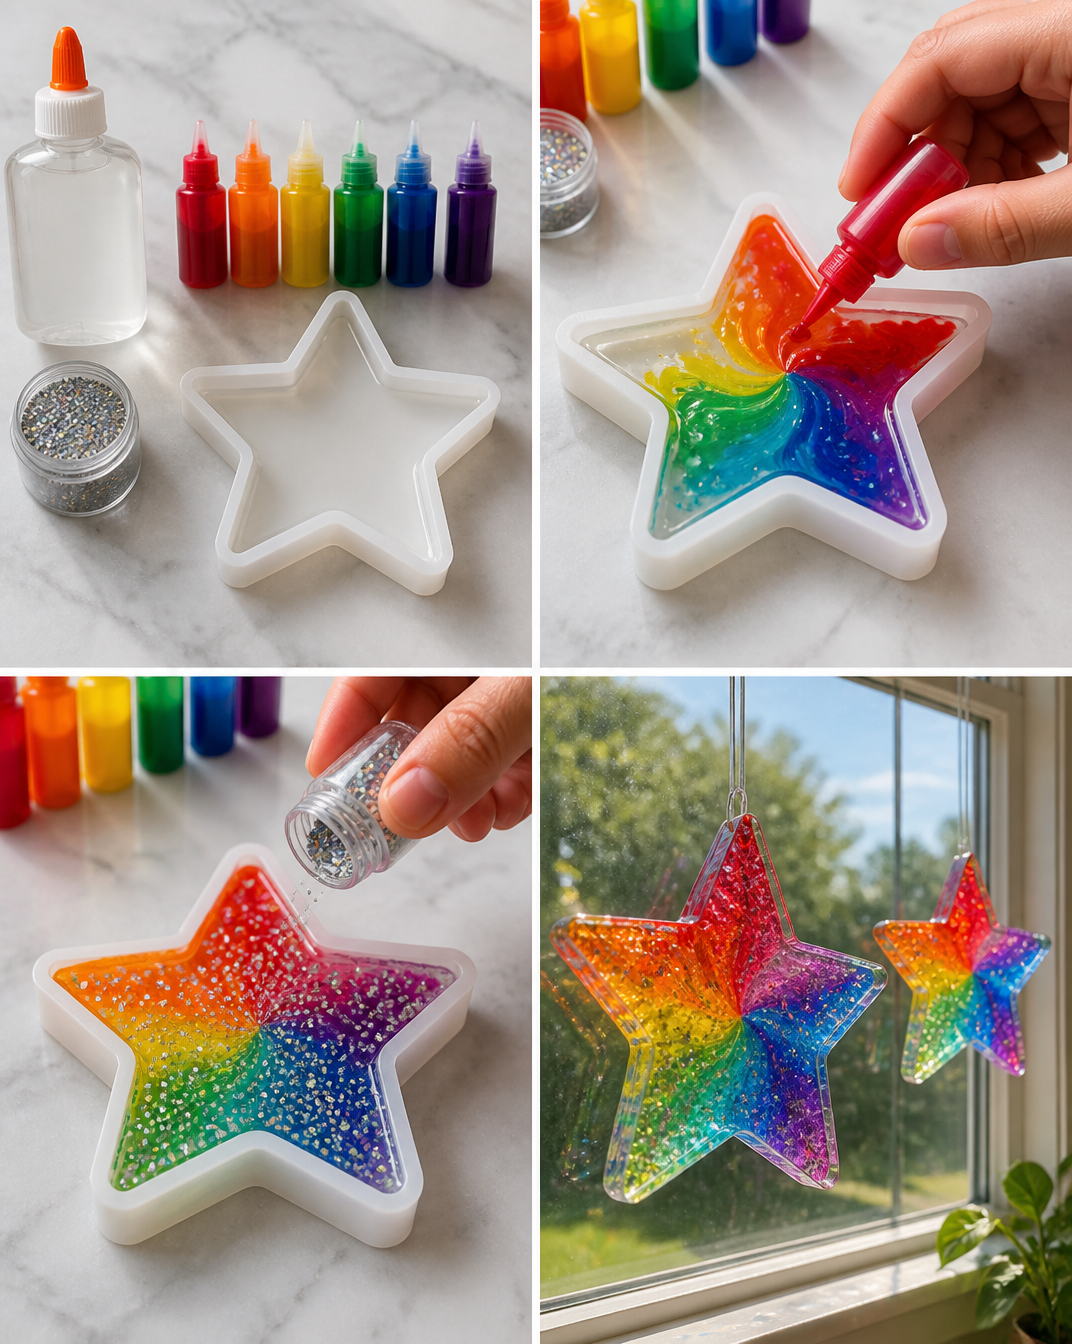
While making these stars, you can indulge in the simple joy of creativity. This act fosters a sense of calm. It is a reminder that beauty can emerge from ordinary moments. The process offers a respite from the hustle of daily life, wrapping you in a cozy cocoon of creativity that remains lighthearted yet purposeful.
A Gentle Look at the Process
Before diving into this wonderful project, let’s take a moment to consider the beauty of creating. As you prepare materials, visualize the vibrant colors and textures coming together. Gathering items creates a rhythm, perhaps a soft tap of the brush against the table or the swirl of glue as it spills gently onto your canvas. Each motion becomes a dance, weaving together color, light, and your unique expression.
As you begin, you’ll find a gentle flow in the making. The concentration on each star offers a meditative experience. The act of pouring, stirring, and crafting will wrap you in calm. This soothing experience makes the project as rewarding as the final decorative piece.
Materials You’ll Need
- Clear glue (washable, child-friendly options are pleasant)
- Assorted rainbow colors of tissue paper or transparency sheets
- Glitter (fine or chunky, based on your preference)
- Scissors (a good pair makes cutting smooth and easy)
- A brush or sponge applicator for glue
- Baking parchment or wax paper (to avoid sticking)
- A star-shaped template (optional, or you can freehand)
- A small bowl of water for cleaning brushes
Most of these materials are easy to find or may already be in your home. Feel free to adapt the materials to what you have on hand, as the heart of this project lies in the joy of creating rather than strict guidelines.
Step-by-Step Directions
-
Prepare Your Workspace
Choose a quiet, comfortable place where you can spread out your materials. Lay down the baking parchment to protect your surface. -
Create a Template
If you’re using a template, trace and cut out star shapes from your colored tissue paper. You can create a variety of sizes to add depth and interest.
-
Mix Your Glue
Pour a small amount of clear glue into a bowl. You can dilute it slightly with water for easier application, depending on your preference. -
Apply Glue to the Star
Use the brush or sponge to gently coat one side of the star shape with glue. Feel the soft bristles glide against the paper, spreading the adhesive evenly. -
Add Colors and Glitter
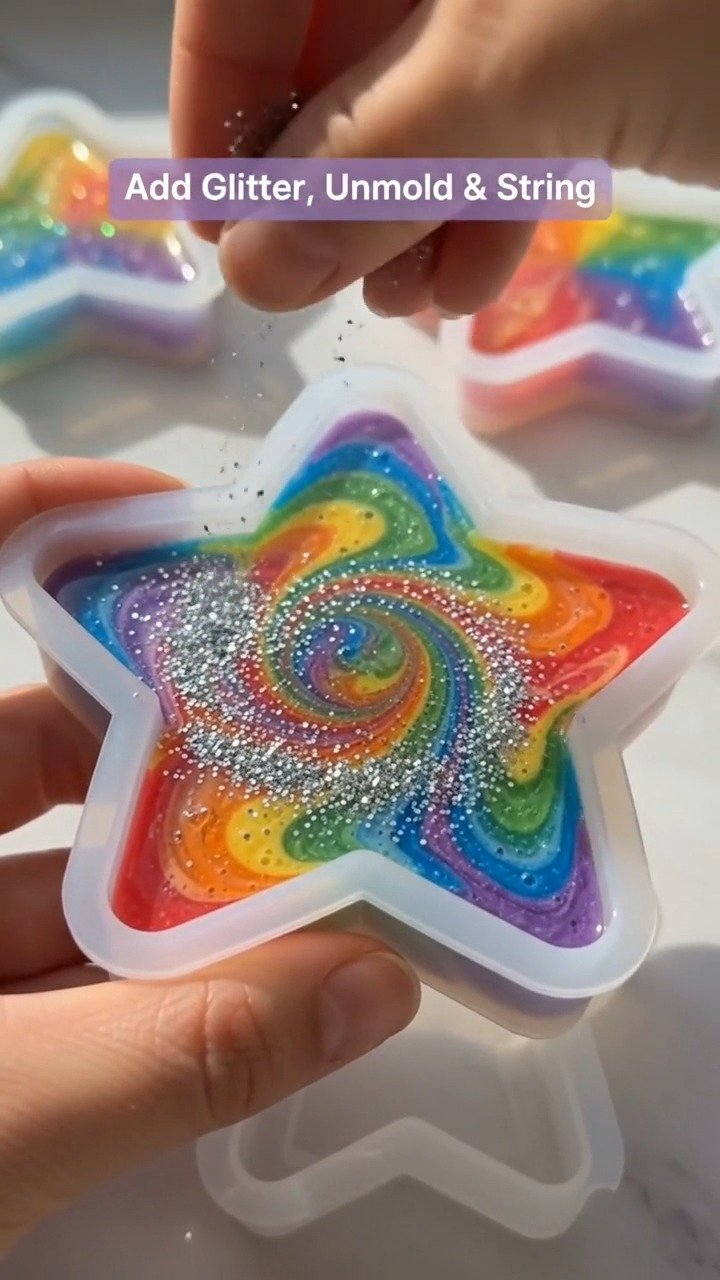
Place small pieces of various colored tissue paper onto the glued star. Sprinkle your chosen glitter over the top. Notice the textures combining in a delightful way; how the gloss of the glitter contrasts with the softness of the paper. -
Let It Dry
Carefully slide each embellished star onto the baking parchment. Allow the glue to dry completely, which may take a few hours. -
Hang and Enjoy
Once dry, choose a spot in your window to display your stars. The light passing through will enhance the colors and glitter, creating a lovely luminous flair.
Enjoying the Finished Piece
As the sun rises and shines through your window, the stars will come to life, casting enchanting hues across your walls and floors. Each star, a testament to your creativity, fills your space with light and warmth. These decorations serve not only as art but as gentle reminders of the joy in creating and the tranquility it brings.
Imagine sipping tea while watching the way the colors shift as the sunlight moves throughout the day. Sharing these stars with loved ones can deepen the experience, inviting conversations about the making process and the moments that inspired each design. They become more than just decorations; they become cherished tokens of a mindful moment spent together.
Keeping It for Later
Your translucent star decorations will add beauty to your space, but it’s wise to consider their care. Store them in a cool, dry place, away from direct sunlight, to maintain their vibrancy. If you wish to reuse the stars for different occasions, gently clean them with a slightly damp cloth to remove any dust. Always handle them with care, as the delicate materials can tear or snag easily.
Consider using seasonal display techniques. For example, during the winter holidays, placing these stars in a cozy corner can create a festive atmosphere. They can easily transition from one season to the next, bringing their charm year-round.
Gentle Tips & Variations
- Mix Colors: Experiment with blending colors on the tissue paper for a marbled effect. This invites a unique design that reflects your personality.
- Add Shapes: Try branching out beyond stars. Cut out hearts, moons, or even abstract shapes to create a dynamic display.
- Eco-Friendly Options: If you’re inclined towards sustainability, consider using recycled materials, like old magazines or leftover wrapping paper, to create beautiful, colorful stars.
- Personalize with Messages: Write small notes or positive affirmations on the star shapes before embellishing them. This adds a personal touch and can brighten someone’s day.
FAQs About Clear glue, rainbow colors, and glitter create translucent star decorations that catch the light beautifully in any window.
Q: What type of clear glue works best?
A: A washable school glue works well for this project. It remains flexible when dry and is easy to clean up. Look for non-toxic options if you’re sharing this with children.
Q: Can I use a different adhesive?
A: Yes, you can use craft glue or Mod Podge if you prefer. Just keep in mind that drying times and textures may vary.
Q: What if I don’t have glitter?
A: If glitter is not available, consider using sequins or colored salt for a similar sparkling effect. These can also add a different texture and feel.
Q: How do I hang the stars?
A: You can use string or fishing line to hang the stars. A small dab of glue can also help secure the star’s point to the window frame.
Q: Can I make these stars with kids?
A: Absolutely. Just make sure to supervise them while using scissors and the glue. It’s a wonderful way to spark creativity and bond over a shared project.
A Gentle Note Before You Go
As you wrap up your crafting time, take a moment to bask in the tranquility of your creative process. Each star represents a part of you, a calm moment captured in colorful brilliance. Let their presence in your space serve as a reminder to cherish stillness amidst life’s busyness.
No matter your crafting experience, embrace the joy of making. Create, observe, and breathe in the beauty around you. Each creation carries with it a story, a moment of mindfulness stitched into its very being. So, carry your stars with pride; they brighten not just windows, but hearts as well.
Print
DIY Translucent Star Decorations
- Total Time: 130 minutes
- Yield: Varies based on size of stars created
- Diet: N/A
Description
Brighten any window with these enchanting translucent star decorations made from clear glue, tissue paper, and glitter.
Ingredients
- Clear glue (child-friendly)
- Assorted rainbow colors of tissue paper
- Glitter (fine or chunky)
- Scissors
- Brush or sponge applicator
- Baking parchment or wax paper
- A star-shaped template (optional)
- A small bowl of water for cleaning brushes
Instructions
- Prepare your workspace with baking parchment to protect surfaces.
- Create a template by tracing star shapes from colored tissue paper.
- Mix a small amount of clear glue in a bowl, diluting it with water if desired.
- Apply glue to one side of the star shape using a brush or sponge.
- Add small pieces of tissue paper and sprinkle glitter on top.
- Let the stars dry on baking parchment for several hours.
- Hang the stars in your window to enjoy their colorful glow.
Notes
Personalize with messages or experiment with other shapes.
- Prep Time: 10 minutes
- Cook Time: 120 minutes
- Category: Crafts
- Method: Crafting
- Cuisine: N/A