

The late afternoon light catches the warm orange yarn, and the little pouch grows quietly across your palm. You hear the soft pull of the hook through each loop, then the gentle tap of it resting against the table. This Little Fox Pouch Crochet Pattern has that small, satisfying shape that feels useful before it even feels finished. It takes a few calm evenings, some steady counting, and a little patience around the ears and face, but nothing asks you to hurry.
Why This Little Fox Pouch Crochet Pattern Is So Soothing to Crochet
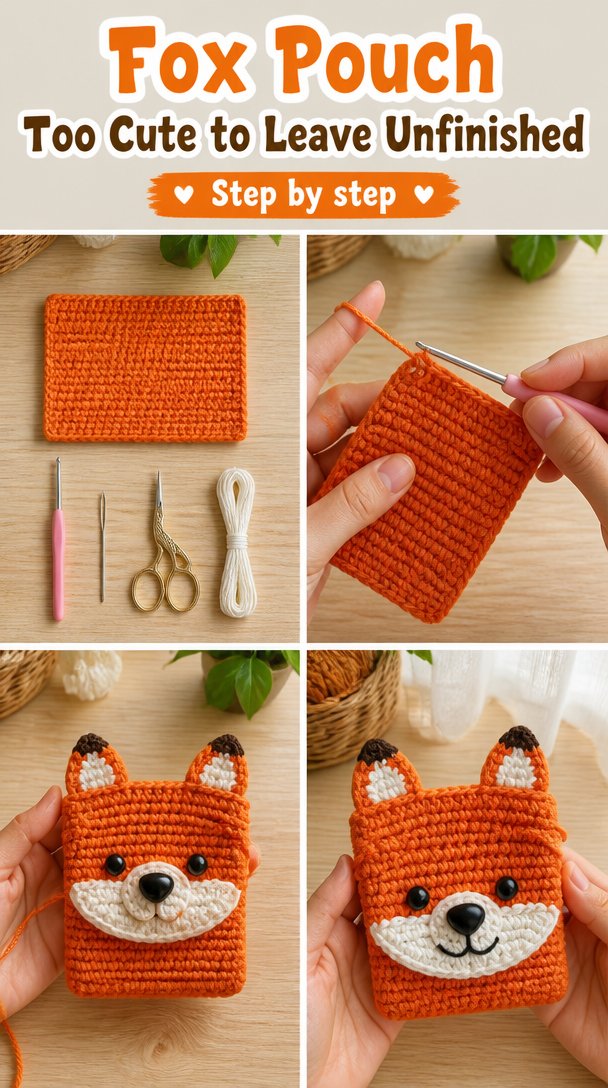
This pouch gives your hands a simple path to follow. You work flat pieces in familiar stitches, watch the fox shape appear through color and small details, then join everything into a soft little pocket. The first rows may curl at the edges, as crochet often does, but the fabric settles once it gains a little weight.
I made mine beside the living room window while a pot of coffee cooled on the table. During the first ten minutes, my hands felt clumsy and the yarn kept catching lightly on my ring. Then the rhythm arrived: yarn over, pull through, yarn over, pull through. The room grew quieter around it.
The finished pouch feels especially at home in an American living room, where it can sit in the basket beside an armchair, hold charging cords on a desk, or tuck small treasures into a child’s room. You might work on it during a rainy evening on the couch, take it to the porch in summer, or keep it in your project bag for a slow Saturday morning.
This is a small project, but small does not mean rushed. A few careful rows let you practice even tension, notice your stitch tops, and enjoy the warm color moving through your fingers. Many people find crocheting calming because the hands receive a steady, manageable task, and this pouch offers that rhythm without demanding a large commitment.
How This Little Fox Pouch Crochet Pattern Comes Together
The pouch uses mostly half double crochet, or hdc. A half double crochet sits between a single crochet and a double crochet in height, so it builds fabric more quickly than single crochet while staying fairly firm. That balance suits a pouch because the fabric has enough body to hold small items without feeling stiff.
You will crochet a front panel and a back panel, add small ears, stitch on a simple fox face, and join the panels with single crochet. The front and back use the same rectangle, which keeps the project approachable and makes counting easier. The ears use increases and decreases to create gentle points rather than sharp, complicated shaping.
This pattern uses US crochet terms. UK readers often find these posts too, and the same word can mean a different stitch there, so please use the US meanings given here. A US half double crochet is not the same as a UK half treble crochet, even though the names sound related.
The pattern suits a confident beginner and remains pleasant for an intermediate crocheter who wants a quiet make. Set aside about three to five hours, spread across two or three evenings. The face takes the most fiddling, especially when you position the eyes and muzzle, but the main panels move steadily.
Pattern at a Glance
Keep this little summary nearby while you gather your yarn and prepare your hook.
- Skill level: Confident beginner
- Finished size: 7 inches wide by 8 inches tall (18 cm by 20 cm), not including ears
- Gauge: 14 half double crochet and 10 rows measure 4 inches (10 cm)
- Yarn: Worsted weight (weight 4, medium), about 320 yards total, or two 100 g skeins plus a small amount of cream and black
- Hook: H-8 (5.0 mm)
- Other supplies: Yarn needle, scissors, tape measure, stitch marker, small amount of polyester fiberfill, and two 12 mm safety eyes or embroidered eyes
- Stitch multiple: Any multiple of 2 stitches, with the starting chain counted separately for turning
- Estimated time: Three to five hours
Materials for This Little Fox Pouch Crochet Pattern
- About 260 yards of rust or orange worsted weight yarn (weight 4, medium), plus about 60 yards of cream worsted weight yarn for the muzzle and ear centers; choose yarn with about 170 yards per 100 g skein
- One 100 g skein of rust or orange yarn and one 100 g skein of cream yarn, with leftovers for future small projects
- Small amount of black worsted weight yarn for the nose and facial details, about 10 yards
- H-8 (5.0 mm) crochet hook, with half a size up or down fine depending on your tension
- Yarn needle for weaving in ends, preferably with a blunt tip
- Scissors
- Stitch marker, optional, for marking the first stitch of a round or a joining point
- Tape measure
- Two 12 mm safety eyes, optional, or black yarn for embroidered eyes
- A small pinch of polyester fiberfill for the muzzle, optional
A worsted weight acrylic yarn works well here because it gives the pouch steady structure, stays affordable for a small gift, and usually handles gentle machine washing. A smooth acrylic from Lion Brand, Red Heart, or Caron would all be reasonable examples. Choose the yarn type first, then look for a similar worsted weight with about 170 yards per 100 g skein.
Make a gauge swatch before you begin if you want the finished pouch close to the listed size. Work 14 half double crochet and 10 rows in a small square, then measure the center 4 inches (10 cm). The twenty minutes spent checking gauge can save you from making both panels and discovering that the pouch feels too loose or too narrow.
You can substitute another worsted weight yarn safely if the fiber and yardage are close. Cotton will make a firmer, less stretchy pouch, while wool will feel softer and may relax after blocking. If you use a thinner or thicker yarn, expect the finished size and drape to change, and check the fabric so the filling does not peek through.
Step by Step
- Difficulty and stitch multiple: This is a confident beginner project. The main fabric uses any multiple of 2 stitches, with the turning chain added separately. The pattern below begins with 26 chains, giving you 25 working stitches after the first chain is skipped.
- With rust yarn, make a foundation chain of 26 chains, or ch. A foundation chain is the starting row of linked loops. Keep it relaxed; if it pulls tight, remake it or use one hook size larger just for the chain.
- Row 1: Skip the first 2 chains from the hook and work 1 half double crochet, or hdc, in each remaining chain across. To make an hdc, yarn over, insert the hook, yarn over and pull up a loop, then yarn over and pull through all 3 loops. You will have 25 hdc. Chain 2 to turn.
- Rows 2 through 20: Turn, then work 1 hdc in each stitch across. The chain 2 does not count as a stitch in this pattern. Each row has 25 hdc, and the fabric should measure about 7 inches wide by 8 inches tall when lightly relaxed.
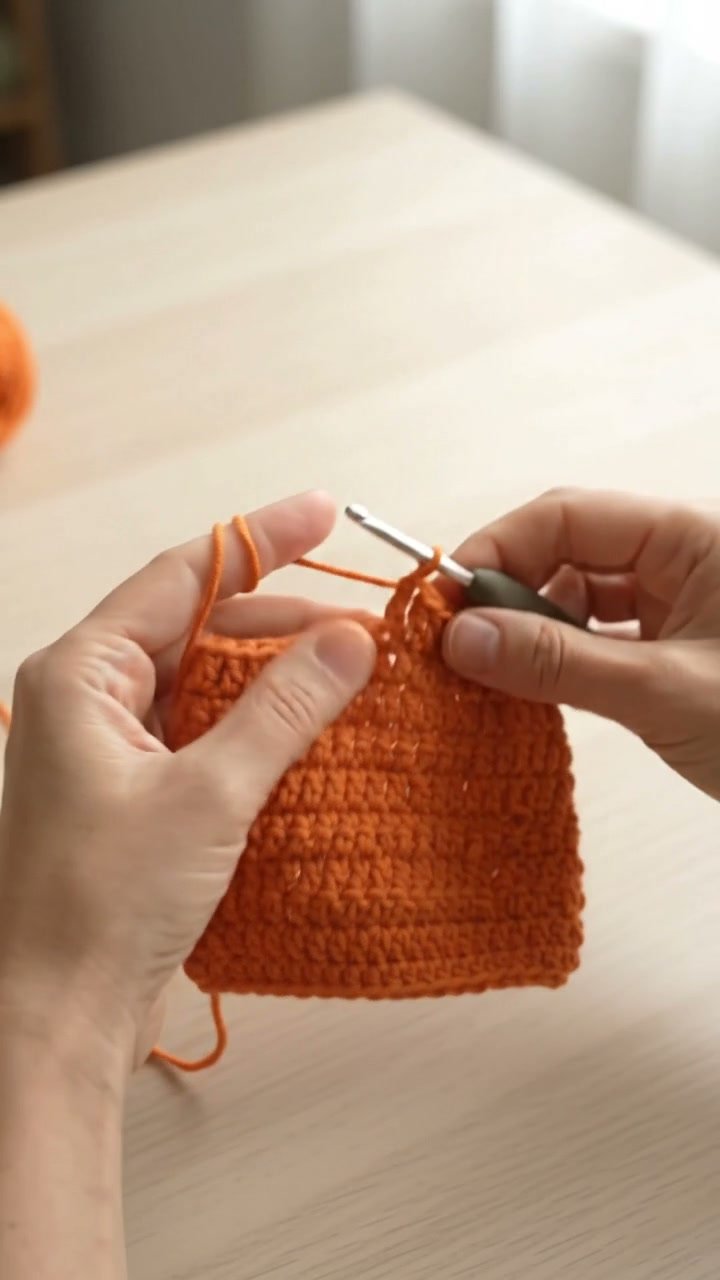
- Fasten off the first panel, leaving a 10-inch tail for sewing if you prefer to join with a yarn needle. Make a second panel in the same way, but do not fasten off at the end. Place both panels together with the right sides facing outward and the edges aligned.
- For the ears, use rust yarn and make two small triangles. Chain 8. Beginning in the second chain from the hook, work 1 single crochet, or sc, in each of the next 7 chains. A single crochet uses one loop on the hook after the pull-through, making a dense fabric. Chain 1 and turn.
- Ear row 2: Work 1 sc in the first stitch, then 1 decrease, or dec, across the next 2 stitches, then 1 sc in each remaining stitch. A decrease joins two stitches into one and narrows the row. You will have 6 stitches. Chain 1 and turn.
- Continue the ear shaping: work 1 sc, decrease across the next 2 stitches, then 1 sc in the remaining stitches. You will have 5 stitches. Chain 1 and turn. Repeat the decrease pattern until 1 stitch remains, fasten off, and make a second ear. The small triangles may curl slightly; a light pressing with your fingers usually settles them.
- For each cream ear center, chain 5. Work 1 sc in the second chain from the hook and in each chain across, giving you 4 sc. Chain 1 and turn. Work 1 sc in each stitch for 2 rows, then fasten off. Sew one cream piece onto each rust ear, leaving the tips rust colored.
- Make the cream muzzle by working a magic ring, also called a magic circle. Wrap the yarn around two fingers, insert the hook into the ring, pull up a loop, and chain 1. Work 6 sc into the ring, pull the loose tail to close the center, and join with a slip stitch, or sl st, into the first sc. A slip stitch moves the yarn without adding height.
- Muzzle round 2: Work 2 sc in each stitch around. This is an increase, or inc, because you place two stitches into one stitch. You will have 12 sc. Join with a sl st and fasten off, leaving a sewing tail. Add a little fiberfill behind the muzzle if you want it gently raised, but keep it flat enough for the pouch to close comfortably.
- Arrange the ears along the top edge of the front panel, with the points facing upward. Sew them in place through the lower edge of each triangle. Position the muzzle about 2 inches below the top edge, then sew it down. Add a small black embroidered nose and two short curved eyes, or attach safety eyes before joining the panels.
- If a mistake shows up, pause at the end of the row and count the stitch tops from the hook side across. A missing stitch often leaves a wider gap near the edge, while an extra stitch makes the edge flare. Pull back one stitch at a time by gently removing the hook and drawing out the last loops, then place the hook back into the live loop and continue.
- Place the back panel behind the front panel. With rust yarn, join at the upper left corner using a slip stitch, then single crochet through both layers down the side, across the bottom, and up the other side. Leave the top open. Work 1 sc in each side row, placing one stitch into each row end, and about 2 sc in each corner so the fabric lies flat. Fasten off when you reach the upper right corner.
- Weave in the ends with your yarn needle, passing each tail back and forth through several stitches before trimming it. If the acrylic fabric looks a little uneven, block it cold by lightly misting it and shaping it flat with your fingers. Do not press acrylic with a hot iron because heat can melt or flatten the fibers.
Where This Piece Finds Its Place
The finished pouch is just the right size for earbuds, hair clips, small sewing tools, or the handful of treasures that gathers beside an armchair. I like it on the entry table with spare keys tucked inside, though it also works well in a basket near the couch where small things tend to wander.
For a child, embroider the face instead of using safety eyes, and keep the finished pouch away from children under three because small parts and long loose stitches can be unsafe. A pouch for a crib or car seat needs special care: it should never hang loose where it could become a hazard, and this design is better suited to supervised play, shelves, or an older child’s room.
It makes a gentle holiday gift when filled with a packet of cocoa, a small notebook, or a pair of soft socks. For a baby shower, you could make a fox pouch for the parent’s changing bag, but keep all eyes, buttons, and loose decorations out of reach of the baby.
If you sell finished pieces, my own policy is simple: I am happy to sell items I make from my patterns, with clear credit to the pattern designer.
Caring for Your Crochet
Because this version uses acrylic yarn, wash it by hand or on a gentle cycle with cold or warm water. Place the pouch in a mesh bag if you machine wash it, and use a small amount of mild detergent. Avoid hot water, which can encourage the fabric to lose its shape even when the yarn itself is washable.
Dry the pouch flat on a clean towel. Never hang it wet, especially by one corner, because the weight of the water can stretch the side seam. Reshape the ears and corners with your fingers while the pouch remains damp.
Block acrylic cold or with gentle steam held at a distance, but never touch it with a hot iron. Too much heat can melt acrylic fibers and leave shiny, flattened spots. If you use wool for a substitution, untreated wool needs gentler washing because it can felt, while superwash wool generally tolerates a careful washing machine cycle.
Store the pouch folded or resting flat somewhere breathable rather than hanging it from a hook. If you use wool, add cedar or lavender nearby for moth protection, but keep scented materials from direct contact with the fabric. Save leftover yarn with its label so you still have the dye lot if you need to repair or enlarge the pouch later.
Small Changes That Shift the Whole Piece
You can make this fox pouch your own without changing its quiet character.
- Try a thicker yarn with a larger hook for a roomier pouch. The fabric will grow in both width and height, and the pouch may feel more cushioned. A thinner yarn will create a smaller, lighter pouch with a more delicate drape.
- Use two shades of rust for gentle color blocking. Work the lower rows in a darker orange and the upper rows in a lighter shade, changing colors at the end of a row so the edge stays tidy.
- Swap the half double crochet for single crochet if you want a denser fabric. Single crochet takes longer and makes the pouch firmer, but it also gives the face a smooth surface for embroidery.
- Resize the pouch by adjusting the foundation chain in any multiple of 2. Add or remove rows to change the height, keeping the two panels the same size. A longer chain gives width, while extra rows give height.
- Add a simple cream border around the opening with one round of single crochet. You could also sew the pouch to a fabric lining, or fill it with a handwritten note when giving it as a small seasonal gift.
I tested the face placement with pins before sewing, and that small pause helped. The eyes looked too close together on my first attempt, so I moved them outward by one stitch. Nothing dramatic happened, but the fox expression softened immediately.
Frequently Asked Questions About This Little Fox Pouch Crochet Pattern
Can I use a different hook size for this fox pouch?
Yes, you can use a different hook size, but the finished measurements may change. The H-8 (5.0 mm) hook gives a balanced fabric with worsted weight yarn. Go down to G-6 (4.0 mm) for denser stitches, or up to I-9 (5.5 mm) for a softer, slightly larger pouch, and check that the fabric does not show large gaps.
What yarn can I substitute for the worsted weight acrylic?
Choose another worsted weight yarn with a similar thickness and about 170 yards per 100 g skein. Cotton gives a firm pouch, wool gives warmth and softness, and acrylic gives easy care and good shape. A smooth medium weight yarn from Premier Yarns, WeCrochet, or Cascade Yarns can work as an example, but always check your gauge.
What should I do if I notice a mistake several rows later?
First, decide whether the mistake affects the edge, the stitch count, or only the appearance. If it changes the shape, pull back calmly to the row above the mistake and rework from there. If it is a small interior unevenness, you may leave it, especially on a pouch that will carry everyday items. The face can hide surprisingly little, so count before sewing details.
Is this pouch suitable for a beginner?
Yes, this pattern suits a confident beginner who knows how to chain, work single crochet and half double crochet, join with a slip stitch, and sew pieces together. The fiddliest part is shaping and attaching the ears, followed by placing the face. If you can count 25 stitches across a row, you have the main skill needed.
How long does the fox pouch take to crochet?
Plan on three to five hours, depending on your pace and how much time you spend on the face. The two panels crochet fairly quickly, while the ears, muzzle, and sewing take more attention. If you work slowly in short sessions, two or three evenings feels comfortable rather than crowded.
Does this pattern use US or UK crochet terms?
This pattern uses US crochet terms. In particular, single crochet means sc, half double crochet means hdc, and slip stitch means sl st. UK patterns use different names for some of these stitches, so check the terminology before beginning if you usually crochet from UK instructions.
Take the Time You Need
Let the pouch grow at the speed your hands choose. Count when counting helps, pause when the yarn starts to feel tense, and allow a small uneven place to be part of the making rather than a reason to rush. The hook will find its rhythm again, and your fox will slowly take shape in the quiet space you made for it.
—META—
SEO Title: Little Fox Pouch Crochet Pattern
Meta Description: Make a sweet little fox pouch with calm, clear steps, US crochet terms, simple shaping, and gentle ideas for gifting or everyday storage.
Slug: little-fox-pouch-crochet-pattern
Category: Crochet Patterns
Tags: crochet, fox pouch, crochet gifts, beginner crochet, slow making
Image Alt Text: Crochet fox pouch panels and warm yarn on a cozy table
A small crocheted fox pouch with ears, muzzle, and embroidered face
Rust, cream, and black yarn supplies beside a crochet hook
Pinterest Title: Little Fox Pouch Crochet Pattern
Pinterest Description: Make a small fox pouch with simple stitches and gentle shaping. A calm crochet project for gifting, organizing, or slow evenings at home.

Little Fox Pouch Crochet Pattern
- Total Time: 300 minutes
Description
This Little Fox Pouch Crochet Pattern creates a small pouch that is perfect for organizing small items or as a charming gift. With soothing crochet steps and simple shaping, it’s an ideal project for a calm crafting session.
Materials
- 260 yards rust or orange worsted weight yarn (weight 4, medium)
- 60 yards cream worsted weight yarn for the muzzle and ear centers
- 10 yards black worsted weight yarn for nose and facial details
- H-8 (5.0 mm) crochet hook
- Yarn needle for weaving in ends
- Scissors
- Stitch marker (optional)
- Tape measure
- Two 12 mm safety eyes (optional) or black yarn for embroidered eyes
- Small pinch of polyester fiberfill (optional)
Instructions
- Make a foundation chain of 26 chains with rust yarn.
- Skip the first 2 chains from the hook and work 1 half double crochet (hdc) in each remaining chain across. You will have 25 hdc. Chain 2 to turn.
- Turn, then work 1 hdc in each stitch across for rows 2 through 20. Each row has 25 hdc, and the fabric should measure about 7 inches wide by 8 inches tall when lightly relaxed.
- Fasten off the first panel, leaving a 10-inch tail for sewing. Make a second panel in the same way but do not fasten off.
- Place both panels together with the right sides facing outward and edges aligned.
- To make the ears, chain 8 with rust yarn. Work 1 single crochet (sc) in each of the next 7 chains, then chain 1 and turn.
- For ear row 2, work 1 sc in the first stitch, then decrease across the next 2 stitches, then 1 sc in each remaining stitch. You will have 6 stitches. Chain 1 and turn.
- Continue the ear shaping: work 1 sc, decrease across the next 2 stitches, then 1 sc in the remaining stitches until 1 stitch remains. Fasten off and make a second ear.
- For each cream ear center, chain 5. Work 1 sc in the second chain from the hook and in each chain across, giving you 4 sc. Chain 1 and turn. Work 1 sc in each stitch for 2 rows, then fasten off. Sew one cream piece onto each rust ear.
- To make the cream muzzle, work a magic ring and chain 1. Work 6 sc into the ring, pull the loose tail to close, and join with a slip stitch into the first sc.
- For muzzle round 2, work 2 sc in each stitch around. You will have 12 sc. Join with a slip stitch and fasten off, leaving a sewing tail. Add fiberfill if desired.
- Arrange the ears and muzzle on the front panel, sewing them in place.
- Place the back panel behind the front panel. Join at the upper left corner with a slip stitch, then single crochet through both layers, leaving the top open.
- Weave in the ends and block the fabric if necessary.
Notes
The pouch is ideal for small items like earbuds or hair clips. For a child, embroider the face instead of using safety eyes. Always supervise children with small parts.