

The little metal click of the hook is easy to hear on a quiet Sunday morning, especially when a tiny pumpkin begins to take shape beneath your fingers. These Crochet Halloween Keychains and Bag Charms use only a small amount of yarn, yet each one carries a cheerful bit of autumn for a backpack, market tote, or set of house keys. I made mine at the kitchen table with coffee cooling beside the yarn basket, and the first few rounds felt pleasantly fiddly before my hands warmed up. This is a small project for slow making, seasonal gifting, and those in-between moments when you want a finish line you can actually see.
Why Crochet Halloween Keychains and Bag Charms Is So Soothing to Crochet
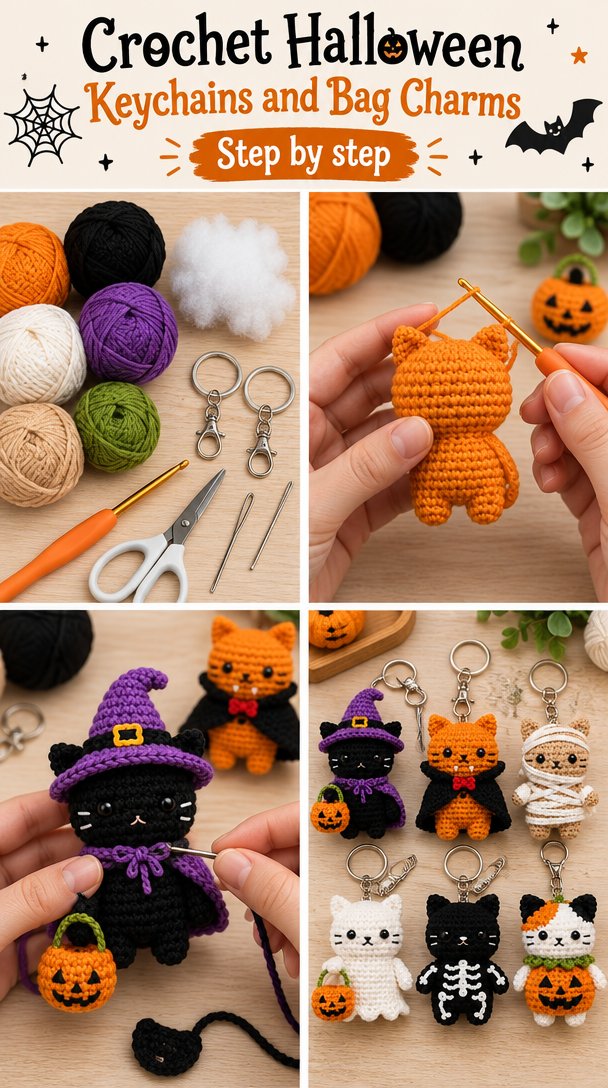
Small crochet projects have a particular kind of comfort. You can hold the whole piece in one hand, watch the shape appear quickly, and stop after one charm without leaving a large blanket spread across the couch. These little Halloween decorations ask for attention, but not for hurry.
The pumpkin begins as a simple circle worked in rounds. Once the increases settle into a steady rhythm, your hands repeat the same motion: yarn over, pull through, pause, and count. I like that the piece grows with a soft, springy texture while the evening light moves across the table.
On a rainy night, you can keep a charm in your lap beside a mug of coffee and listen to the quiet click of the hook. On a warm summer porch, the project fits neatly into a small basket. During the first cold snap, one finished charm can become a tiny seasonal touch on a coat zipper or lunch bag.
There is no pressure to make a whole set at once. The first pumpkin may take a little longer while you check your stitches. The second usually feels more familiar, and by the third, you may find your hands moving before your mind starts planning the next color.
The Rhythm of This Crochet Project
These charms come together from a magic ring, also called a magic circle, followed by rounds of single crochet and increases. A single crochet, abbreviated sc, makes a firm fabric that holds a little stuffing without leaving large openings. That density suits a keychain, because the finished piece needs to withstand being handled and tucked into a bag.
The pattern uses US crochet terms. UK readers often find American crochet posts confusing because the same word can mean a different stitch there, so keep that difference in mind when you read sc, or single crochet, in these instructions.
You will make the pumpkin body in six rounds, add a small stem, then attach a keychain ring or lobster clasp. The movement is compact and rhythmic, although the tiny size makes the final assembly a little fiddly. Plan on about 30 to 45 minutes for one charm, including stuffing and attaching the hardware. A set of four can take several evenings if you work slowly.
This pattern suits a confident beginner. You need to know how to make a chain, written ch, which is a looped foundation made by pulling yarn through the active loop, and a slip stitch, written sl st, which joins or finishes a round without adding height. I explain the other stitches as they appear.
Pattern at a Glance
Keep this small summary nearby while you work.
- Skill level: confident beginner
- Finished size: about 3 inches tall by 3 inches wide (7.5 cm by 7.5 cm)
- Gauge: 20 single crochet and 22 rounds measure 4 inches (10 cm), although exact gauge is less critical for a charm
- Yarn: worsted weight (weight 4, medium), about 35 yards total, or about 21 g
- Hook size: H-8 (5.0 mm)
- Other supplies: polyester fiberfill, yarn needle, scissors, stitch marker, keychain ring or lobster clasp, and a small amount of black yarn
- Stitch multiple: rounds are worked over 6-stitch increase sections, with no repeating flat-row multiple
- Estimated time: 30 to 45 minutes per charm
Gathering Your Materials
- Worsted weight (weight 4, medium) cotton yarn, about 35 yards total or 21 g for one charm. Choose an orange shade for the pumpkin, plus a small amount of green and black. Lily Sugar’n Cream is one easy-to-find cotton example, but any similar worsted weight cotton can work.
- H-8 (5.0 mm) crochet hook. A half size up or down is fine depending on your tension.
- Polyester fiberfill, about 1 tablespoon for each charm, or enough to make the shape softly full without stretching the stitches.
- Yarn needle with a blunt tip for weaving in ends and sewing the stem.
- Small scissors.
- One stitch marker, optional, to mark the beginning of each round.
- Tape measure, optional but useful for checking the finished size.
- One small keychain ring or lobster clasp for each charm, easy to find at craft stores or in a sewing box.
- Small amount of black worsted weight cotton for an optional stitched face.
The gauge for this project is 20 single crochet and 22 rounds measuring 4 inches (10 cm). A twenty-minute swatch may feel longer than the charm itself, but it tells you whether the fabric will hold its stuffing. For a keychain, a slightly firm fabric works better than a loose one.
You can substitute another worsted weight fiber, but cotton gives this charm a stable shape and handles frequent handling well. Acrylic can work too, although it may feel softer and stretchier. Keep acrylic away from a hot iron because it can melt. If you use wool, remember that untreated wool can felt with warm water and agitation, while superwash wool tolerates machine washing more easily.
Step by Step
- Difficulty and repeat: This is a confident beginner project. The body is worked in rounds, and the increases follow groups of 6 stitches rather than a flat-row stitch multiple. Place a stitch marker in the first stitch of each round if counting feels slippery.
- With orange yarn, make a magic ring, also called a magic circle. Chain 1, then work 6 single crochet, or sc, into the ring. Pull the yarn tail gently to close the center, then join with a slip stitch, or sl st, to the first single crochet. You have 6 stitches.
- Round 2: Chain 1. Work 2 sc in every stitch around. An increase means working two stitches into one stitch, so this round doubles the circle evenly. Join with a slip stitch to the first sc. You have 12 stitches.
- Round 3: Chain 1. Repeat 1 sc in the next stitch, then 2 sc in the following stitch around. Join with a slip stitch. You have 18 stitches.
- Round 4: Chain 1. Repeat 1 sc in each of the next 2 stitches, then 2 sc in the next stitch around. Join with a slip stitch. You have 24 stitches. The circle may curl slightly here, which is normal while it remains small.
- Round 5: Chain 1. Work 1 sc in each stitch around with no increases. Join with a slip stitch. You still have 24 stitches. The fabric should begin to cup, making room for the stuffing.
- Round 6: Chain 1. Work 1 sc in each stitch around. Join with a slip stitch, then fasten off with a long tail for sewing. You still have 24 stitches. Add a small amount of polyester fiberfill now, using the blunt end of your hook to ease it into the sides.
- Make the second half of the pumpkin in the same way, beginning with a magic ring and 6 sc. Work the same six rounds: 6, 12, 18, 24, 24, and 24 stitches. Stuff this half lightly as well, keeping the shape rounded rather than hard.
- Hold the two pumpkin halves together with the right sides facing outward. The right side, or RS, is the side you want to show; the wrong side, or WS, faces inside. Using the long orange tail from one half, sew around the edge through both layers, picking up one stitch from each half at a time.
- Before closing the last inch, add or remove a pinch of stuffing. Pull the seam snug, but do not draw it so tightly that the edge puckers. Finish with a knot tucked inside the pumpkin, then weave in the ends by threading the yarn needle through several stitches and trimming the tail close.
- For the stem, use green yarn to make a slip knot, chain 5, then slip stitch in the second chain from the hook and in each chain across. Fasten off with two tails. Fold the short stem in half and sew it to the top of the pumpkin, placing the stitches through the center so it stays secure.
- If you want a face, thread black yarn onto the yarn needle and add two small eyes and a simple mouth. Keep the stitches short and tight. Small parts and long loose stitches are unsafe for children under three, so use embroidered features rather than buttons or safety eyes for a young child’s item.
- Attach the hardware by sewing the top of the pumpkin firmly to a keychain ring or lobster clasp. Pass the yarn through the attachment several times, then wrap the tail around the base and weave it through the pumpkin. Pull back calmly if a mistake appears. If you spot a missing stitch several rows later, undo one or two rounds to the problem, correct it, and continue rather than tugging the whole charm out of shape.
- Finish by checking every tail and connection. Weave in the ends securely with the yarn needle. Cotton usually does not need blocking for this project, but if the pumpkin looks uneven, dampen it lightly, shape it with your fingers, and let it dry completely. Blocking means shaping a finished piece while it dries, and it should never replace a secure sewn attachment.
Where Crochet Halloween Keychains and Bag Charms Finds Its Place
A finished pumpkin can hang from your house keys, a school backpack, a market tote, or the zipper of a living room storage basket. The cotton keeps the charm light, while the firm single crochet gives it enough structure to hold its round shape through ordinary use.
I like a small cluster of three on a fall basket beside the armchair. One orange, one cream, and one deep green make a quiet seasonal display without filling the room with decorations. You can also tuck one into a Halloween card or tie it onto a wrapped loaf of pumpkin bread as a reusable gift tag.
For a simple gift, make one charm in the recipient’s favorite color and add a second in orange. A child can enjoy the seasonal shape, while an adult may prefer the charm on a work bag or key ring. If you give one to a young child, sew every feature securely and avoid loose hardware.
Caring for Crochet Halloween Keychains and Bag Charms
Because this pattern uses cotton, wash the charm by hand or place it in a small mesh bag on a gentle cycle with cold or warm water. Use a small amount of mild detergent, and avoid bleach if you want the color to remain even. Press out extra water in a towel rather than twisting the pumpkin.
Dry the charm flat and reshape it with your fingers while it is damp. Never hang it wet from the keychain hardware, because the weight can stretch the attachment point. Let it dry fully before returning it to a bag or pocket.
Cotton rarely needs formal blocking here. If you do block it, use cool water and shape it by hand. Do not press it with a hot iron. Acrylic yarn can melt under high heat, and even cotton can scorch, so keep heat away from the stuffed form and the metal clasp.
Store finished charms in a breathable basket or drawer rather than a sealed plastic bag when possible. Keep leftover yarn with its label so you have the fiber information and dye lot if you make another matching set. For wool versions, folded storage with cedar or lavender nearby can help discourage moths, but keep scented materials from direct contact with the crochet.
Small Ways to Make It Your Own
Try a thicker yarn if you want a larger bag charm. A bulky yarn with a suitable hook will make the pumpkin grow quickly, but the finished piece will have a softer drape and may need more stuffing. A thinner yarn creates a tiny ornament, although you may need a smaller hook and a finer yarn needle.
Play with color blocking. Make the first half orange and the second half cream for a two-tone pumpkin, or use black for one round near the bottom. Change colors at the slip stitch join so the transition stays near the back of the charm.
If you prefer a firmer fabric, replace the single crochet with a smaller stitch only if you adjust the size carefully. Single crochet already creates a dense surface, while half double crochet, written hdc, makes a taller and slightly more flexible fabric. Double crochet, written dc, grows faster but leaves more space between stitches and may let the stuffing show.
Resize the flat circle by continuing the increase rhythm. The pattern uses 6, 12, 18, and 24 stitches, adding 6 stitches per increase round. Add another increase round for a wider charm, then work plain rounds until the side looks deep enough. Keep the two halves the same so the seam lines up.
Add a simple border if you want a more finished edge on a flat ornament version. A round of slip stitches in green can frame the shape, while a small bow makes a sweet gift topper. My own policy is simple: I am glad when readers sell finished items they make from my patterns, as long as they present the work honestly and do not claim to have designed the pattern.
Frequently Asked Questions About Crochet Halloween Keychains and Bag Charms
Can I use a different hook size for these crochet keychains?
Yes, you can use a different hook size, but the fabric and finished size will change. The pattern uses H-8 (5.0 mm) because it makes a firm cotton fabric without making the tiny rounds uncomfortable. Go down to G-6 (4.0 mm) for a denser charm, or up to I-9 (5.5 mm) for a softer, slightly larger piece.
What yarn can I substitute for worsted weight cotton?
You can substitute another worsted weight yarn with about 35 yards needed for one charm. Acrylic creates a soft, washable pumpkin, while cotton holds its shape more firmly and suits a keychain better. If you choose wool, wash it carefully because untreated wool can felt. Always check that the yarn does not leave large gaps around the stuffing.
What should I do if I find a mistake several rows later?
Pull back only to the row where the mistake began. Remove the slip stitch and unravel one round at a time, keeping the working loop on your hook once you reach the correct place. If the mistake sits inside a stuffed half, take out the stuffing first. Recount the round before continuing, and remember that correcting one missed stitch usually takes less time than disguising it.
Are these Halloween keychains suitable for a beginner?
Yes, these keychains suit a confident beginner who can make a magic ring, single crochet, increases, and slip stitches. The stitches are simple, but the small size makes the final sewing a little fiddly. If you are brand new, make one practice circle before adding stuffing. The first few rounds may feel tight, and your hands often warm up after the first ten minutes.
How long does one crochet Halloween charm take?
One charm takes about 30 to 45 minutes, including the two crocheted halves, stuffing, sewing, and hardware. Your first one may take closer to an hour while you check the stitch counts. A set of four can take several evenings if you work in short sessions, especially when you add embroidered faces or careful attachments.
Does this pattern use US or UK crochet terms?
This pattern uses US crochet terms. The main stitch is single crochet, abbreviated sc; in UK terminology, that same stitch is usually called double crochet. If you normally follow UK patterns, check each abbreviation before beginning, since changing the stitch name can change the entire size and texture of the charm.
Take the Time You Need
Let the pumpkin stay small and simple. Count when you need to, pause when your hands want a rest, and allow the shape to become familiar one round at a time. The charm does not need to be perfect to carry a little of your attention into the season, and the quiet work remains worthwhile even when you make it only for yourself.
—META—
SEO Title: Crochet Halloween Keychains and Bag Charms
Meta Description: Make calm Crochet Halloween Keychains and Bag Charms with cotton yarn, simple rounds, and gentle seasonal details for gifts or bags.
Slug: crochet-halloween-keychains-bag-charms
Category: Crochet Patterns
Tags: crochet, halloween, keychains, bag charms, beginner crochet
Image Alt Text: A small orange crochet pumpkin charm beside a crochet hook and cotton yarn
A crochet pumpkin half showing single crochet rounds and a stitch marker
Pinterest Title: Crochet Halloween Bag Charms
Pinterest Description: Make a small crochet pumpkin charm with simple rounds and cotton yarn. It is a gentle seasonal project for gifts, bags, or keys.

Crochet Halloween Keychains and Bag Charms
- Total Time: 45 minutes
Description
Make calm Crochet Halloween Keychains and Bag Charms with cotton yarn, simple rounds, and gentle seasonal details for gifts or bags.
Materials
- Worsted weight cotton yarn, about 35 yards total or 21 g for one charm (orange shade for pumpkin, plus small amount of green and black)
- H-8 (5.0 mm) crochet hook
- Polyester fiberfill, about 1 tablespoon for each charm
- Yarn needle with a blunt tip
- Small scissors
- One stitch marker (optional)
- One small keychain ring or lobster clasp for each charm
- Small amount of black worsted weight cotton for an optional stitched face
Instructions
- With orange yarn, make a magic ring and chain 1, then work 6 single crochet into the ring. Pull the yarn tail to close the center, then join with a slip stitch to the first single crochet.
- Round 2: Chain 1. Work 2 single crochet in every stitch around. Join with a slip stitch to the first single crochet.
- Round 3: Chain 1. Repeat 1 single crochet in the next stitch, then 2 single crochet in the following stitch around. Join with a slip stitch.
- Round 4: Chain 1. Repeat 1 single crochet in each of the next 2 stitches, then 2 single crochet in the next stitch around. Join with a slip stitch.
- Round 5: Chain 1. Work 1 single crochet in each stitch around with no increases. Join with a slip stitch.
- Round 6: Chain 1. Work 1 single crochet in each stitch around. Join with a slip stitch, then fasten off with a long tail for sewing.
- Make the second half of the pumpkin in the same way, starting with a magic ring and 6 single crochet, then completing the same six rounds: 6, 12, 18, 24, 24, and 24 stitches.
- Hold the two pumpkin halves together with the right sides facing outward. Using the long orange tail from one half, sew around the edge through both layers, picking up one stitch from each half at a time.
- Before closing the last inch, add or remove a pinch of stuffing. Finish with a knot tucked inside the pumpkin, then weave in the ends.
- For the stem, use green yarn to make a slip knot, chain 5, then slip stitch in the second chain from the hook and in each chain across. Fasten off with two tails. Sew it to the top of the pumpkin.
- If desired, thread black yarn onto the yarn needle and add two small eyes and a simple mouth.
- Attach the hardware by sewing the top of the pumpkin firmly to a keychain ring or lobster clasp.
- Finish by checking every tail and connection. Weave in the ends securely with the yarn needle.
Notes
Keep small parts and long loose stitches in mind for child safety. Use embroidered features rather than buttons or safety eyes for items made for children under three.