

This post contains Amazon affiliate links. As an Amazon Associate I earn from qualifying purchases.
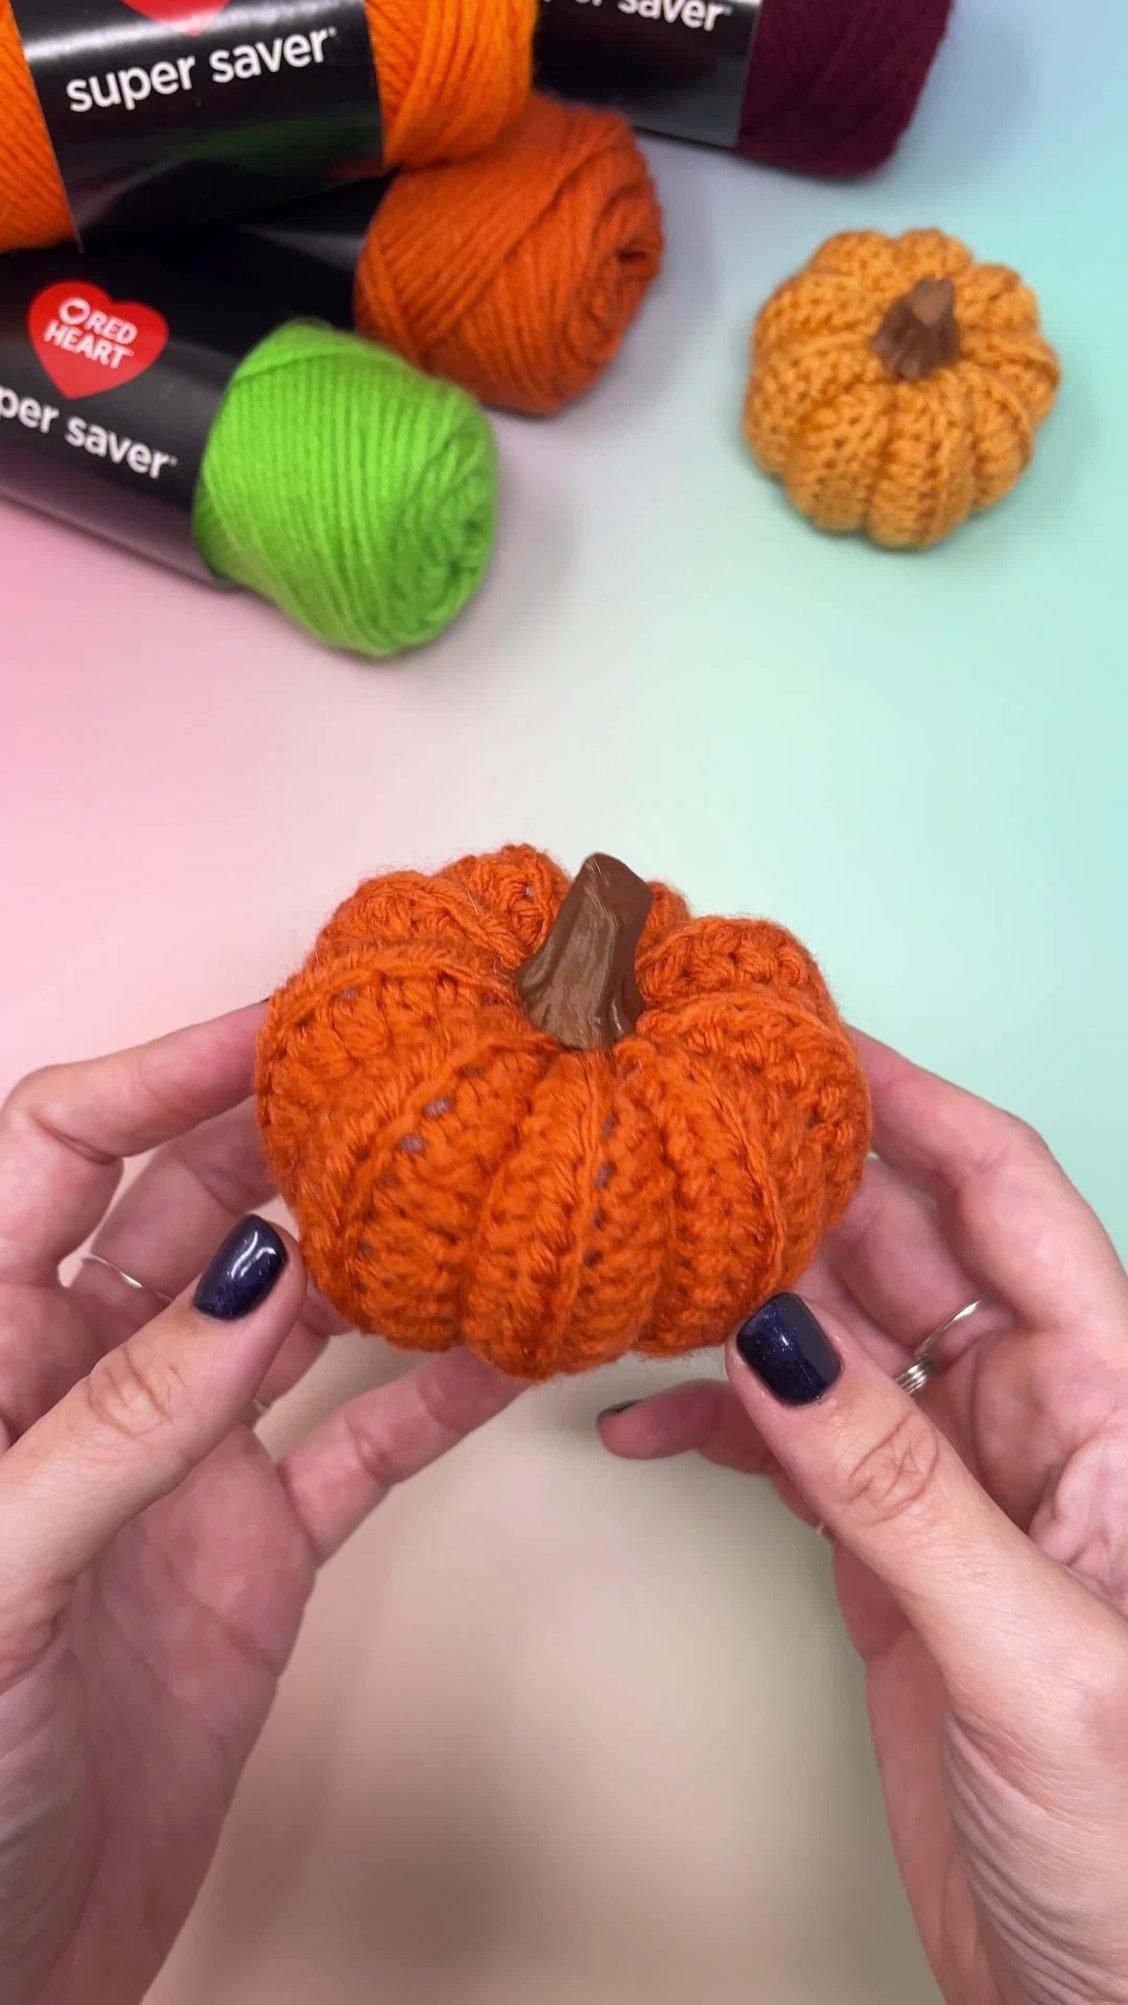
The yarn rests warmly across your knees, and the hook makes that small, familiar pull through each loop. In the late afternoon, with a mug of coffee beside the yarn basket, this Quick & Easy Crochet Pumpkin grows one quiet round at a time. It is a small project, but it gives your hands somewhere gentle to go. The finished pumpkin has a softly ridged body, a little gathered top, and enough shape to sit steadily on a mantel, porch table, or basket beside your armchair.
Why Quick & Easy Crochet Pumpkin Is So Soothing to Crochet
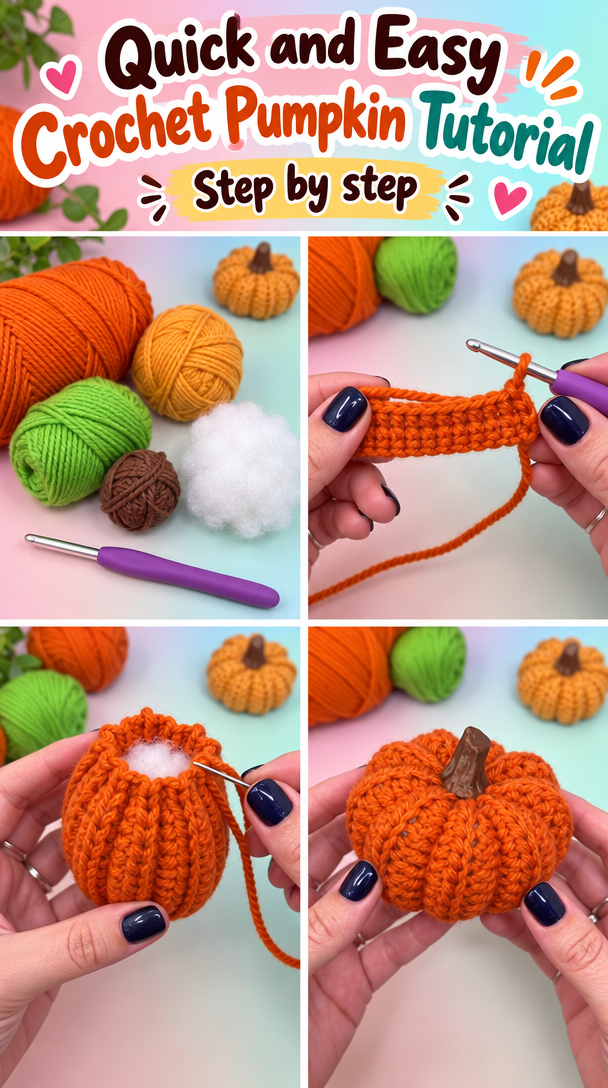
This pumpkin uses a simple rhythm that settles in quickly. You work back and forth in rows, then sew the rectangle into a tube and gather the ends. The fabric grows beneath your hands without asking you to keep track of a complicated chart, so your attention can stay with the yarn, the quiet click of the hook, and the changing texture under your fingertips.
The first few rows may curl a little. That is normal. Once the piece gains some length, it becomes easier to hold, and the fabric begins to settle across your lap. I noticed my hands warming up after about ten minutes, especially on a cool fall evening when the porch door kept letting in a little air.
A pumpkin also gives you a satisfying stopping point. You can make one while a pot simmers, during a rainy evening on the couch, or over several short sessions across a weekend. Many people find crocheting calming because the repeated movement creates a steady rhythm, and this project leaves plenty of room for that feeling without demanding a long commitment.
The finished shape suits everyday American home life in an easy way. Place it beside a stack of cookbooks, tuck it into a fall centerpiece, or let it sit in a shallow bowl with pinecones. It feels seasonal without needing a whole room of decorations.
How Quick & Easy Crochet Pumpkin Comes Together
The main stitch is half double crochet, often shortened to hdc. It sits between single crochet and double crochet in height, so it builds fabric fairly quickly while keeping enough body for the pumpkin to hold its rounded shape. Working in the back loop only, or BLO, leaves a raised ridge on the front of the fabric.
You will make a rectangle with 30 rows. Each row begins with a turning chain, which lifts the yarn to the correct height for the next row. After the rectangle is finished, you sew the short edges together, gather one opening, add a little polyester fiberfill, and gather the other opening.
This pattern uses US crochet terms. UK readers often find these posts too, and the same word means a different stitch there, so please use the US meaning of half double crochet given in the steps. The pattern is beginner friendly, although sewing the gathered ends takes a few patient minutes.
Plan on about two to three hours of hands-on work, spread over one or two evenings. The crochet itself moves steadily. The fiddliest part is pulling the gathers evenly so the stuffing stays tucked inside.
Pattern at a Glance
Here are the details to keep beside you while you work.
- Skill level: Easy, beginner friendly
- Finished size: about 5 inches tall and 5 inches wide (13 cm tall and 13 cm wide)
- Gauge: 14 half double crochet stitches and 10 rows measure 4 inches (10 cm)
- Yarn: worsted weight (weight 4, medium), about 180 total yards (165 m), or one 4-ounce (113 g) skein
- Hook size: H-8 (5.0 mm)
- Other supplies: polyester fiberfill, yarn needle, scissors, stitch marker, and tape measure
- Stitch multiple: any number of stitches, with 30 rows for the finished height
- Estimated time: two to three hours
Materials for Quick & Easy Crochet Pumpkin
- About 180 yards (165 m) of worsted weight yarn, weight 4 medium, in a smooth acrylic yarn, approximately one 4-ounce (113 g) skein. A yarn with about 170 to 200 yards per 4-ounce skein works well. Lion Brand is one easy-to-find example, but the pattern does not depend on that brand.
- H-8 (5.0 mm) crochet hook. A half size up or down is fine depending on your tension, though changing the hook can change the finished size.
- Polyester fiberfill, about 2 to 3 ounces (57 to 85 g), or enough to make a firm but squeezable shape.
- Yarn needle with an eye large enough for worsted weight yarn.
- Scissors.
- One stitch marker, optional, for marking the first stitch or keeping track of your working loop.
- Tape measure for checking gauge and the finished dimensions.
- A small amount of brown or green worsted weight yarn for the stem, optional.
Gauge is worth the twenty minutes here because it tells you whether the fabric will hold stuffing without looking loose. Make a small swatch with half double crochet in the back loop only, then count 14 stitches and 10 rows across the center. If your swatch has more stitches in 4 inches, your tension is tighter, so try a larger hook. If it has fewer stitches, try a smaller hook.
You can safely substitute another worsted weight, weight 4 medium yarn with a similar yardage. Acrylic keeps this decorative piece affordable, washable, and sturdy, while cotton gives a firmer, less fuzzy surface. If you use cotton, the pumpkin may feel slightly heavier and less springy. Avoid novelty yarn for your first version because it can hide the back-loop ridges and make missed stitches difficult to see.
Step by Step
- This is an easy project, and the stitch pattern has a multiple of any number of stitches because every row repeats the same stitch across. For the sample size, chain 20 stitches. A chain, shortened to ch, forms the foundation chain that supports the first row.
- Turn your chain so the back bumps face upward. Work one half double crochet, or hdc, in the second chain from the hook. To make an hdc, yarn over, insert the hook, yarn over and pull up a loop, then yarn over and pull through all three loops on the hook. Work one hdc in each remaining chain. You will have 19 stitches.
- Chain 1 and turn. This is your turning chain, and it does not count as a stitch in this pattern. Work one hdc in the back loop only, or BLO, of every stitch across. The back loop is the loop farthest from you at the top of the stitch. You will have 19 stitches.
- Repeat the second row 29 more times: chain 1, turn, then work one hdc in the BLO of every stitch across. You will have 30 rows total, with 19 stitches in each row. Let the fabric rest in your palm now and then; the ridges should run across the width like soft corduroy.
- After row 30, fasten off, leaving a yarn tail about 18 inches (46 cm) long. Pull the tail through the last loop. Use your tape measure before sewing, because the rectangle should be about 7 inches wide and 15 inches long (18 cm wide and 38 cm long), depending on your tension.
- Fold the rectangle so the first row meets the last row, with the ridges running vertically. Thread the long tail onto your yarn needle. Sew the two short edges together with a simple whipstitch, passing through both layers. Keep the stitches close and even, then tie a secure knot inside the tube.
- Turn the tube so the seam sits inside. Thread another length of yarn onto the needle and make long running stitches around one open edge, placing each stitch through the side of the fabric about half an inch apart. Pull the yarn slowly to gather the opening. Add a few extra passes across the center if a small hole remains, then knot securely.
- Begin adding polyester fiberfill through the open end. Use small pieces rather than one large handful, and press them into the corners with the blunt end of your hook. Fill until the pumpkin feels rounded but still gives when you press it. Overstuffing can stretch the ridges and make the top difficult to close.
- Make running stitches around the second open edge, again about half an inch apart. Pull the yarn gradually while shaping the stuffing with your fingers. If the pumpkin looks lopsided, loosen the gathers slightly, move the fiberfill, and pull again. The top does not need to close perfectly flat because the stem will cover the center.
- When the opening is closed, pass the needle through the gathered center several times. Tie two secure knots, then push the needle through the pumpkin and bring it out several inches away. Snip the yarn close to the surface and gently tug the pumpkin so the end disappears inside.
- For a simple stem, cut an 8-inch (20 cm) strand of brown or green yarn and fold it in half. Push the folded loop through the top center, pull the loose ends through the loop, and tighten gently. If you prefer a crocheted stem, make a short chain, slip stitch back across it, and sew it to the top.
- Take a quiet look around the pumpkin before finishing. If a stitch went missing several rows back, you may see a vertical gap or a ridge that suddenly stops. Pull back calmly one row at a time, undoing the last stitch first, then rebuild the missing hdc in the BLO. It is often faster to fix the small section now than to hide it later.
- Weave in the ends by threading each tail through several stitches on the inside, changing direction once before trimming. This is called weaving in the ends, and it keeps the yarn from loosening. Acrylic does not need wet blocking for this project, but you may gently shape the pumpkin by hand. If you use wool, block lightly and allow it to dry completely before stuffing.
Where Quick & Easy Crochet Pumpkin Finds Its Place
This little pumpkin works best where you can see its texture from close by. Set it in a basket beside the armchair, place three in a shallow bowl on the coffee table, or add one to a bookshelf between ceramic pieces and paperbacks. Its size makes it easy to move when you want to clear a surface.
On a front porch, keep it under cover so rain and strong sun do not wear the yarn quickly. Indoors, it can stay out from the first cool evening through Thanksgiving and beyond. The warm ridges catch low light especially nicely, and the pumpkin still feels at home after the larger seasonal decorations have gone away.
For gifting, tuck one into a small basket with a tea towel, a jar of apple butter, or a handwritten recipe card. You can make a pair in two coordinating colors and give them as a hostess gift. If you sell finished items, my policy is simple: I sell only pieces I made myself and clearly credit the pattern source when required.
Keeping Quick & Easy Crochet Pumpkin Looking Good
For the acrylic yarn used here, spot clean first with a cool, damp cloth. If the pumpkin needs a deeper clean, place it inside a mesh laundry bag and use a gentle cycle with cold water and a small amount of mild detergent. Press out extra water with a towel, then dry it flat while reshaping the ridges and gathers.
Do not hang the pumpkin wet because the stuffing can pull the fabric out of shape. Acrylic can melt under a hot iron, so do not press it directly. If the piece needs smoothing, use steam from a distance or block it cold with your hands and let it dry naturally.
Store the pumpkin in a breathable basket or cotton bag, folded or resting on its side rather than hanging. Keep it away from damp storage areas. The acrylic does not need moth protection, but if you make a wool version, add cedar or lavender and remember that untreated wool can felt while superwash wool tolerates machine washing more easily.
Keep leftover yarn with its label so you have the fiber content, washing information, and dye lot if you make another pumpkin later. Even a small label tucked into your project basket can save guesswork.
Small Ways to Make Quick & Easy Crochet Pumpkin Your Own
You can change the feel of this project without changing its basic construction. These are invitations rather than rules, so try the version that matches the yarn already waiting in your basket.
- Try a thicker yarn for a larger, heavier pumpkin. A bulky yarn will make the ridges broader and the shape quicker to crochet, while a thinner yarn will create a smaller pumpkin with a tighter, more delicate surface. Change your hook to suit the yarn and make a gauge swatch before committing to the full rectangle.
- Use two colors for gentle color blocking. Work 10 rows in one shade and 20 rows in another, or alternate every five rows. Carrying yarn up the side can leave a visible edge, so fasten off each color and weave in the ends inside the pumpkin.
- Swap the half double crochet for single crochet if you want a denser fabric. Single crochet, or sc, makes a shorter, firmer stitch, so the pumpkin may need more rows to reach the same height. The stuffing will show less, but the finished piece will take longer to grow.
- Resize by changing the starting chain and the number of rows. A longer foundation chain makes a taller rectangle, while more rows make a wider one. Since this pattern uses any stitch count, you can adjust freely, but keep the rectangle close to a two-to-one length-to-width proportion for a balanced pumpkin.
- Add a simple border if you enjoy a finished edge. Work single crochet around the rectangle before sewing, placing one stitch in each row end along the long sides. A contrasting border gives a handmade gift a little more definition without adding a difficult stitch pattern.
Frequently Asked Questions About Quick & Easy Crochet Pumpkin
Can I use a different hook size for Quick & Easy Crochet Pumpkin?
Yes, you can use a hook one half size up or down, depending on your tension. The pattern calls for H-8 (5.0 mm), but a larger hook creates a looser, softer fabric and a slightly larger pumpkin. A smaller hook makes denser fabric and may keep the stuffing from peeking through. Check your gauge if the finished size matters to you.
What yarn can I substitute for the worsted weight yarn?
Choose another smooth worsted weight, weight 4 medium yarn with about 170 to 200 yards per 4-ounce skein. Acrylic gives the pumpkin durable, washable structure, while cotton creates a firmer shape. You can use wool, but untreated wool may felt with warm water and agitation. Avoid mixing fibers with very different washing needs in one pumpkin.
What should I do if I find a mistake several rows later?
First, look for a missing vertical ridge or a row with only 18 stitches instead of 19. If the mistake affects the shape, pull back one row at a time until you reach it, then rebuild the missing half double crochet in the back loop only. If the error sits inside the gathered seam and does not change the rectangle, you may leave it.
Is this pumpkin suitable for a beginner?
Yes, this project suits a beginner who knows how to make a chain and basic half double crochet. The crochet section repeats one row, and the main new idea is working into the back loop only. Sewing the tube and gathering the ends takes patience, but you can undo those stitches if the shape does not look even.
How long does it take to crochet this pumpkin?
Most crocheters can finish it in two to three hours of hands-on work. The exact time depends on your pace, how often you stop, and how carefully you shape the gathers. The rectangle usually goes quickly, while stuffing and closing the ends take longer than expected. You can easily split the project across two quiet evenings.
Does this pattern use US or UK crochet terms?
This pattern uses US crochet terms. The main stitch is a US half double crochet, which is called a half treble in UK terminology. The abbreviations here are ch for chain, hdc for half double crochet, BLO for back loop only, and sc for single crochet when the optional border is mentioned.
Take the Time You Need
Let the pumpkin take the shape it wants as you work. A missed stitch does not undo the quiet time you spent making it, and an uneven gather can usually be adjusted with patient fingers. Set the hook down when you need to, return when the yarn feels inviting again, and let this small piece become part of an ordinary day.
Meta title: Quick & Easy Crochet Pumpkin Pattern
Meta description: Make a cozy Quick & Easy Crochet Pumpkin with worsted weight yarn, simple half double crochet rows, and gentle step-by-step instructions.
Slug: quick-easy-crochet-pumpkin

Quick & Easy Crochet Pumpkin
- Total Time: 120 minutes
Description
This pumpkin uses a simple rhythm that settles in quickly. You work back and forth in rows, then sew the rectangle into a tube and gather the ends. The finished pumpkin has a softly ridged body, a little gathered top, and enough shape to sit steadily on a mantel, porch table, or basket beside your armchair.
Materials
- About 180 yards (165 m) of worsted weight yarn, weight 4 medium, in a smooth acrylic yarn, approximately one 4-ounce (113 g) skein.
- H-8 (5.0 mm) crochet hook.
- Polyester fiberfill, about 2 to 3 ounces (57 to 85 g).
- Yarn needle with an eye large enough for worsted weight yarn.
- Scissors.
- One stitch marker, optional.
- Tape measure.
Instructions
- Chain 20 stitches.
- Turn your chain so the back bumps face upward. Work one half double crochet (hdc) in the second chain from the hook.
- Work one hdc in each remaining chain, yielding 19 stitches.
- Chain 1 and turn. Work one hdc in the back loop only (BLO) of every stitch across, for a total of 19 stitches.
- Repeat the second row 29 more times to have 30 rows total.
- Fasten off, leaving a yarn tail about 18 inches (46 cm) long.
- Fold the rectangle so the first row meets the last row, with the ridges running vertically.
- Sew the two short edges together with a simple whipstitch, tying a secure knot inside the tube.
- Turn the tube so the seam sits inside. Gather one opening with long running stitches around, then fill with polyester fiberfill.
- Make running stitches around the second open edge, pulling gradually while shaping the stuffing.
- When the opening is closed, tie knots and hide the yarn tail.
- For a stem, cut an 8-inch (20 cm) strand of brown or green yarn, fold it in half, and push the loop through the top center.
- Weave in the ends.
Notes
This project is beginner-friendly and can be completed in two to three hours of hands-on work.