

The yarn tail rests in my lap while late afternoon light moves across the table, and the small pull of the hook through each loop makes the room feel quieter. Christmas Gnome with Fluffy Beard grows one simple piece at a time, with a soft body, a pointed hat, and a beard that begs to be brushed between your fingers. I made this little gnome over several calm evenings, usually with coffee nearby and the yarn basket tucked beside my chair. It is not a race project. The charm comes from watching a few familiar stitches become a friendly seasonal figure.
The Quiet Joy of Crocheting Christmas Gnome with Fluffy Beard
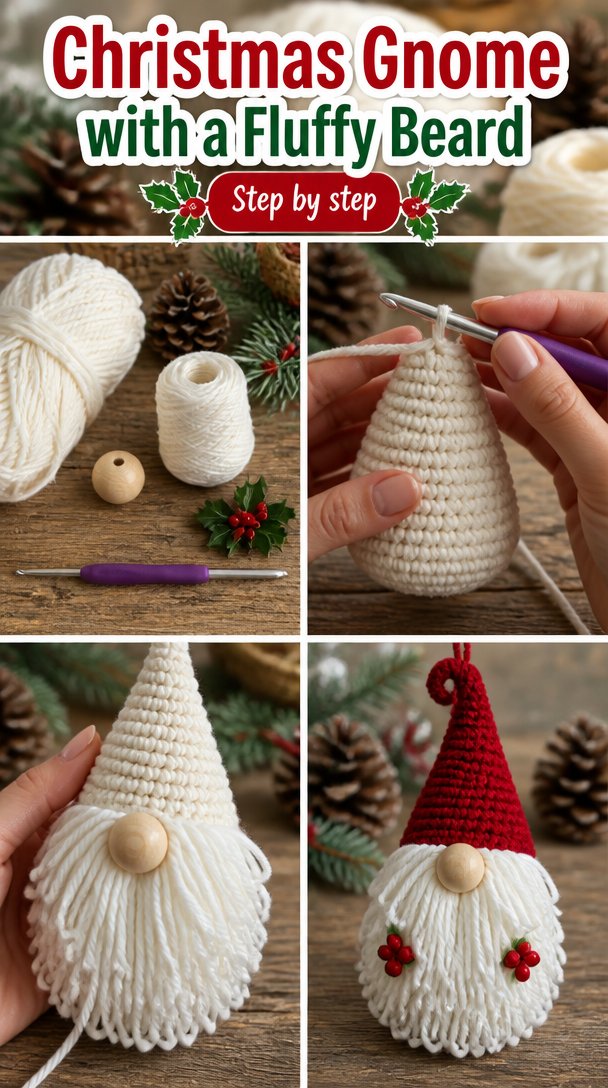
This Christmas gnome has a steady rhythm that suits a rainy evening on the couch or a long fall afternoon near the window. You work the body in rounds, feel the fabric become firmer as the shape rises, then slow down for the hat and small finishing details. The beard adds a different texture at the end, so the project never feels completely repetitive.
I especially like the way the first rows curl slightly before the piece gains enough weight to settle. That little curl is normal, and it gives your hands something gentle to do while the form takes shape. After about ten minutes, my fingers warmed up and the quiet click of the hook began to feel almost like a metronome.
The finished gnome fits comfortably on a mantel, a bookshelf, or the basket beside an armchair. You can make one in traditional winter colors, choose a soft neutral palette for a quiet home, or use a bright hat that brings a little cheer to the kitchen. The project asks for attention, but not for strain.
How Christmas Gnome with Fluffy Beard Comes Together
The body begins with a magic ring, also called a magic circle, so you can close the center neatly. You work mostly in single crochet, abbreviated sc, which creates a sturdy fabric that holds its shape and keeps the stuffing from showing through. A single crochet uses a compact motion: insert the hook, yarn over, pull up a loop, yarn over again, and pull through both loops.
You will shape the body with increases and decreases. An increase places two single crochet stitches into one stitch, while a decrease joins two stitches together. The hat uses half double crochet, abbreviated hdc, for a little more height and a soft, flexible surface.
This pattern uses US crochet terms. UK readers often find these posts too, and the same word can mean a different stitch there, so please check your labels before beginning. The pattern has a simple stitch multiple and clear counts, which makes it friendly for a newer crocheter while still giving an experienced maker enough room to settle into the rhythm.
Plan on about three to five hours, spread over several evenings if you like. The fiddliest part is attaching the beard and face details, not the crocheting itself. You can pause after any round and leave the project safely in your basket.
Pattern at a Glance
Here are the details I used for my finished Christmas gnome.
- Skill level: Easy, with basic shaping and small finishing details
- Finished size: About 8 inches tall by 5 inches wide (20 cm tall by 13 cm wide)
- Gauge: 18 single crochet and 20 rounds measure 4 inches (10 cm)
- Yarn: Worsted weight (weight 4, medium), about 250 total yards, or 2 skeins of 125 yards per 100 g skein
- Hook: H-8 (5.0 mm)
- Other supplies: Polyester fiberfill, yarn needle, scissors, stitch marker, 2 safety eyes or black yarn, and a small piece of faux fur yarn for the beard
- Stitch multiple: Body shaping begins with 6 stitches and expands in multiples of 6
- Estimated time: About 3 to 5 hours
Gathering Your Materials
- Worsted weight yarn, weight 4 medium, in about 250 total yards, or 2 skeins of 125 yards per 100 g skein. Choose acrylic for easy washing and a firm shape. A medium acrylic from Lion Brand is one easy-to-find example.
- Small amount of bulky or super bulky faux fur yarn for the beard, about 25 yards. You can swap in brushed worsted weight yarn, thick roving yarn, or several strands of white yarn held together.
- H-8 (5.0 mm) crochet hook. A half size up or down is fine depending on your tension, though changing the hook can change the finished size.
- Polyester fiberfill, about 3 ounces (85 g), for the body and hat. Use a little more or less as the shape requires.
- Yarn needle with a large eye for weaving in the ends and sewing the pieces together.
- Sharp scissors, easy to find in most sewing baskets.
- One stitch marker, optional, for marking the first stitch of each round.
- Tape measure for checking gauge and the finished height.
- Two small safety eyes or a small amount of black yarn for embroidered eyes. Embroidered eyes are a good choice if the gnome may be handled by a young child.
- Small amount of pink, peach, or tan worsted weight yarn for the nose.
- Optional felt circle or scrap of cardboard for the base, if you want the gnome to stand more firmly.
Gauge is worth the twenty minutes here because it controls the density of the body. Make a small swatch in single crochet, wash it if you plan to wash the finished gnome, and measure after it dries. If your stitches are loose, stuffing may peek through, so try a smaller hook. If your stitches are tight, move up to I-9 (5.5 mm).
You can substitute another worsted weight acrylic yarn without trouble as long as the yardage and fabric feel stay close. A cotton blend will make a firmer, heavier gnome, while wool will feel warm and springy. Untreated wool can felt with warm water and agitation, so choose superwash wool if you want machine washing. Keep the faux fur close to the same thickness, but do not worry about matching its exact fiber.
Step by Step
- Difficulty and foundation: This is an easy project with basic shaping. The body uses a stitch multiple of 6, beginning with 6 stitches in a magic ring. Place a stitch marker in the first stitch of each round if that helps you keep your place.
- Make a magic ring, also called a magic circle. Chain 1, then work 6 single crochet stitches into the ring. Pull the yarn tail gently to close the center, then slip stitch to the first single crochet. You now have 6 stitches.
- For Round 2, chain 1 and work 2 single crochet stitches in each stitch around. This is an increase round, and you will finish with 12 stitches. Slip stitch to the first single crochet before beginning the next round.
- For Round 3, chain 1, then repeat single crochet in the next stitch and 2 single crochet in the following stitch around. This gives you 18 stitches. The fabric may cup slightly, which is helpful for the base.
- For Round 4, chain 1 and repeat single crochet in each of the next 2 stitches, then 2 single crochet in the next stitch around. You will have 24 stitches. Keep your tension even rather than pulling the yarn tight after every stitch.
- For Rounds 5 through 12, chain 1 and work 1 single crochet in each stitch around. Each round has 24 stitches. The sides will begin to rise, and the small cup will start looking like a little body.
- For Round 13, chain 1, then repeat single crochet in the next 2 stitches and single crochet two together in the next 2 stitches. A single crochet two together is a decrease that turns two stitches into one. Repeat around for 18 stitches.
- For Round 14, chain 1, then repeat single crochet in the next stitch and single crochet two together in the next 2 stitches around. You will have 12 stitches. Add a small amount of polyester fiberfill now, placing it firmly into the bottom and sides without packing it hard.
- For Round 15, chain 1 and work single crochet two together around. You will have 6 stitches. Add a little more fiberfill before the opening becomes too small, shaping the body with your fingers as you go.
- Cut the yarn, leaving a 10-inch tail. Thread the tail onto a yarn needle, weave it through the front loops of the remaining 6 stitches, and pull gently to close. Knot securely, then weave in the end through the body. The body should feel full but still soft when you press it.
- For the hat, make a magic ring with 6 single crochet stitches. Work Round 2 with 2 single crochet in each stitch for 12 stitches. For Round 3, repeat single crochet in the next stitch and 2 single crochet in the next stitch around for 18 stitches.
- Continue the hat in half double crochet, abbreviated hdc. A half double crochet uses a yarn over before inserting the hook, then you pull through the stitch, yarn over again, and pull through all three loops. Work 1 hdc in each stitch around for Rounds 4 through 10, keeping 18 stitches in every round.
- Shape the hat brim by working one round of single crochet in each of the 18 stitches. Fasten off with a long tail. Lightly fill the hat so it keeps a gentle point, but leave the lower edge flexible. Sew the hat to the top of the body with the yarn needle, taking small stitches around the brim.
- Make the nose with a small magic ring and 6 single crochet stitches. Work 2 single crochet in each stitch for 12 stitches, then fasten off. Add a tiny pinch of fiberfill if you want a rounded nose. Sew it to the center of the body just below the hat brim.
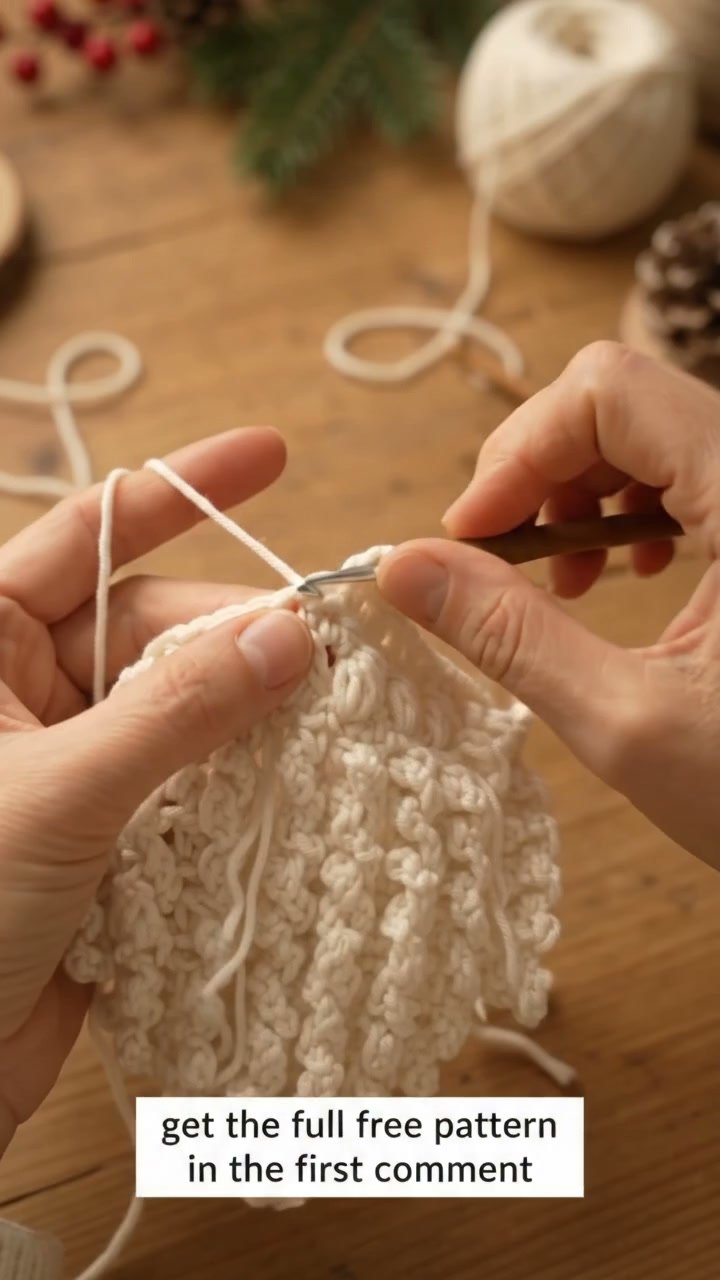
- Attach the beard beneath the nose. Cut several equal lengths of faux fur yarn, about 7 inches each, fold each strand in half, and pull the folded loop through a stitch with your hook. Draw the loose ends through the loop and tighten gently. Add rows until the beard feels full, then trim the lower edge carefully into a soft point.
- Add the eyes with safety eyes or embroidered black yarn. If you use safety eyes, push the backs through firmly and check them before giving the gnome away. Small parts and long loose stitches are unsafe for children under three, so embroidered features are the safer choice for a young child.
- Finish by checking the shape and weaving in every loose end. If your acrylic yarn needs shaping, block cold by arranging the piece gently and letting it dry completely. Do not press acrylic with a hot iron because heat can melt or flatten the fibers.
Where Christmas Gnome with Fluffy Beard Finds Its Place
The finished gnome sits nicely on a mantel beside a small bowl of pinecones, though mine spent its first week on the bookshelf where I could see the beard while I worked at my desk. It also fits into a holiday basket, a guest room, or the corner of a kitchen shelf. The compact size makes it easy to move when you are dusting or changing seasonal decorations.
For a gift, tuck the gnome into a small fabric basket with tea, cocoa, or a pair of warm socks. You can make the hat in the recipient’s favorite color and embroider a tiny initial on the back. A handmade decoration like this feels personal without asking the recipient to find a special place for something large.
If you plan to sell finished gnomes, my own policy is simple: I am happy to sell items I personally make from my patterns, with clear credit to the pattern source when required.
Caring for Christmas Gnome with Fluffy Beard
This version uses acrylic worsted weight yarn, so wash it on a gentle cycle with cold water and a mild detergent. Place the gnome in a mesh laundry bag if the beard has a long pile. Hand washing in cool water gives the most control, especially when the face includes safety eyes or sewn-on details.
Press out water with a towel and dry the gnome flat. Never hang it wet, because the weight can stretch the body and pull at the beard. Reshape the hat and body while damp, then let everything dry fully before returning it to a shelf.
Acrylic usually holds its shape well, but heat can damage it. Avoid a hot iron and do not place the gnome against a heater. If you want to block it, use cool water and gentle pinning or shaping, then let it air dry.
Store the gnome folded or standing in a breathable cotton bag rather than sealed plastic. Keep leftover yarn with its label so you have the dye lot if you make a second gnome later. Cedar and lavender are useful wool-storage choices, but this acrylic project does not need moth protection in the same way wool does.
Small Ways to Make Christmas Gnome with Fluffy Beard Your Own
Try a thicker yarn if you want a larger gnome. A bulky yarn will increase the finished size and give the body a softer, heavier drape, but you will need a larger hook and more stuffing. A thinner yarn creates a smaller figure with firmer details, and you may enjoy it as a tree ornament if you add a hanging loop.
Play with color blocking. A cream body with a rust-colored hat feels gentle and autumnal, while a deep green hat gives the figure a traditional holiday look. You can also make several small gnomes with the same body color and different hats for a collected shelf display.
For a denser fabric, replace the hat’s half double crochet with single crochet. The hat will take longer and feel less drapey, but it will hold a sharper point and resist stretching. If you want a taller, airier hat, use double crochet, abbreviated dc, and check the shape after every few rounds.
Resize the body by keeping the increase pattern in multiples of 6. Add one or two even rounds for a taller gnome, or stop after fewer even rounds for a short, round figure. A simple single crochet border around a felt base can also help the gnome stand securely.
For gifting, match the beard texture to the recipient. A fluffy faux fur beard feels playful, while a brushed cotton beard looks calmer and holds up well in a home with pets. If the gnome will be handled by a baby, leave off safety eyes and any loose beard strands, since small parts and long loose stitches need special care around children under three.
Frequently Asked Questions About Christmas Gnome with Fluffy Beard
Can I use a different hook size for Christmas Gnome with Fluffy Beard?
Yes, you can use a different hook size if your tension needs it. Start with H-8 (5.0 mm), then move down for a denser fabric or up to I-9 (5.5 mm) if your stitches feel tight. Check that the stuffing does not show through. A different hook will also change the finished size.
What yarn can I substitute for the recommended yarn?
Use another worsted weight acrylic yarn with a similar yardage and soft, medium fabric. Cotton will make the gnome firmer and heavier, while superwash wool will feel springier and tolerate more washing. Avoid untreated wool if you do not want felting. For the beard, any soft yarn can work if you secure and trim it carefully.
What should I do if I find a mistake several rows later?
First, pause and look at the stitch count and shape before pulling anything out. If the gnome still looks balanced, you may be able to correct the next round quietly. If a missing stitch changes the shape, insert your hook into the last correct round and pull back one stitch at a time. The yarn will loosen, and you can rebuild the round calmly.
Is this gnome pattern suitable for a beginner?
Yes, this project suits a beginner who knows chain, slip stitch, single crochet, and basic increases and decreases. The body uses repeating rounds, and the hat adds half double crochet after the main shape is complete. The beard and face take patience, but they do not require advanced techniques.
How long does Christmas Gnome with Fluffy Beard take to crochet?
Most makers can finish it in about 3 to 5 hours, depending on pace and how much time they spend shaping the beard and sewing the pieces together. You may prefer to divide the work across several evenings. The body can be finished in one sitting, while the finishing details feel easier when your hands are fresh.
Does this pattern use US or UK crochet terms?
This pattern uses US crochet terms throughout. The main stitch is single crochet, abbreviated sc, and the hat uses half double crochet, abbreviated hdc. In UK terminology, those names refer to different stitches, so check your pattern language before beginning if you usually crochet from UK instructions.
Taking It Slow
Give the gnome the amount of attention you have available, whether that means one round before bed or a longer Sunday afternoon with the yarn across your knees. You can pause, count again, and return tomorrow without losing the quiet thread of the work. The shape will wait for you, and your hands will remember more than you think.
—META—
SEO Title: Christmas Gnome with Fluffy Beard Pattern
Meta Description: Crochet a Christmas Gnome with Fluffy Beard using simple US stitches, soft yarn, and calm step-by-step shaping for a handmade seasonal accent.
Slug: christmas-gnome-fluffy-beard
Category: Crochet Patterns
Tags: crochet, christmas decor, crochet gnome, amigurumi, handmade gifts
Image Alt Text: Christmas gnome crochet body, hat, and fluffy beard supplies
Finished crochet Christmas gnome with a pointed hat and soft white beard
Hands attaching a fluffy beard to a small crocheted Christmas gnome
Pinterest Title: Fluffy Beard Christmas Gnome
Pinterest Description: Make a soft Christmas gnome with a fluffy beard and simple crochet shaping. This calm pattern suits slow evenings and handmade holiday decorating.

Christmas Gnome with Fluffy Beard
- Total Time: 300 minutes
Description
Crochet a Christmas Gnome with Fluffy Beard using simple US stitches, soft yarn, and calm step-by-step shaping for a handmade seasonal accent.
Materials
- Worsted weight yarn, about 250 total yards, or 2 skeins of 125 yards per 100 g skein
- Small amount of bulky or super bulky faux fur yarn for the beard, about 25 yards
- H-8 (5.0 mm) crochet hook
- Polyester fiberfill, about 3 ounces (85 g)
- Yarn needle with a large eye
- Sharp scissors
- One stitch marker (optional)
- Tape measure
- Two small safety eyes or a small amount of black yarn for embroidered eyes
- Small amount of pink, peach, or tan worsted weight yarn for the nose
- Optional felt circle or scrap of cardboard for the base
Instructions
- Make a magic ring, chain 1, and work 6 single crochet stitches into the ring.
- Pull the yarn tail gently to close the center, then slip stitch to the first single crochet.
- For Round 2, chain 1 and work 2 single crochet stitches in each stitch around (12 stitches).
- For Round 3, chain 1, then repeat single crochet in the next stitch and 2 single crochet in the following stitch around (18 stitches).
- For Round 4, chain 1 and repeat single crochet in each of the next 2 stitches, then 2 single crochet in the next stitch around (24 stitches).
- For Rounds 5 through 12, chain 1 and work 1 single crochet in each stitch around (24 stitches).
- For Round 13, chain 1, then repeat single crochet in the next 2 stitches and single crochet two together in the next 2 stitches (18 stitches).
- For Round 14, chain 1, then repeat single crochet in the next stitch and single crochet two together in the next 2 stitches (12 stitches). Add a small amount of polyester fiberfill.
- For Round 15, chain 1 and work single crochet two together around (6 stitches). Add a little more fiberfill.
- Cut the yarn, leaving a 10-inch tail. Weave it through the front loops of the remaining 6 stitches and pull gently to close.
- Make the hat with a magic ring of 6 single crochet stitches, increase to 12 stitches for Round 2, and to 18 stitches for Round 3.
- Work in half double crochet for Rounds 4 through 10 (18 stitches each round).
- Shape the hat brim with one round of single crochet in each of the 18 stitches. Fasten off with a long tail.
- Make the nose with a small magic ring and 6 single crochet stitches, increase to 12 stitches, then fasten off.
- Sew the nose to the center of the body just below the hat brim.
- Attach the beard beneath the nose using several lengths of faux fur yarn.
- Add the eyes with safety eyes or embroidered black yarn.
- Finish by checking the shape and weaving in every loose end.
Notes
Adjust colors and textures to personalize your gnome for different themes or recipients. Check gauge to ensure proper size and shaping.
- Active Time: 180 minutes