

The hook makes a small, steady pull through each loop as late afternoon light settles across the yarn basket. Soon the bear’s little face begins to appear, and the growing pencil case rests with a gentle weight across your knees. Crochet an Adorable Bear Pencil Case is a small project with enough personality to keep your hands interested, yet enough repetition to let your thoughts soften. I made mine over several quiet evenings, usually beside a mug of coffee on the couch. The first rows curled a little, then the fabric grew sturdy enough to settle flat in my hand.
What Makes Crochet an Adorable Bear Pencil Case So Soothing to Crochet
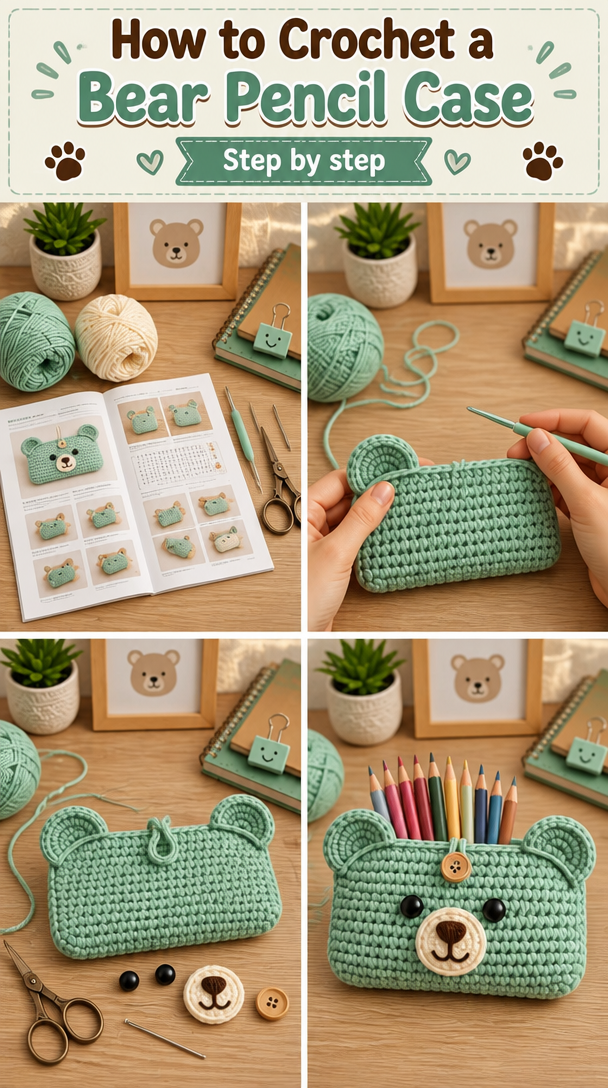
This pencil case has a calm rhythm because most of the body uses double crochet, a taller stitch that grows quickly without feeling rushed. You make a simple rectangle, fold it, and add a small bear face to the front. The shaping stays manageable, so you can pay attention to the yarn sliding over your fingers and the quiet click of the hook instead of holding a complicated chart in your mind.
I like projects that give you a clear little destination. A pencil case feels useful, but it also leaves room for softness. You can crochet it on a rainy evening with the couch lamp on, carry it to the porch during a warm summer morning, or keep it in the basket beside your favorite armchair for those long fall evenings when your hands want something gentle to do.
The bear details add a pleasant pause in the middle. You stop making rows for a moment, sew on the ears and eyes, and watch a face take shape. The work feels especially satisfying after the first ten minutes, when your hands warm up and the motion becomes familiar.
This is not a one-sitting project for most people. Plan on two or three evenings, depending on your pace and how carefully you sew the face. That slower timing suits the piece. It gives you something small to return to without making the project feel like an assignment.
How Crochet an Adorable Bear Pencil Case Comes Together
You will begin with a foundation chain, which is the starting row of chain stitches. The body grows in simple double crochet rows, with a narrow stripe near the top to give the bear a little contrast. You will fold the rectangle, seam the sides, and add a flap with a button closure.
A double crochet, abbreviated dc, uses a yarn over before you pull through the loops. It makes a fabric that feels flexible but still holds pencils neatly. I chose it here because single crochet would make the case firmer and slower to build, while double crochet gives a softer hand without leaving large openings.
This pattern uses US crochet terms. UK readers often find these posts too, and the same word can mean a different stitch there, so please use the US meaning of double crochet throughout. The pattern suits a confident beginner, and a more experienced crocheter can finish it while listening to music or watching a familiar show.
Pattern at a Glance
Here is the whole project in one quiet little view.
- Skill level: confident beginner
- Finished size: 8 inches long by 3.5 inches wide (20 cm by 9 cm)
- Gauge: 14 double crochet and 8 rows measure 4 inches (10 cm)
- Yarn: worsted weight (weight 4, medium), about 180 total yards (165 m), or 2 skeins of about 100 g each
- Hook size: H-8 (5.0 mm)
- Other supplies: yarn needle, scissors, stitch marker, tape measure, 1 button, and sewing thread
- Stitch multiple: any multiple of 2 stitches plus 2 for the turning chain
- Estimated time: 2 to 3 evenings, or about 3 to 5 hours
What You Need for This Project
- Worsted weight (weight 4, medium) cotton yarn, about 180 total yards, or two 100 g skeins with about 170 yards per skein. Choose one main color and a small amount of a contrast color for the muzzle and ears (easy to find)
- A worsted weight cotton yarn such as Lily Sugar’n Cream as one example, though any similar cotton yarn can work
- H-8 (5.0 mm) crochet hook, with half a size up or down fine depending on your tension
- Yarn needle for sewing pieces together and weaving in the ends
- Scissors
- Stitch marker, optional, for marking the first stitch when you work the flap
- Tape measure
- One medium washable button, about 5/8 inch (1.5 cm) wide
- Small amount of sewing thread in a matching color for attaching the button securely
Cotton makes sense for this project because it gives the case a firm, dependable shape and handles regular washing better than a delicate fiber. A swatch takes about twenty minutes, but it tells you whether the finished case will stay near 8 inches by 3.5 inches. If your swatch measures fewer than 14 double crochet across 4 inches, your stitches are larger, so try a smaller hook. If it measures more, try a larger hook.
You can substitute another worsted weight yarn, including an acrylic or cotton blend, but expect the fabric to change slightly. Acrylic can feel softer and lighter, while cotton usually gives more structure. If you choose acrylic, keep it away from a hot iron because acrylic melts under high heat. Block it cold or use gentle steam from a distance.
Step by Step
- Difficulty and repeat: This is a confident beginner pattern. The stitch multiple is any multiple of 2 stitches plus 2 for the turning chain. You will make the sample with 28 foundation chains.
- With the main color, make a foundation chain of 28 chains. A chain, abbreviated ch, forms a small looped foundation. Keep the chain relaxed; if it pulls tight, use a hook one size larger just for the chain.
- Row 1: Chain 2 to turn. Work 1 double crochet in the third chain from the hook and in each chain across. The chain 2 does not count as a stitch. You should have 26 double crochet.
- Rows 2 through 13: Chain 2 and turn. Work 1 double crochet in each stitch across, placing the last stitch into the top of the final double crochet from the previous row. You will have 26 double crochet at the end of every row.
- At the end of Row 13, change to the contrast color by completing the final yarn over of the last double crochet with the new yarn. This keeps the color change neat. Work Rows 14 and 15 in the contrast color, with 26 double crochet in each row.
- Change back to the main color at the end of Row 15. Work Rows 16 through 25 in the main color, keeping 26 double crochet in every row. Let the fabric rest in your palm from time to time; it should feel flexible, not stiff.
- Make the flap: Chain 2 and turn. Work 1 double crochet in each of the first 26 stitches. Repeat this row for 4 rows, ending with 26 double crochet on Row 29. The flap will extend from one short edge of the rectangle.
- Shape the flap on Row 30. Chain 2 and turn, then work 1 double crochet in the first stitch, skip 1 stitch, and work 1 double crochet in each stitch across. You will have 25 double crochet. This small decrease begins the rounded end.
- On Row 31, chain 2 and turn. Work 1 double crochet in the first stitch, skip 1 stitch, and work 1 double crochet across the remaining stitches. You will have 24 double crochet. On Row 32, repeat the same decrease for 23 double crochet.
- On Row 33, chain 2 and turn. Work 1 double crochet in each stitch across, with 23 double crochet. Fasten off and leave a 12-inch (30 cm) tail for sewing if you prefer to use the tail for part of the finishing.
- Make two small bear ears in the contrast color. For each ear, make a magic ring, also called a magic circle, by wrapping the yarn into a loose loop. Work 6 single crochet into the ring, pull the center closed, and join with a slip stitch. A single crochet, or sc, makes a short, firm stitch. A slip stitch, or sl st, joins without adding height.
- Fold the rectangle so the lower edge sits beneath the flap. Use the main-color yarn and a yarn needle to sew the two side seams, working through both layers. Leave the flap open while you sew. Stitch slowly and keep the seam even.
- Sew the ears near the upper corners of the front, just below the flap. Add two small embroidered eyes and a simple oval nose with the contrast yarn. If you use a button instead of embroidery, attach it firmly and check that no thread loop remains loose.
- Mark the button position by closing the flap and placing the button beneath the center of the flap. Sew it on with matching sewing thread, then weave in every yarn tail. To weave in the ends means passing each tail back and forth through nearby stitches before trimming it close.
- Finish with a narrow border if you like. Join the main color at one lower corner, work single crochet evenly around the opening and flap, and join with a slip stitch. If the edge ripples, remove a few stitches and space them farther apart. If it pulls, add one extra stitch at a corner.
- If a mistake appears, pause before pulling anything apart. Count the stitches at the row end and look for the small V that marks the final stitch. If you missed one several rows back, gently pull back to that place, correct it, and continue. I once found a missing stitch after three rows and undoing those rows took less time than trying to hide the crooked edge.
- Block the case only if the fiber suits it. For cotton, lightly dampen the finished piece, smooth it to 8 inches by 3.5 inches, and let it dry flat. Blocking means shaping damp crochet as it dries. Avoid hot ironing, especially with acrylic, and let the case dry completely before adding pencils.
Where This Piece Finds Its Place
The finished bear pencil case fits easily in a school bag, desk drawer, or the basket beside the living room armchair. Mine holds pencils, a small ruler, and the stubby eraser I always seem to misplace. The cotton fabric gives it enough body to stand open on a desk without feeling rigid.
It also makes a sweet small gift. Add colored pencils for a child, watercolor pencils for a friend who sketches, or a few good pens for someone starting a new notebook. For a holiday gift, tuck it inside a larger project bag with a handwritten note. A simple handmade case feels personal without asking you to make an entire collection.
Keep the button securely sewn, especially if you give the case to a young child. Small parts and long loose stitches are unsafe for children under three. This project works best for older children and adults who can use the closure safely.
Caring for Crochet an Adorable Bear Pencil Case
Because this version uses cotton, wash it by hand or on a gentle cycle with cold or warm water. Use a mild detergent and place the case in a mesh laundry bag if you use the washing machine. Press out extra water with a towel rather than twisting the fabric.
Dry the case flat and reshape the corners while it is damp. Never hang it wet, because the weight of the water can stretch the cotton and pull the button area out of shape. If the case needs fresh shaping, block it cold on a towel and let it dry naturally.
Store it folded or standing flat in a breathable drawer rather than pressed under heavy books. Cotton does not need cedar or lavender for moth protection in the same way wool does, but a clean, dry storage place keeps the fabric pleasant. Keep any leftover yarn with its label so you have the fiber information and dye lot if you make a matching piece later.
If you substitute acrylic, follow the same gentle washing advice and avoid a hot iron. Acrylic melts under direct heat, so use cold blocking or very light steam held well above the fabric.
Small Ways to Make It Your Own
- Try a different worsted weight color pairing. A warm brown bear with a cream muzzle feels traditional, while mustard and navy suit a fall desk. Color blocking also lets you use small leftovers without changing the structure.
- Use a thicker yarn with a larger hook for a roomier case. The fabric will grow in both width and length, and the finished piece may feel softer with more drape. A thinner yarn will make a smaller, lighter case.
- Swap the double crochet for single crochet if you want a denser fabric. Single crochet takes longer and feels firmer, but it keeps tiny pencils or crochet hooks from pressing through the openings.
- Resize the body by changing the foundation chain in multiples of 2 plus 2. Add or remove rows to change the length, and remember that the flap needs enough rows to cover the opening.
- Add a simple single crochet border in a third color, or embroider a flower, star, or tiny heart beside the bear’s face. For a gift, place a name tag inside rather than adding a loose decoration to the outside.
These changes do not need to happen all at once. One color shift or a different button can make the case feel like yours while preserving the calm, familiar construction.
Frequently Asked Questions About Crochet an Adorable Bear Pencil Case
Can I use a different hook size for this bear pencil case?
Yes, you can use a different hook size, but the finished measurements may change. Try H-8 (5.0 mm) first, then move down to a G-6 (4.0 mm) for denser stitches or up to an I-9 (5.5 mm) for a softer fabric. Check your gauge before beginning so the case does not become unexpectedly narrow or loose.
What yarn can I substitute for the cotton?
You can substitute a similar worsted weight yarn, such as acrylic or a cotton blend. Cotton gives the pencil case its firm shape and handles washing well, while acrylic feels softer and may drape more. Choose yarn with about 170 yards per 100 g skein when possible, and make a gauge swatch before committing to the full project.
What should I do if I find a mistake several rows later?
Pull back calmly to the row where the mistake began, then rebuild the rows one at a time. Look for the missing V-shaped stitch at the row edge, since that is where mistakes often hide. If the error does not affect the shape and the case is for personal use, you can also leave it. Handmade fabric does not need perfect silence.
Is this bear pencil case suitable for a beginner?
Yes, this project suits a confident beginner who knows how to make chain, double crochet, single crochet, slip stitch, and a magic ring. The rows repeat, and the flap uses only simple decreases. The bear face and side seams require patience, but neither step demands advanced shaping.
How long does this crochet pencil case take?
Expect about 3 to 5 hours, spread over 2 to 3 evenings. The body works fairly quickly, while sewing the seams, ears, button, and face takes the slower portion. If you crochet at a relaxed pace or stop often to count, give yourself an extra evening without treating that as a problem.
Does this pattern use US or UK crochet terms?
This pattern uses US crochet terms. In US terminology, double crochet means dc, while UK terminology uses double crochet for a different taller stitch. The abbreviations here are chain, slip stitch, single crochet, and double crochet, so readers familiar with UK patterns should take a moment to translate them before beginning.
Taking It Slow
Let the pencil case take the time it takes. The fabric will grow through small movements, one loop after another, and a missed stitch can be corrected without undoing the quiet part of the evening. Set the work down when your hands need rest, return when the yarn feels inviting, and allow the finished bear to carry a little evidence of your own careful pace.
—META—
SEO Title: Crochet an Adorable Bear Pencil Case
Meta Description: Crochet an Adorable Bear Pencil Case with cotton yarn, simple rows, and a sweet finish for calm evenings and useful handmade storage.
Slug: adorable-bear-pencil-case
Category: Crochet Patterns
Tags: crochet, pencil case, bear crochet, beginner crochet, cotton yarn, handmade gifts
Image Alt Text: Bear pencil case crochet project resting on a cozy lap
Close view of double crochet rows and bear face details
Finished crochet bear pencil case with pencils inside
Pinterest Title: Adorable Bear Pencil Case Pattern
Pinterest Description: Crochet a small bear pencil case with simple stitches and a gentle, useful shape. A calm handmade project for quiet evenings or thoughtful gifts.

Crochet an Adorable Bear Pencil Case
- Total Time: 240 minutes
Description
Crochet an Adorable Bear Pencil Case with cotton yarn, simple rows, and a sweet finish for calm evenings and useful handmade storage.
Materials
- Worsted weight (weight 4, medium) cotton yarn, about 180 total yards (2 skeins of about 100 g each)
- H-8 (5.0 mm) crochet hook
- Yarn needle
- Scissors
- Stitch marker (optional)
- Tape measure
- One medium washable button, about 5/8 inch (1.5 cm) wide
- Small amount of sewing thread in a matching color
Instructions
- With the main color, make a foundation chain of 28 chains.
- Row 1: Chain 2 to turn. Work 1 double crochet in the third chain from the hook and in each chain across (26 double crochet).
- Rows 2 through 13: Chain 2 and turn. Work 1 double crochet in each stitch across (26 double crochet at the end of each row).
- At the end of Row 13, change to the contrast color. Work Rows 14 and 15 in the contrast color (26 double crochet in each row).
- Change back to the main color at the end of Row 15. Work Rows 16 through 25 in the main color (26 double crochet in each row).
- Make the flap: Chain 2 and turn. Work 1 double crochet in each of the first 26 stitches for 4 rows.
- Shape the flap on Row 30 by chaining 2, turning, and working 1 double crochet in the first stitch, skipping 1 stitch, and then working 1 double crochet in each of the remaining stitches (25 double crochet).
- On Row 31, chain 2 and turn, then work 1 double crochet in the first stitch, skip 1 stitch, and work 1 double crochet across (24 double crochet).
- On Row 32, repeat the same decrease for 23 double crochet.
- On Row 33, chain 2 and turn. Work 1 double crochet in each stitch across (23 double crochet). Fasten off and leave a 12-inch tail for sewing if preferred.
- Make two small bear ears in the contrast color. For each ear, make a magic ring, work 6 single crochet into the ring, pull the center closed, and join with a slip stitch.
- Fold the rectangle so the lower edge sits beneath the flap. Use the main-color yarn and a yarn needle to sew the two side seams, leaving the flap open while sewing.
- Sew the ears near the upper corners of the front, just below the flap. Add two embroidered eyes and a simple oval nose with the contrast yarn or attach a button.
- Mark the button position by closing the flap and placing the button beneath the center of the flap. Sew it on with matching sewing thread.
- Finish with a narrow border if desired by joining the main color at one lower corner and working single crochet evenly around the opening and flap.
- Block the case if needed by lightly dampening it and letting it dry flat.
Notes
Keep the button securely sewn, especially if giving the case to a young child. Small parts and long loose stitches are unsafe for children under three. This project is suitable for older children and adults.
- Active Time: 180 minutes