This post contains Amazon affiliate links. As an Amazon Associate I earn from qualifying purchases.
There’s a special moment when warm light dances across smooth surfaces, casting gentle shadows that flicker in and out of focus. As you sit down to create your glass pebble lantern, the world outside fades. Each pebble, cool and glossy in your hands, carries whispers of tranquility. You feel the texture of the glass under your fingertips, inviting you into a space where creation flows naturally. The process becomes a meditation, guiding you toward a soft glow that lights your heart as much as your space.
The Heart Behind This DIY
Creating a glass pebble lantern is not just about assembling materials. It’s about embracing a journey where each step brings relaxation and mindfulness. When you gather pebbles, you engage your senses—visually connecting with radiant colors and unique shapes. Every choice speaks of personal taste, leading you to slow down and notice.
As you work, your mind clears. The soothing repetition of placing each pebble creates a rhythm. This project captures the quiet joy of creation, reminding you that the act of making can ground you amidst chaos. The gentle light from the lantern becomes a symbol of peace, illuminating corners of your home and heart. In these moments, you rediscover not just the essence of crafting but also the joy of being present.
A Gentle Look at the Process
Before we delve into gathering materials, let’s explore the gentle flow of crafting a glass pebble lantern. As you prepare, imagine the experience of choosing your pebbles. There’s a subtle crunch as you pour them from the bag. Touching each one, notice the smoothness, the coolness, and the varying sizes.
When you start setting the pebbles, there’s a rhythmic dance to placing them, perhaps gluing them in a spiral or a pattern. The calm sound of glue being squeezed accompanies your focused movements. Watch how the light changes as it bounces off these vibrant surfaces. Each step is an invitation to breathe deeply, slowing down and savoring each moment in the creation of something lovely.
Materials You’ll Need
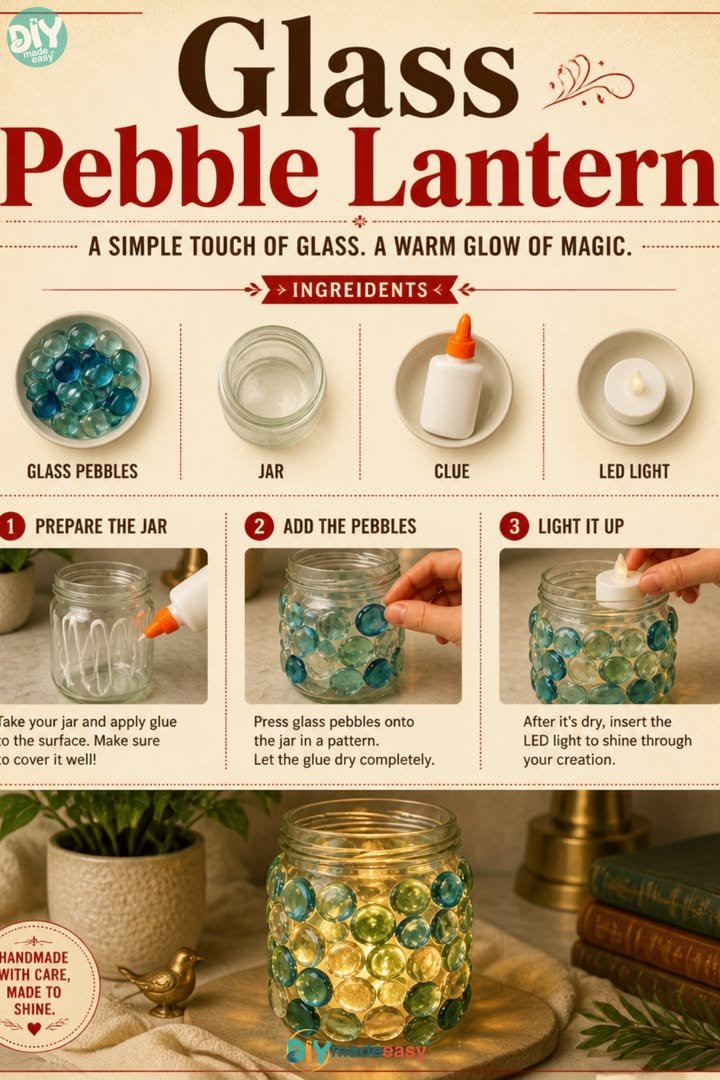
- Clear glass jar (any size you prefer)
- Glass pebbles (varied colors and sizes, easy to find at craft stores)
- Craft glue or a hot glue gun
- Tea light candle or LED tealight (for safety, optional for flickering light)
- Optional: twine or ribbon for decoration
These materials harmonize to create an inviting ambiance. You can find the glass pebbles in many colors, allowing you to curate a piece that reflects your personality and style. Choose a clear glass jar; it will beautifully showcase your pebbles. A tea light offers a warm glow, but an LED option ensures your creation remains safe and worry-free.
Step-by-Step Directions
-
Begin by selecting a clear glass jar. Set it on your work surface and take a moment to appreciate its simplicity.
-
Carefully open your package of glass pebbles. Feel their smoothness in your hands, letting their quiet colors inspire your design.

-
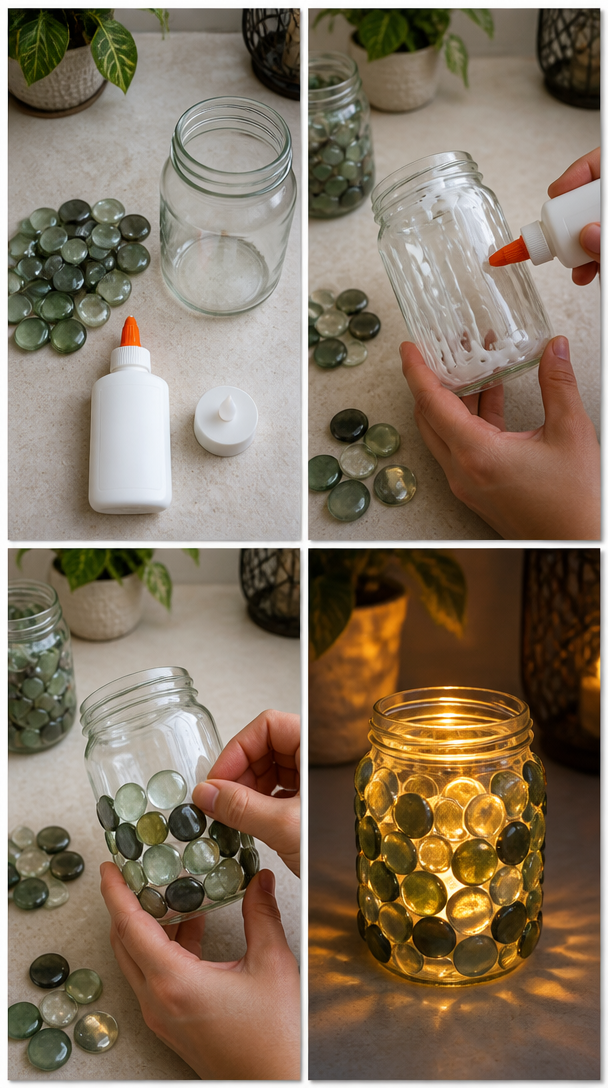
Starting from the base of the jar, apply a small drop of glue and gently press a pebble into place. Feel the slight resistance as the glue grabs the glass.
-
Continue placing pebbles around the jar, working your way up. Adjust the colors and sizes as you go, letting spontaneity guide your pattern.
-
Allow the first layer to dry completely. As you wait, breathe in the calm around you.
-
Once dry, apply glue to the next section of the jar, repeating the process. Watch as your lantern takes shape, each layer building upon the last.
-
When you reach the top, you can add a final layer or decorative elements like twine or ribbon around the rim to add a personal touch.
-
Let the entire lantern dry thoroughly. This is a beautiful time to pause, reflect, and envision the soft glow it will create.
-
Once dry, place a tea light or LED candle inside the jar. Light it and turn off the room lights to see the magic come alive.
Enjoying the Finished Piece
As you turn off the lights and sit in the soft glow of your glass pebble lantern, enjoy a sense of accomplishment. This lantern does more than beautify your space; it serves as a reminder to slow down and appreciate the little moments. Place it on a bedside table, or use it as a centerpiece during cozy gatherings.
Let it illuminate quiet evenings, or serve as a gentle nightlight. The glass pebbles reflect the flickering light, creating a tranquil atmosphere that invites relaxation. Each flicker and shadow tells the story of your creation, inviting warmth into your home.
Keeping It for Later
Caring for your glass pebble lantern is as simple as enjoying it. If you choose to use a real candle, ensure it is placed inside safely and watch it closely while lit. If an LED light is your choice, you can leave it unattended without worry.
When not in use, keep your lantern in a safe, dry place to protect it from dust. Should it gather dust later, a soft cloth can gently wipe the glass and pebbles clean. If you ever wish to refresh or change its position, you can easily relocate it, adding charm wherever it goes.
Gentle Tips & Variations
Here are some gentle invitations to make this project your own:
- Consider using pebbles that match the seasons—warm reds and oranges for autumn, cool blues for winter.
- Try arranging the pebbles in a gradient to create a soothing visual flow.
- Add a small piece of greenery—like a sprig of dried lavender or a tiny succulent—inside the jar for extra texture.
- Embellish with a personal note or a special quote on a small piece of paper, placing it inside the jar for a sweet surprise when lit.
- Experiment with different sizes of jars. A trio of varying heights can make a delightful display.
FAQs About Glass Pebble Lantern
Can I use real candles with my glass pebble lantern?
Yes, you can use real candles if you keep a close eye on them while lit. For safety, consider an LED candle for peace of mind.
Do the materials have to be specific brands or types?
No, you can use any clear glass jar and any type of glass pebbles. The idea is to create something that resonates with you.
How long does the lantern last?
With proper care, your lantern can last for many years. Keep it away from heavy wear and tear, and it will remain a cherished piece.
Can I change the design later?
Absolutely! If you want a new look, you can carefully remove the pebbles and start again. Each creation can evolve with your style.
Is this project suitable for children?
With supervision, this project can be suitable for children, especially with the use of LED candles. Ensure that they use the glue safely.
A Gentle Note Before You Go
As you finish your glass pebble lantern, take a moment to breathe deeply and reflect on your experience. This project offers not just a lovely addition to your space but a reminder of the peace found in creativity. Each time you light it, let the warm glow guide you back to that tranquil moment spent crafting. Embrace the potential of mindful making, and let your creativity continue to shine brightly in your world.
Print
Glass Pebble Lantern
- Total Time: 15 minutes
- Yield: 1 lantern
- Diet: N/A
Description
Create a beautiful glass pebble lantern that adds warmth and tranquility to your space. This project combines creativity with mindfulness, resulting in a stunning piece perfect for any setting.
Ingredients
- Clear glass jar (any size you prefer)
- Glass pebbles (varied colors and sizes)
- Craft glue or a hot glue gun
- Tea light candle or LED tealight (optional)
- Twine or ribbon for decoration (optional)
Instructions
- Begin by selecting a clear glass jar.
- Carefully open your package of glass pebbles.
- Starting from the base of the jar, apply a small drop of glue and gently press a pebble into place.
- Continue placing pebbles around the jar, working your way up.
- Allow the first layer to dry completely.
- Once dry, apply glue to the next section and repeat the process.
- When you reach the top, add a final layer or decorative elements.
- Let the lantern dry thoroughly.
- Once dry, place a tea light or LED candle inside the jar and light it.
Notes
For safety, consider using an LED candle instead of a real candle. Keep your lantern in a safe, dry place when not in use.
- Prep Time: 15 minutes
- Cook Time: 0 minutes
- Category: Craft
- Method: Crafting
- Cuisine: N/A