

This post contains Amazon affiliate links. As an Amazon Associate I earn from qualifying purchases.
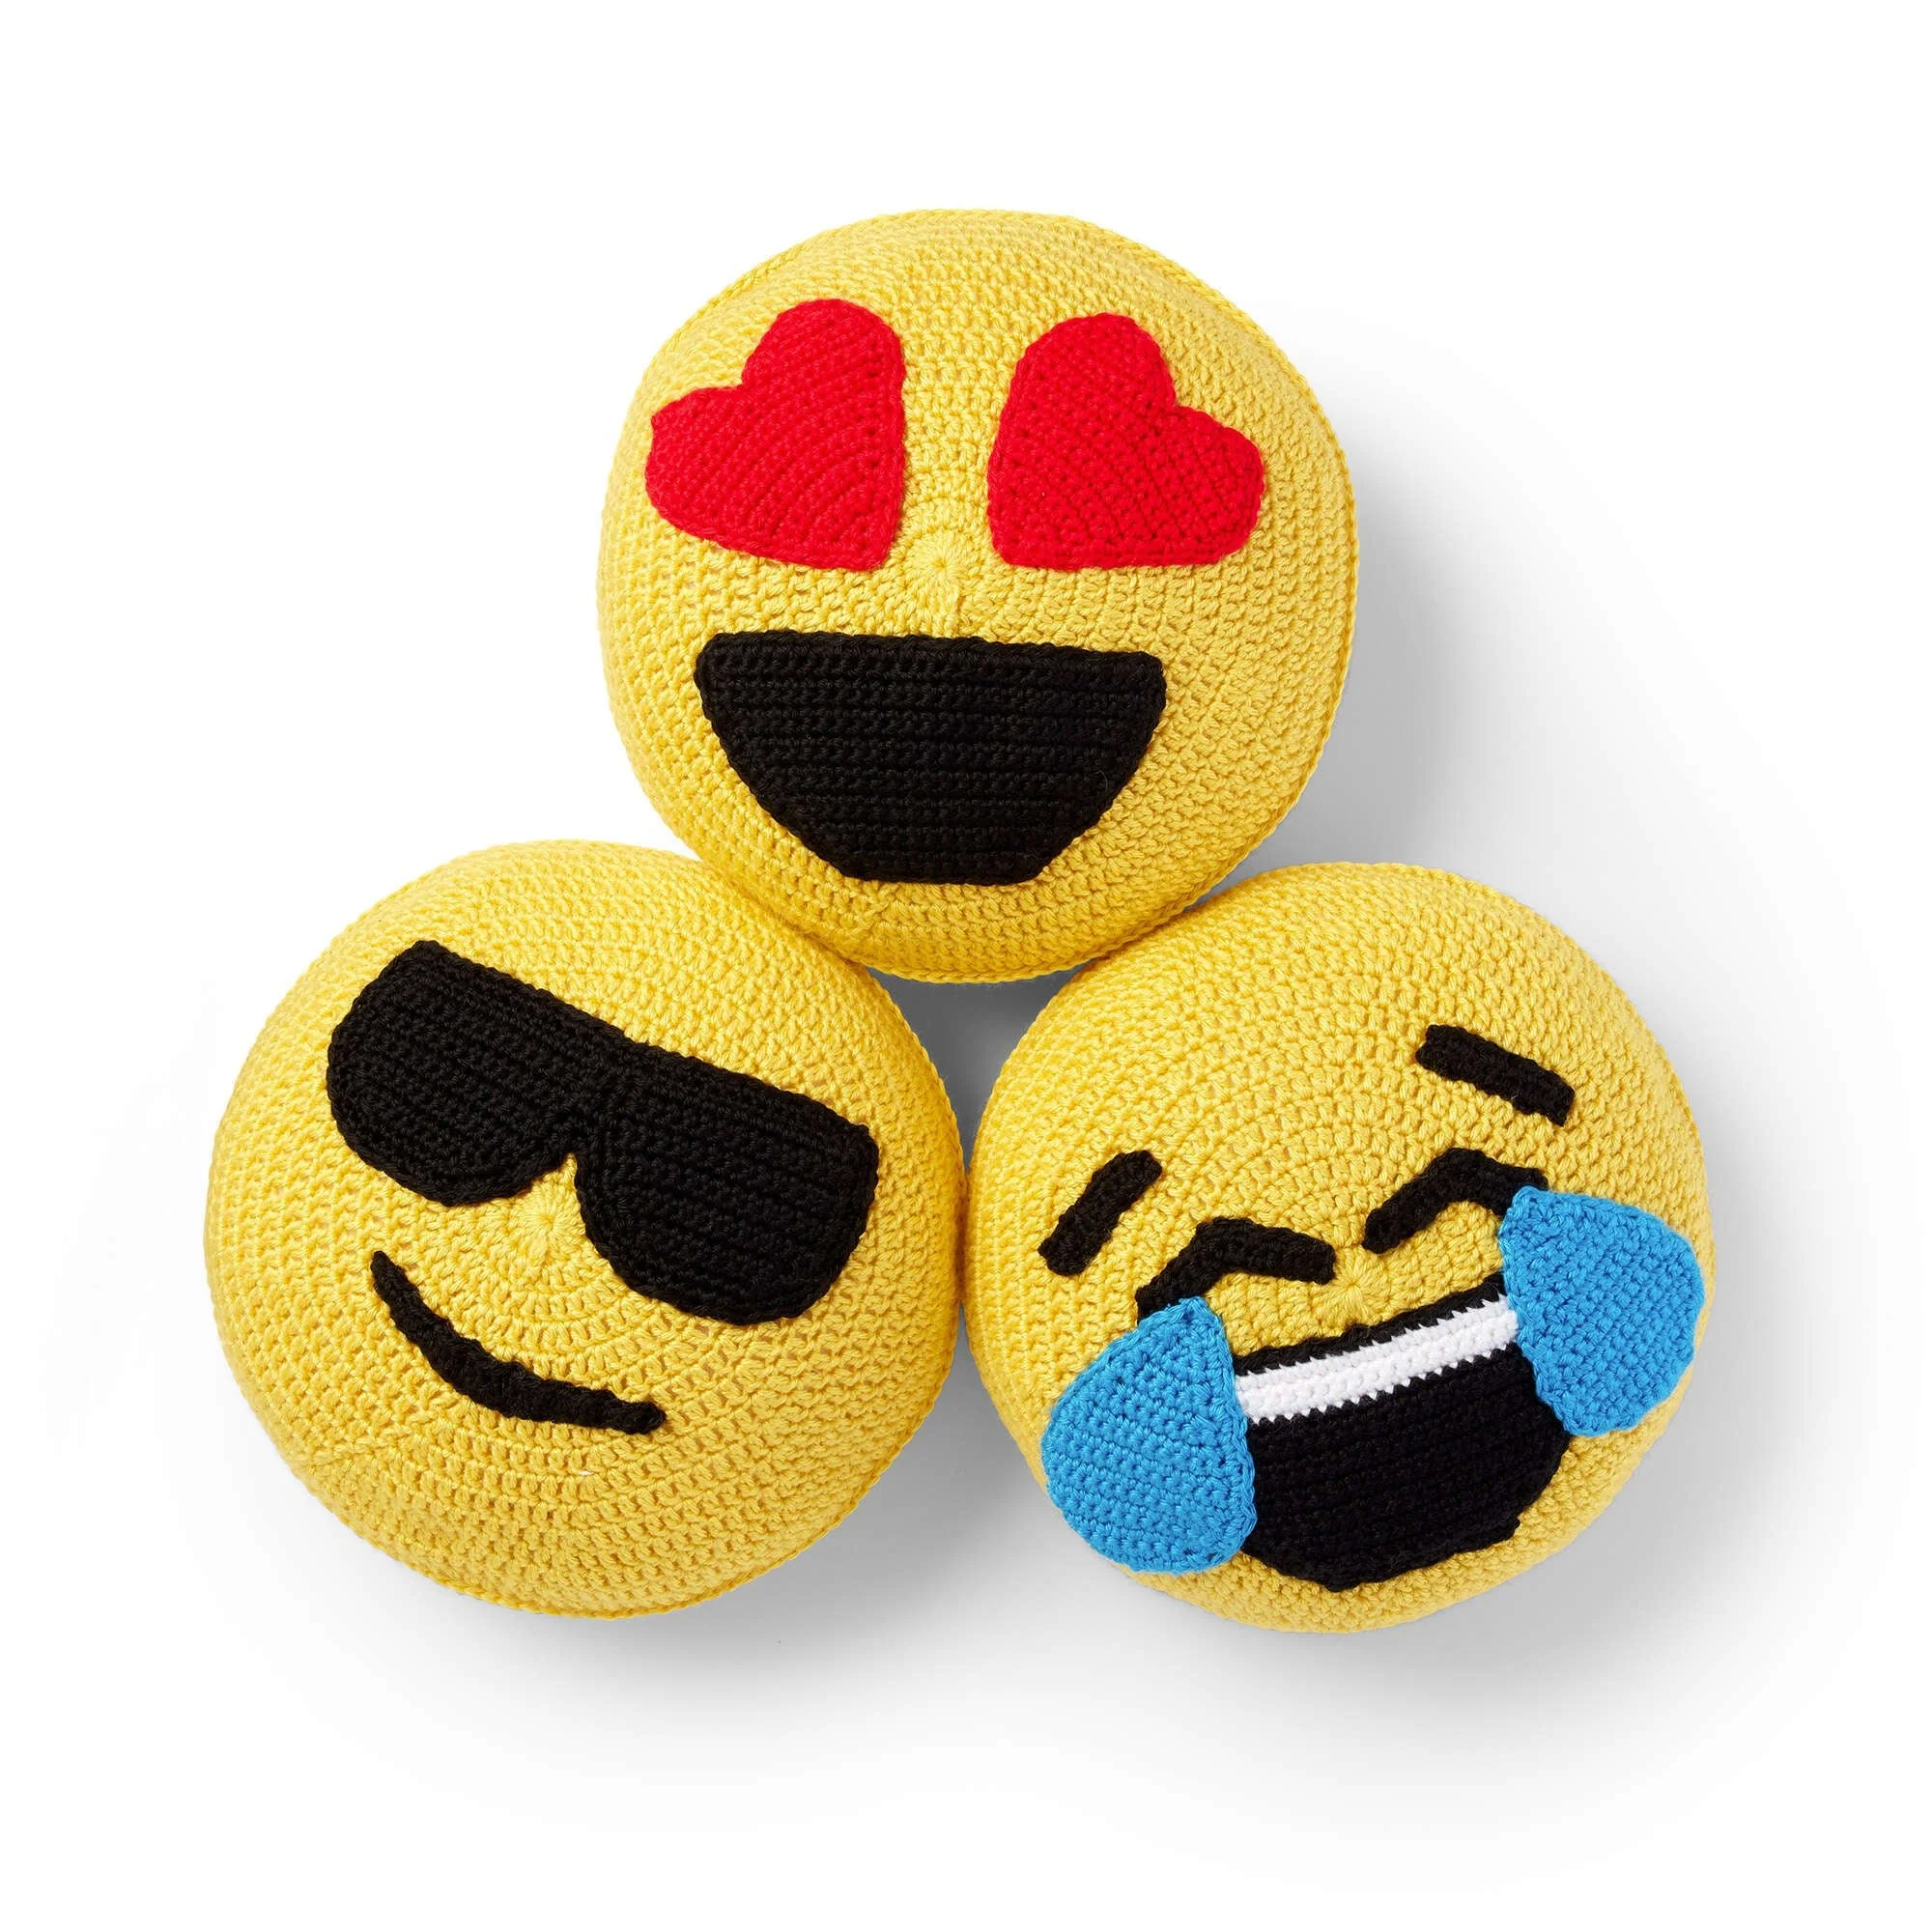
A set of three crochet emoji pillows brings a playful pop of color to a sofa, bedroom, or reading nook. Each round pillow starts with a simple circular crochet base, then gets its personality from expressive features such as heart-shaped eyes or laughing tears. The project suits crocheters who are comfortable working in rounds, and it’s a cheerful handmade gift for birthdays, teens, or anyone who likes a little fun in their home décor.
Why you’ll love this pattern
These emoji pillows combine a useful, familiar shape with plenty of room for personality. The base is worked in rounds, so you can focus on practicing increases and keeping your circle even. Once the rounds are complete, the features let you personalize each pillow without changing the basic construction.
Making a set of three gives you a coordinated display while allowing each pillow to show a different expression. The color palette—Lemonade, Red, Black, Cobalt Blue, and White—has the bold contrast needed for emoji faces. You can also use the pillows as a chance to practice color changes and sewing appliqués neatly onto crochet fabric.
The finished pillows work well as playful room accents and handmade gifts. Since the project uses a standard round pillow form, the filling is built in; there’s no need to shape loose stuffing as you assemble the cover.
“I enjoyed how quickly the faces came together after the rounds were done. Stitch markers helped me keep the circles even, and changing the features made each pillow feel like its own little character.”
Before you begin
You’ll make three round emoji pillows, each using a 14-inch-diameter pillow form. The crochet cover is constructed from front and back panels worked in the main color. Each panel begins with a chain-4 center and grows in rounds through increases until it reaches 126 double crochet stitches, following the round-by-round instructions for the pattern.
The main technique is crocheting in the round, including working increases evenly to keep the circle flat. The emoji details are made separately in contrasting colors and sewn on according to the chosen design. Finally, the front and back are joined around the pillow form.
The project is a good fit for an advanced beginner who knows how to chain, double crochet, increase, fasten off, and sew crochet pieces together. If you’re newer to working in rounds, take your time with the first few rounds and use a stitch marker to track the beginning of each round. The exact working time depends on your pace and how many details each face includes; the three pillows will take longer than a single one, especially if you add careful finishing.
Materials you’ll need
- Caron® Simply Soft® yarn in:
- Lemonade
- Red
- Black
- Cobalt Blue
- White
- U.S. G/6 crochet hook
- 3 round pillow forms, each 14 inches in diameter
Caron® Simply Soft® is a soft, smooth yarn that works well for colorful home décor and makes the stitched features easy to see. Keep the same yarn weight and a similar fiber if you choose an alternative; a much thicker or thinner yarn can change the size and firmness of the crochet panels, so they may no longer fit the pillow forms as intended.
The amounts of each color are not specified here, so check the complete pattern instructions for yardage before starting. You’ll also find a yarn needle useful for sewing on the features, joining the panels, and weaving in ends. Stitch markers are optional but practical for marking the start of rounds.

Pattern instructions
Follow the pattern’s specified stitches and increases for every round. The source instructions do not provide the full round-by-round sequence or the shapes and stitch counts for individual emoji features, so use the complete pattern directions for those details rather than guessing. The steps below outline the construction in a clear order.
-
Choose the main color. Select the main color indicated for the emoji you’re making. Make two matching round panels for each pillow: one for the front and one for the back.
-
Begin at the center. Chain 4. Join or work into the chain as directed in the full pattern. Follow its first-round instructions to establish the center of the circular base.
-
Work the base in rounds. Continue crocheting in rounds, using the stitches and increases specified for each round. The increase sequence gradually expands the circle. Keep track of the start of each round, and count your stitches as you go.
-
Reach the stated stitch count. Follow the pattern’s round instructions until you reach 126 double crochet stitches. Do not add extra increases beyond the directions: too many can make the circle ruffle, while too few can cause it to cup or curl.
-
Make a second panel. Repeat the same instructions for the matching back panel. Check that the two pieces are the same size before assembly. If one is noticeably larger, review the round counts and stitch tension before joining.
-
Fasten off the panels. Fasten off as directed and leave a suitable yarn tail if you plan to use it for joining. Weave in any other loose ends securely on the wrong side, taking care not to pull the fabric out of shape.
-
Create the emoji features. Use the contrasting colors and feature instructions provided for the design you’ve chosen. Examples include heart eyes and laughing-crying eyes. Make each feature separately where the pattern calls for appliqués, then arrange the pieces on the front panel before sewing. This dry layout makes it easier to check the expression and spacing.
-
Join the front and back. Place the two panels together with their edges aligned. Join them using the method specified in the pattern, leaving enough of the edge open to insert the pillow form. Keep your stitches even and avoid tightening the seam so much that the edge puckers.
-
Insert the pillow form. Ease the 14-inch round pillow form into the cover through the opening. Adjust the crochet panels around it so the form sits evenly and the fabric is not stretched excessively.
-
Close the opening and sew on the features. Finish joining the panels around the pillow form, then secure the seam. Sew the emoji features onto the front according to the design instructions. Use small, even stitches and secure the ends on the back of the work.
The source instructions specify an end point of 126 double crochet stitches for the round base, but they do not give the intervening round counts, exact joining method, or feature stitch counts. Follow the complete pattern for those details so the panels and facial features match the intended design.
Ways to use your finished project
Arrange the three pillows together on a sofa or bed for a bright, coordinated display. They also look fun on a reading chair, in a teen’s bedroom, or in a playroom where a soft, expressive accent fits the space. A single pillow can sit on a desk chair or reading nook if you prefer a smaller touch of color.
An emoji pillow makes a cheerful birthday or holiday gift, especially when you choose the recipient’s favorite expression or colors. For a handmade gift set, pair the pillows with a card that names each expression or explains the color choices. If you make pillows for a craft fair, keep the faces neatly sewn and the panels evenly joined so each piece looks polished and holds its shape.
How to care for your crochet project
Check the care instructions on the yarn label before washing. Caron® Simply Soft® is a synthetic yarn, but care recommendations can vary by product and label. Since the pillows have sewn-on features and a form inside, avoid putting the whole pillow in a washing machine unless the pillow-form label and yarn instructions both say that it is safe.
For small marks, spot-clean gently with cool or lukewarm water and a mild detergent. Blot rather than scrub, since rubbing can roughen the yarn or distort small details. If the cover can be removed according to your construction, wash it only if the seam and features can withstand the process; otherwise, clean the assembled pillow with minimal moisture.
Let the pillow air-dry completely before using or storing it. Reshape the cover while damp, smoothing the round edges and face features into position. Avoid hanging a wet pillow, which can stretch the crochet fabric, and keep it away from direct high heat. Store clean, dry pillows in a cool place rather than compressing them for a long time. If the colors are new, test a damp cloth on an inconspicuous area before spot-cleaning to check for color transfer.
Tips for success
- Mark the start of each round. A removable stitch marker makes it easier to see where a round begins and ends, particularly when the stitches look similar.
- Count the stitches after each round. Even increases matter in a flat circle. If your count is off, correct it before continuing rather than trying to hide the difference in later rounds.
- Keep your tension consistent. Tight stitches can make the cover too small for the pillow form; loose stitches can leave gaps or make the fabric sag. The recommended hook is U.S. G/6, so use it as your starting point and check the finished panel against the expected fit.
- Check the circle as it grows. Lay the panel on a flat surface every few rounds. A flat panel usually indicates that the increases are being worked evenly. If it cups or ripples, compare your work with the round instructions before moving on.
- Match the two panels. Try to maintain the same tension and round counts on the front and back. Similar panels are easier to join and are less likely to bunch around the pillow form.
- Plan the facial layout first. Place eyes, mouths, and other features on the front before sewing. Step back and check the expression from a short distance; small changes in spacing can make a face look quite different.
- Secure features carefully. Sew appliqués down around their edges so they do not lift with regular use. Weave in ends on the wrong side and avoid leaving long loops where they could catch.
- Join without stretching. Line up the edges naturally instead of tugging one panel to match the other. If the edges don’t align, check that the panels have the same number of rounds and similar tension.
- Keep the opening manageable. Leave enough room to insert the pillow form without forcing it through a very small gap. Once it is in place, finish the seam evenly.
Customize your project
The expression is the easiest place to personalize these crochet emoji pillows. Choose different feature colors from the listed palette, or rearrange the available colors to create a coordinated set with distinct faces. Keep strong contrast between the eyes, mouth, and main color so the features remain clear from across the room.
You can also make a themed trio, such as cheerful faces for a playroom or a red-and-white palette for a festive display. If you change the main color, consider whether the eye and mouth colors will still stand out. A low-contrast combination may make the expression harder to read.
For a simple decorative finish, use the joining method in the pattern and keep any added edging restrained so it does not compete with the face. Extra border rounds may increase the panel size and affect how the cover fits a 14-inch pillow form. Using a different yarn weight or a textured yarn can also change the size, thickness, and stitch definition; make a test panel or swatch before committing to all three pillows. Avoid changing the hook size without checking the finished dimensions, since it can alter the fit.
Frequently asked questions
Is this crochet emoji pillow pattern beginner-friendly?
It’s suitable for an advanced beginner who can make double crochet stitches, work increases in rounds, and sew pieces together. A complete beginner may want to practice circular increases on a small sample first. Stitch markers and frequent counting make the main base easier to manage.
What yarn works best for these pillows?
The specified yarn is Caron® Simply Soft® in Lemonade, Red, Black, Cobalt Blue, and White. A similar-weight yarn may work, but a change in thickness, fiber, or texture can affect the panel size and fit around the 14-inch pillow form. Check the alternative yarn’s label and make a test piece if you’re unsure.
Can I use a different hook size?
The listed hook is U.S. G/6. A different hook may change your tension and the finished panel size. If your crochet is noticeably tight or loose, test a small sample first and compare it with the intended fit rather than switching sizes automatically.
How much yarn will I need?
The available material list does not give yardage. Check the full pattern for the amounts needed in each color, especially because feature choices use different colors in different proportions. It’s sensible to have enough main-color yarn for both panels of each pillow before you begin.
How do I make the pillow larger or smaller?
The base is designed to fit a 14-inch-diameter pillow form. Changing the number of rounds or the hook size can change the cover dimensions, and you’ll need a pillow form that matches the finished cover. Altering the size may also affect how the features fit and how much yarn you need.
Why is my crochet circle curling or ruffling?
A circle that cups may have too few increases for your tension, while a ruffled edge can indicate too many increases or loose tension. Check the stitch count and the pattern’s increase placement for each round. It’s best to correct the problem where it begins rather than trying to flatten the whole panel later.
How can I keep the edges even when joining the panels?
Make sure both panels have the same number of rounds and similar tension. Align the edges without pulling, then join with consistent stitches. If one panel has a longer edge, recount the stitches and compare the round instructions before sewing.
How should I wash a finished pillow?
Follow the yarn and pillow-form care labels. Spot-cleaning with cool or lukewarm water and mild detergent is a cautious option for an assembled pillow. Blot gently, reshape it, and let it air-dry fully. Avoid soaking or machine-washing the whole pillow unless both the yarn and form instructions allow it.
Can I sell finished emoji pillows made from this pattern?
The available instructions do not state the designer’s terms for selling finished items. Check the original pattern’s usage rules before offering completed pillows for sale.
Print
Crochet Emoji Pillows
Description
A set of playful crochet emoji pillows that brighten up any space with their unique expressions.
Materials
- Caron® Simply Soft® yarn in Lemonade
- Caron® Simply Soft® yarn in Red
- Caron® Simply Soft® yarn in Black
- Caron® Simply Soft® yarn in Cobalt Blue
- Caron® Simply Soft® yarn in White
- U.S. G/6 crochet hook, 1
- 3 round pillow forms, each 14 inches in diameter
- Yarn needle, 1
- Stitch markers, optional
Instructions
- Choose the main color. Select the main color indicated for the emoji you’re making. Make two matching round panels for each pillow: one for the front and one for the back.
- Begin at the center. Chain 4. Join or work into the chain as directed in the full pattern. Follow its first-round instructions to establish the center of the circular base.
- Work the base in rounds. Continue crocheting in rounds, using the stitches and increases specified for each round. The increase sequence gradually expands the circle. Keep track of the start of each round, and count your stitches as you go.
- Reach the stated stitch count. Follow the pattern’s round instructions until you reach 126 double crochet stitches. Do not add extra increases beyond the directions: too many can make the circle ruffle, while too few can cause it to cup or curl.
- Make a second panel. Repeat the same instructions for the matching back panel. Check that the two pieces are the same size before assembly. If one is noticeably larger, review the round counts and stitch tension before joining.
- Fasten off the panels. Fasten off as directed and leave a suitable yarn tail if you plan to use it for joining. Weave in any other loose ends securely on the wrong side, taking care not to pull the fabric out of shape.
- Create the emoji features. Use the contrasting colors and feature instructions provided for the design you’ve chosen. Examples include heart eyes and laughing-crying eyes. Make each feature separately where the pattern calls for appliqués, then arrange the pieces on the front panel before sewing.
- Join the front and back. Place the two panels together with their edges aligned. Join them using the method specified in the pattern, leaving enough of the edge open to insert the pillow form. Keep your stitches even and avoid tightening the seam so much that the edge puckers.
- Insert the pillow form. Ease the 14-inch round pillow form into the cover through the opening. Adjust the crochet panels around it so the form sits evenly and the fabric is not stretched excessively.
- Close the opening and sew on the features. Finish joining the panels around the pillow form, then secure the seam. Sew the emoji features onto the front according to the design instructions. Use small, even stitches and secure the ends on the back of the work.
Notes
Follow the complete pattern for round-by-round instructions and individual emoji features' stitch counts.