- Introduction
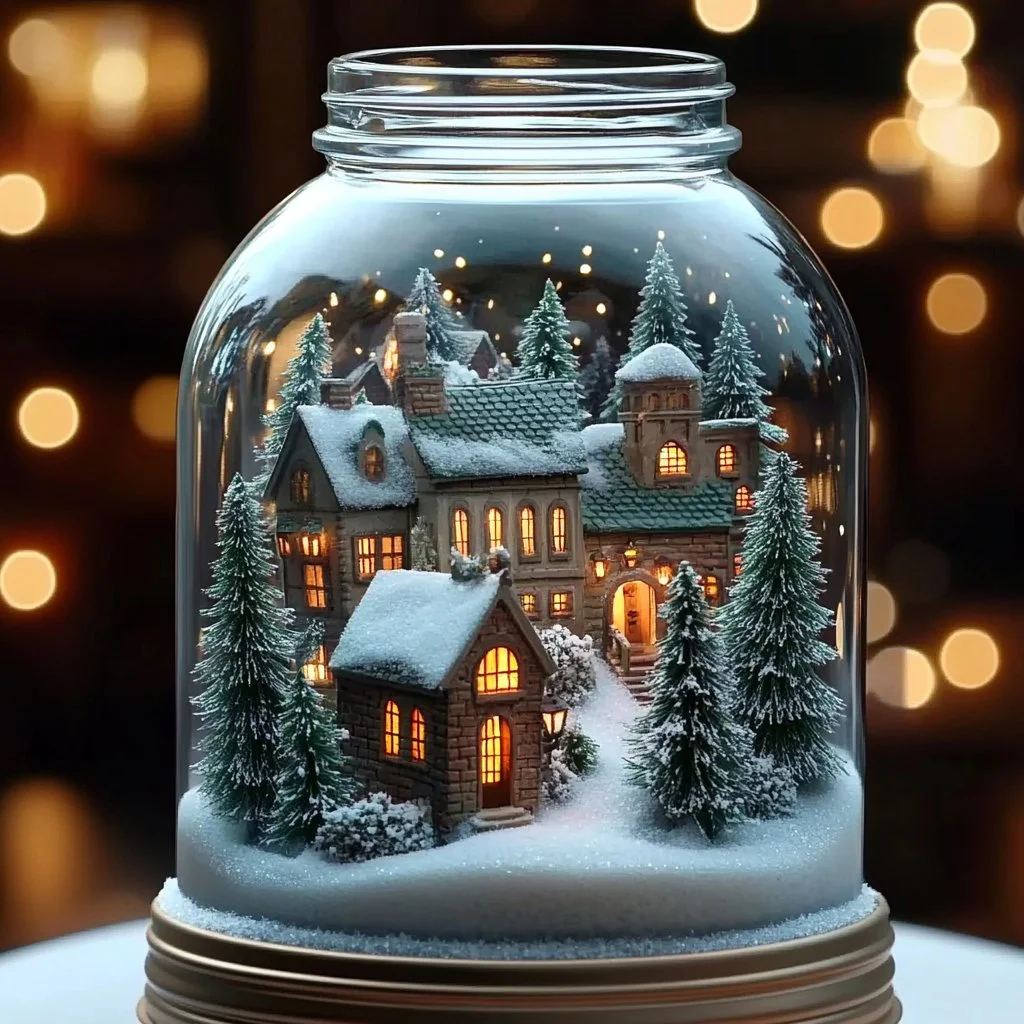
Winter brings with it a unique charm, enveloping the world in a blanket of sparkling snow and creating a cozy atmosphere that’s perfect for crafting. One delightful way to capture this beauty is by creating a cozy winter village scene in a jar. This craft not only brings a piece of winter magic into your home but also serves as a wonderful gift or a cherished decoration. Using simple materials, you can transport yourself to a miniature village where twinkling lights illuminate frosted rooftops and snowflakes gently fall. The process of assembling this scene is both relaxing and satisfying, allowing your creativity to shine while you engage with the peaceful ambiance of winter.
- Why You’ll Love This Cozy Winter Village Scene in a Jar:
- Creative Outlet: Unleashes your artistic side and allows personal expression.
- Seasonal Decor: Adds a festive touch to your winter home decor.
- Personalized Gift: Makes a thoughtful and unique gift for friends and family.
- Easy to Make: Simple steps ensure even beginners can create a beautiful masterpiece.
- Engaging Activity: Perfect for family bonding or a solo craft day.
- Reusable Materials: Uses eco-friendly items and can be customized year after year.
- Materials:
- A clean, clear glass jar with lid
- Miniature figurines (like trees, houses, and people)
- Artificial snow or cotton balls
- Acrylic paint (white for snow effects, optional)
- Hot glue gun and glue sticks
- Twinkling fairy lights (battery-operated recommended)
- Ribbon or twine for decoration
- Scissors
- Full Step-by-Step:
Prepare the Jar
- Clean and dry the glass jar thoroughly.
- If desired, paint the inside bottom with white acrylic paint to symbolize snow.
Create the Scene
- Start arranging your miniature figurines inside the jar.
- Position larger items (like houses) towards the back and smaller figures in front for depth.
- Use hot glue to secure the figurines in place, ensuring they don’t shift.
Add Texture
- Layer artificial snow or cotton balls around the figurines to create a winter wonderland vibe.
- Gently pack the ‘snow’ around the bases of the figurines for a more natural look.
Illuminate Your Jar
- Carefully weave the fairy lights into the jar, placing the battery pack outside the jar’s opening.
- Turn on the lights to add a magical glow to your village scene.
Final Touches
- Tie a piece of ribbon or twine around the jar lid for a decorative effect.
- Optional: Add a small tag with a winter quote or the year for a personalized touch.
- Tips & Variations:
- Customization: Use themed figurines (like animals or seasonal characters) to reflect personal interests.
- Swap Materials: If you don’t have fairy lights, consider using a small candle (only if the jar is fire-safe).
- Layering: Combine different types of ‘snow’ (e.g., glitter, fake snow, and cotton) for varied textures.
- Snow Effects: Use a small spray of adhesive followed by glitter for a sparkling touch.
- Frequently Asked Questions:
Q1: Can I use real snow instead of artificial snow?
A: Real snow will melt and create a mess. It’s best to stick with artificial materials for longevity.
Q2: How do I best clean the jar for crafting?
A: Use warm soapy water, rinse well, and allow to dry completely before starting your project.
Q3: What type of glue is best for securing the figurines?
A: A hot glue gun works best for a strong bond, but white school glue is a safer alternative for children.
Q4: How can I prevent the snow from getting messy?
A: A clear sealer or spray can help keep materials in place and reduce shedding.
- Suggestions:
- Host a cozy crafting party with friends and family to make multiple jars.
- Create a themed village with a specific color palette for a cohesive look.
- Experiment with different jar sizes for varying scene scales.
- Final Thoughts
Creating a cozy winter village scene in a jar is a perfect way to embrace the spirit of the season and add a touch of whimsy to your home. Whether you’re gifting a jar or keeping it for yourself, each piece is a unique reflection of your creativity. We’d love to see your versions—please share your photographs or leave a comment about your experience! Happy crafting!
Print
Cozy Winter Village Scene in a Jar
- Total Time: 10 minutes
- Yield: 1 jar
- Diet: N/A
Description
Create a charming winter village scene in a jar using simple materials; a perfect holiday decor or gift.
Ingredients
- A clean, clear glass jar with lid
- Miniature figurines (like trees, houses, and people)
- Artificial snow or cotton balls
- Acrylic paint (white for snow effects, optional)
- Hot glue gun and glue sticks
- Twinkling fairy lights (battery-operated recommended)
- Ribbon or twine for decoration
- Scissors
Instructions
- Clean and dry the glass jar thoroughly.
- If desired, paint the inside bottom with white acrylic paint to symbolize snow.
- Start arranging your miniature figurines inside the jar.
- Position larger items (like houses) towards the back and smaller figures in front for depth.
- Use hot glue to secure the figurines in place, ensuring they don’t shift.
- Layer artificial snow or cotton balls around the figurines to create a winter wonderland vibe.
- Gently pack the ‘snow’ around the bases of the figurines for a more natural look.
- Carefully weave the fairy lights into the jar, placing the battery pack outside the jar’s opening.
- Turn on the lights to add a magical glow to your village scene.
- Tie a piece of ribbon or twine around the jar lid for a decorative effect.
- Optional: Add a small tag with a winter quote or the year for a personalized touch.
Notes
Consider customizing the scene with themed figurines to reflect personal interests or experimenting with various jar sizes for different scales.
- Prep Time: 10 minutes
- Cook Time: 0 minutes
- Category: Craft
- Method: Crafting
- Cuisine: N/A
Nutrition
- Serving Size: 1 jar
- Calories: 0
- Sugar: 0g
- Sodium: 0mg
- Fat: 0g
- Saturated Fat: 0g
- Unsaturated Fat: 0g
- Trans Fat: 0g
- Carbohydrates: 0g
- Fiber: 0g
- Protein: 0g
- Cholesterol: 0mg

