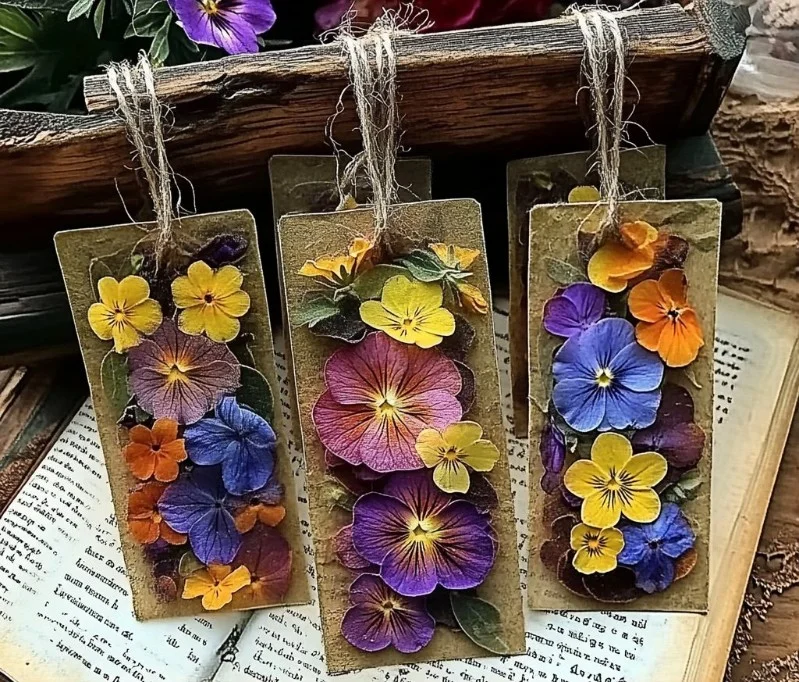
Pressed flower bookmarks are a charming and creative way to preserve the beauty of nature while adding a personal touch to your reading experience. By capturing vibrant blooms and delicate petals, these bookmarks not only serve a practical purpose but also become unique pieces of art that tell a story. Whether you are an avid reader or seeking a thoughtful gift, making pressed flower bookmarks offers a rewarding DIY project that enhances your connection to the natural world. This guide will walk you through the simple steps to create beautiful, one-of-a-kind bookmarks that you can treasure or share with friends and family.
Why You’ll Love This Pressed Flower Bookmarks
- Personalized Touch: Each bookmark is unique, reflecting your style and the beauty of nature.
- Aesthetic Appeal: Bright, colorful flowers will bring joy every time you open your book.
- Thoughtful Gift: Perfect for special occasions like birthdays, holidays, or as a sweet surprise.
- Easy to Make: Simple materials and steps make it accessible for all skill levels.
- Versatile: Customize with different flowers or even dried herbs for a personal twist.
Materials
- Fresh flowers (e.g., pansies, violets, daisies)
- Parchment paper or wax paper
- Heavy books or a flower press
- Clear contact paper or laminating sheets
- Scissors
- Ruler
- Craft knife (optional)
Step-by-Step Instructions
Step 1: Prepare Flowers
- Select fresh flowers, ensuring they are free from moisture and bruises.
- Trim stems to about 1 inch and remove excess leaves.
Step 2: Press Flowers
- Place flowers between two sheets of parchment or wax paper.
- Stack heavy books on top (or use a flower press) and leave for 1-2 weeks.
- Check periodically; flowers should be completely dry and flat.
Step 3: Create Bookmarks
- Once dried, carefully peel flowers from the paper.
- Use scissors or a craft knife to cut out your desired bookmark size, usually about 2 inches by 6 inches.
Step 4: Laminate Bookmarks
- Place pressed flowers on a bookmark base and cover with clear contact paper or laminating sheets.
- Smooth out any bubbles for a clean finish.
Step 5: Trim Edges
- Trim any excess laminate or contact paper to finalize the shape of your bookmark.
Tips & Variations
- Flower Selection: Experiment with different flowers for diverse colors and shapes. Dried herbs like lavender or mint can also be used for fragrance.
- Add Personal Touch: Write quotes or names using fine-tip pens before laminating for a special touch.
- Color Themes: Create seasonal bookmarks by using flowers that match the time of year.
- Gift Packaging: Wrap bookmarks in pretty paper tied with twine for a lovely gift presentation.
Frequently Asked Questions
Q: Can I use flowers from my garden?
A: Absolutely! Just ensure they are free from pesticides and chemicals.
Q: How can I safely dry other types of plants?
A: Other plants can be dried using the same method. Just ensure they have a thin profile to allow for proper pressing.
Q: What do I do if the flowers lose their color?
A: Choose flowers that are known for maintaining color, like marigolds or nasturtiums, or try applying a light coat of clear spray sealant after pressing.
Q: Is there an alternative to laminating?
A: If you don’t have laminating sheets, you can cover the bookmarks with clear packing tape for a similar effect.
Serving Suggestions or Pairings
These charming bookmarks pair beautifully with a cup of herbal tea or coffee, making for a cozy reading session. They also make delightful additions when tied to the spine of a book as a gift, suitable for any occasion, along with some homemade treats like cookies or chocolate bars.
Final Thoughts
Creating pressed flower bookmarks is a delightful and satisfying craft that brings a piece of the outdoors into your reading routine. Not only can you enjoy the beauty of these floral creations every day, but they also make wonderful gifts for your loved ones. We’d love to see your own creations—feel free to share your versions or leave a comment with your experiences!
Print
Pressed Flower Bookmarks
- Total Time: 20175 minutes
- Yield: Assorted bookmarks
- Diet: N/A
Description
Create beautiful, one-of-a-kind bookmarks using pressed flowers, adding a personal touch to your reading experience.
Ingredients
- Fresh flowers (e.g., pansies, violets, daisies)
- Parchment paper or wax paper
- Heavy books or a flower press
- Clear contact paper or laminating sheets
- Scissors
- Ruler
- Craft knife (optional)
Instructions
- Select fresh flowers, ensuring they are free from moisture and bruises. Trim stems to about 1 inch and remove excess leaves.
- Place flowers between two sheets of parchment or wax paper. Stack heavy books on top (or use a flower press) and leave for 1-2 weeks.
- Once dried, carefully peel flowers from the paper. Use scissors or a craft knife to cut out your desired bookmark size, usually about 2 inches by 6 inches.
- Place pressed flowers on a bookmark base and cover with clear contact paper or laminating sheets. Smooth out any bubbles for a clean finish.
- Trim any excess laminate or contact paper to finalize the shape of your bookmark.
Notes
Experiment with different flowers and add personal touches with quotes or names.
- Prep Time: 15 minutes
- Cook Time: 20160 minutes
- Category: Craft
- Method: DIY
- Cuisine: N/A
Nutrition
- Serving Size: 1 bookmark
- Calories: 0
- Sugar: 0g
- Sodium: 0mg
- Fat: 0g
- Saturated Fat: 0g
- Unsaturated Fat: 0g
- Trans Fat: 0g
- Carbohydrates: 0g
- Fiber: 0g
- Protein: 0g
- Cholesterol: 0mg

