

Paper rolls sit quietly on a table, waiting for inspiration. As the sunlight filters through the window, it catches the texture of the kraft paper, creating shadowy patterns on the wooden surface beneath. The air carries a gentle warmth, inviting you to bend and shape the paper into something playful. Soon, these humble rolls will transform into colorful rainbow butterflies with bright wings and playful details, ready to flutter into your creative space. The process feels both simple and magical, grounding you in the moment while sparking a joy that is uniquely yours.
The Heart Behind This DIY
Creating colorful butterfly decorations from paper rolls brings a sense of warmth and peace to your crafting space. The act of transforming something ordinary into something whimsical holds a charm that encourages you to slow down and craft with intention. When your fingers caress the soft curves of the paper rolls, you connect with a deeper rhythm of creativity. Each fold and cut invites you to breathe steadily, allowing the outside world to fade away, if only for a while.
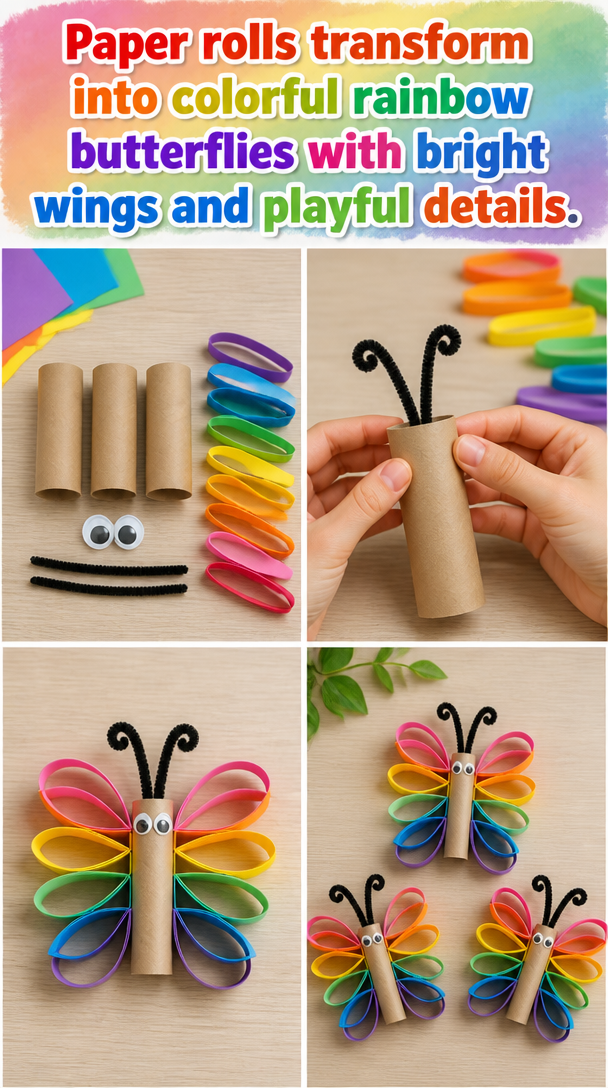
This project lets you engage your senses in a rewarding way. The gentle sound of scissors gliding through the paper, the vibrant colors awakening your vision, and the tactile pleasure of shaping the wings all blend into a soothing experience. With every stroke of paint or stroke of your brush, you infuse a piece of your spirit into each butterfly. It becomes not just a decoration but an extension of your calm, creative energy.
The Flow of Making Paper Rolls Transform into Colorful Rainbow Butterflies with Bright Wings and Playful Details
As you prepare to create, imagine the gentle motions involved in this craft. Picture sitting at your table, surrounded by colors and textures that inspire you. The tactile sensation of the smooth paper, the crispness of your scissors, and the vibrant paint all work together. This mindful process isn’t just about making; it is about enjoying the moment. With each cut, fold, and brushstroke, you weave a narrative that is uniquely your own, reminding you of the simple joys in life.
Materials You’ll Need
Gather these materials for your butterfly-making session:
- Paper rolls (toilet paper or kitchen towel works well)
- Acrylic paints (varied colors)
- Paintbrushes (different sizes)
- Scissors
- Glue (white school glue or hot glue)
- Decorative items (e.g., markers, glitter, stickers, fabric scraps)
- Googly eyes (optional for added character)
- String or thread (if you want to hang them)
These materials are easy to find, and you may already have many on hand. Feel free to get creative with substitutions; crafting is about using what speaks to you.
How This DIY Comes Together
-
Begin by flattening your paper rolls slightly; this gives a good foundation for your butterflies. You can feel the soft bend as you press down, molding the roll.
-
Use scissors to cut the rolls into sections. Each section will form wing shapes. The process flows smoothly as the scissors glide through the cardboard, and the sound of cutting brings a comforting rhythm.

-
Choose your colors and paint the sections. Think of the sensations as the paint brushes across the textured surface — smooth, soft strokes that leave behind vibrant colors. Allow the paint to dry fully.
-
Cut additional shapes from the rolls or even paper to create wing details. Visualize how these shapes will add depth and playfulness.
-
Once the sections have dried, gently glue them together to form butterflies. As the glue bonds the parts, notice the connection you are creating.
-
Lastly, personalize your butterflies with decorative touches. Add googly eyes, sparkle with glitter, or draw patterns with markers. This part invites your unique touch, an extension of your creativity.
The act of making becomes an enjoyable journey, filling your space with joy and color.
Enjoying the Finished Piece
Once you’ve crafted your beautiful butterflies, take a moment to enjoy their presence. Hang them near a window where light can dance through their colors, casting cheerful reflections on your walls. Perhaps they can sit on a shelf, bringing a calm, vibrant touch to your room.
You might find joy in giving them as gifts or sharing them with loved ones. Each butterfly becomes a small token of warmth and love, a piece of creativity that expresses your feelings. The playful twirl of their wings in a warm breeze or the gentle sway when they catch the light can bring a smile to your face, allowing you to pause and reflect.
Caring for Your Finished DIY
To keep your colorful butterflies looking fresh, store them in a dry place away from direct sun exposure. A simple box or a decorative container can hold them gently, preserving their charm. If you notice any paint peeling over time, touch it up with a swift brushstroke to renew their vibrancy.
Encourage others to interact with them. Hanging them at a child’s eye level invites stories and imagination. Both children and adults can find joy in these playful creations, bringing stories to life and creating warmth in any space.
Gentle Tips & Variations
- Consider varying the sizes of the butterflies. A mix of large and tiny ones can create a dynamic display.
- Experiment with different types of decorative elements. Perhaps feathers or pieces of fabric; adding texture creates a richer experience.
- Try making butterflies themed around seasons or holidays, adjusting colors to suit. Pastels for spring or warm tones for autumn not only add beauty but also a thoughtful touch.
- Engage in mindful making by crafting alongside a soothing soundtrack or gentle instrumental music, enhancing the overall experience.
- Invite friends or family to join your butterfly-making session. Sharing the process can create a sense of community and camaraderie as you all explore the magic of transformation together.
FAQs About Paper Rolls Transform Into Colorful Rainbow Butterflies with Bright Wings and Playful Details
Q: Can I use other types of paper besides paper rolls?
A: Yes, you can absolutely use cardstock or even recyclable cardboard to achieve beautiful butterflies, each offering a different texture and look.
Q: What if I don’t have paint?
A: If paint isn’t available, consider using colored markers, crayons, or even wrapping paper to cover your butterflies. The result will be equally charming.
Q: How long do these butterflies last?
A: With gentle care, your butterflies can last for years. Keep them dust-free, and store them carefully to preserve their colors.
Q: Can younger children participate in this project?
A: Absolutely, with supervision. They can enjoy painting and assembling, perhaps focusing on simpler shapes and letting their imagination run wild.
Q: What if I want to make larger butterflies?
A: You can connect multiple paper rolls or use cardboard to create larger sections. Just let your creative spirit lead the way.
Final Reflections on Making Paper Rolls Transform into Colorful Rainbow Butterflies with Bright Wings and Playful Details
As you conclude your time crafting these delightful butterflies, take a moment to appreciate the rhythm of creation you have embraced. Each butterfly is a reflection of your unique journey, a testament to the calmness you cultivated along the way.
Let the process of making be as cherished as the results. As you hang your butterflies around your space, remember to return to this peaceful practice whenever you seek a moment of grounding and joy. Embrace the simple pleasures found in colors, textures, and the act of making.
With every butterfly, a little bit of your heart takes flight, bringing beauty and comfort into the world around you. Allow this experience to inspire more gentle moments of creativity in your journey ahead.
Print
Colorful Rainbow Butterflies from Paper Rolls
- Total Time: 15 minutes
- Yield: 8 butterflies
- Diet: N/A
Description
Transform ordinary paper rolls into whimsical rainbow butterflies, adding a vibrant touch to your space.
Ingredients
- Paper rolls (toilet paper or kitchen towel)
- Acrylic paints (varied colors)
- Paintbrushes (different sizes)
- Scissors
- Glue (white school glue or hot glue)
- Decorative items (markers, glitter, stickers, fabric scraps)
- Googly eyes (optional)
- String or thread (for hanging)
Instructions
- Begin by flattening your paper rolls slightly.
- Use scissors to cut the rolls into sections for wing shapes.
- Choose your colors and paint the sections, allowing them to dry.
- Cut additional shapes to create wing details.
- Once dried, gently glue them together to form butterflies.
- Lastly, personalize your butterflies with decorative touches.
Notes
Encourage others to interact with the butterflies by hanging them at a child’s eye level for imaginative play.
- Prep Time: 15 minutes
- Cook Time: 0 minutes
- Category: Crafts
- Method: DIY Crafting
- Cuisine: N/A