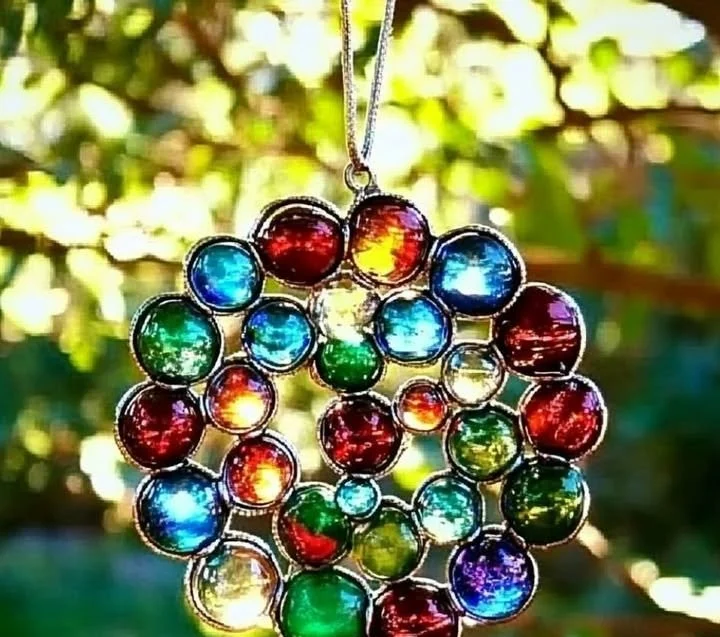
Creating your own glass gem suncatcher is not only a delightful way to brighten your home but also a fantastic opportunity to engage in a fun and creative DIY project. This art piece adds a pop of color to any window or outside space, attracting sunlight and casting vibrant reflections in your room. Whether you’re crafting it for yourself or as a thoughtful gift, the glass gem suncatcher is versatile and easy to make, allowing you to unleash your creativity. This project is suitable for all skill levels and offers a satisfying sense of accomplishment, as you’ll see the results of your handiwork shining beautifully in the light. Gather your materials, clear a workspace, and get ready to immerse yourself in a colorful world of creativity!
Why You’ll Love This Glass Gem Suncatcher
- Visual Appeal: The vibrant colors and patterns will enhance any space.
- Unique Design: Each suncatcher can be customized, making it one-of-a-kind.
- Therapeutic Experience: The crafting process can be relaxing and meditative.
- Eco-Friendly: Use repurposed materials to create beautiful art.
- Simple Instructions: Ideal for both beginners and experienced crafters.
- Perfect Gift: A thoughtful and personal gift for friends or family.
Materials
- Clear acrylic sheet or glass panel
- Glass gems or marbles in various colors
- Strong craft glue or epoxy
- Paintbrush (for spreading glue)
- Small shallow dish (for organizing gems)
- String or fishing line (for hanging)
- Optional: Decorative twine or ribbon
Step-by-Step Instructions
Prepare Your Workspace
- Clear a flat surface where you can work without interruption.
- Lay down newspaper or a protective cover to catch any glue spills.
Arrange Your Gems
- Sort your glass gems by color in the shallow dish.
- Start arranging gems on the acrylic sheet in your desired pattern.
- Mix colors or create gradients—this step is all about creativity!
Glue the Gems
- Once satisfied with your arrangement, begin applying glue to the back of each gem.
- Use a paintbrush to spread a thin layer of glue on the acrylic sheet before placing the gems for added security.
- Press each gem gently into place and wipe away extra glue that may ooze out.
Allow to Dry
- Let the suncatcher sit undisturbed for the recommended drying time.
- Make sure it’s in a safe place where it won’t be knocked over.
Add a Hanging Mechanism
- Once dry, attach a string or fishing line to the top center of the suncatcher for hanging.
- If desired, tie on decorative twine or ribbon for extra flair.
Tips & Variations
- Color Themes: Use color themes like pastels for a gentle look or bright hues for a bold statement.
- Shape: Consider cutting the acrylic or glass into different shapes (e.g., circles, hearts) for variety.
- Textures: Incorporate different textures by adding beads, sequins, or other embellishments around the gems.
- Light Sources: Hang your suncatcher in direct sunlight to amplify its colors or in shadowy areas for subtle beauty.
Frequently Asked Questions
Q1: Can I use any type of glue for this project?
A1: It’s best to use strong craft glue or epoxy that is suitable for glass, as standard glue may not adhere well.
Q2: What if I don’t have glass gems?
A2: You can substitute with colorful beads, buttons, or even cut pieces of colored glass.
Q3: How do I clean the suncatcher once it’s made?
A3: Gently wipe with a soft, damp cloth. Avoid harsh chemicals that may dull the surface.
Q4: Can I customize the size of the suncatcher?
A4: Absolutely! You can create a larger or smaller suncatcher based on your preference, just adjust the amount of materials accordingly.
Serving Suggestions or Pairings
Consider pairing your suncatcher with a refreshing herbal tea or a light citrus beverage that complements its vibrant colors. The cheerful aesthetic makes it a perfect addition to a sunny brunch table or a serene outdoor tea setup. Also, consider using the suncatcher as a backdrop for artisan meals or desserts that celebrate color and light!
Final Thoughts
Crafting a glass gem suncatcher is a rewarding project that not only highlights your artistic flair but also adds charm to your living space. We hope you enjoy making your own stunning suncatchers as much as we do! Feel free to share your creations or leave a comment below; we love hearing about your unique designs and experiences! Happy crafting!
Print
Glass Gem Suncatcher
- Total Time: 45 minutes
- Yield: 1 suncatcher
Description
Brighten your home with a beautiful and customizable glass gem suncatcher that enhances any space with vibrant reflections.
Ingredients
- Clear acrylic sheet or glass panel
- Glass gems or marbles in various colors
- Strong craft glue or epoxy
- Paintbrush (for spreading glue)
- Small shallow dish (for organizing gems)
- String or fishing line (for hanging)
- Optional: Decorative twine or ribbon
Instructions
- Clear a flat surface for your workspace and protect it with newspaper.
- Sort the glass gems by color in a shallow dish.
- Arrange the gems on the acrylic sheet in your desired pattern.
- Glue the back of each gem, using a paintbrush to spread glue on the acrylic sheet for added security.
- Press each gem gently, wiping away any excess glue.
- Let the suncatcher sit undisturbed to dry in a safe place.
- Attach a string or fishing line for hanging, optionally tying on decorative twine or ribbon.
Notes
Consider using different color themes, shapes, and textures for customization.
- Prep Time: 15 minutes
- Cook Time: 30 minutes
- Category: Craft
- Method: Crafting
Nutrition
- Serving Size: 1 suncatcher
- Calories: N/A
- Sugar: N/A
- Sodium: N/A
- Fat: N/A
- Saturated Fat: N/A
- Unsaturated Fat: N/A
- Trans Fat: N/A
- Carbohydrates: N/A
- Fiber: N/A
- Protein: N/A
- Cholesterol: N/A

