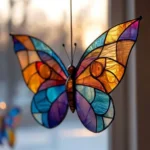
Description
Create a colorful, customizable stained glass butterfly using simple materials and techniques.
Ingredients
- Transparent plastic sheets or parchment paper
- Permanent markers (various colors)
- Scissors
- Black outline marker (like a Sharpie)
- Mod Podge or clear glue
- Paintbrush (for glue)
- Optional: glitter, beads, or embellishments
Instructions
- Use a Template: Find a butterfly outline or draw one on paper.
- Transfer the Design: Place your transparent plastic sheet over the template.
- Color the Spaces: With permanent markers, fill in the butterfly design in various colors.
- Outline the Design: Once colored, use the black marker to outline the butterfly for definition.
- Apply Mod Podge: Use a paintbrush to apply a clear coat of Mod Podge or glue over your design to give it a glossy finish.
- Let Dry: Allow to dry completely; this will enhance the colors and make it more durable.
- Trim Carefully: Once dry, cut out your butterfly shape from the plastic sheet.
- Hang or Place: Use a window suction cup or hang it to display your beautiful stained glass butterfly.
Notes
Experiment with different colors and embellishments for a unique design.
- Prep Time: 30 minutes
- Cook Time: 0 minutes
- Category: Crafts
- Method: Crafting
- Cuisine: N/A
Nutrition
- Serving Size: 1 butterfly
- Calories: 0
- Sugar: 0g
- Sodium: 0mg
- Fat: 0g
- Saturated Fat: 0g
- Unsaturated Fat: 0g
- Trans Fat: 0g
- Carbohydrates: 0g
- Fiber: 0g
- Protein: 0g
- Cholesterol: 0mg