Description
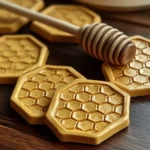
Create unique and functional honeycomb clay coasters that add charm to your home decor.
Ingredients
- Air-dry clay (white or colored)
- Honeycomb stencil or template
- Rolling pin
- Craft knife or clay cutter
- Acrylic paint or clay paint (optional)
- Clear sealant spray (optional)
- Sanding paper (optional)
Instructions
- Prepare Your Workspace: Set up a clean, flat area to work and gather all materials.
- Roll Out the Clay: Use a rolling pin to flatten the air-dry clay to about 1/4 inch thick.
- Cut Out Coasters: Place your honeycomb stencil on the rolled-out clay and cut around the stencil to create coaster shapes.
- Let the Coasters Dry: Place the coasters on a flat surface and let them dry completely, typically 24 hours.
- Paint and Seal (Optional): Once dry, use acrylic paint for color or design and apply a clear sealant if desired.
Notes
Customize your coasters using different stencils, colors, and textures. Ensure all materials are eco-friendly.
- Prep Time: 10 minutes
- Cook Time: 0 minutes
- Category: DIY Craft
- Method: Crafting
- Cuisine: N/A
Nutrition
- Serving Size: 1 coaster
- Calories: 0
- Sugar: 0g
- Sodium: 0mg
- Fat: 0g
- Saturated Fat: 0g
- Unsaturated Fat: 0g
- Trans Fat: 0g
- Carbohydrates: 0g
- Fiber: 0g
- Protein: 0g
- Cholesterol: 0mg