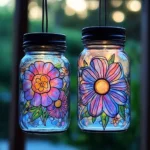
Creating your own DIY sun catcher is a delightful and engaging way to bring a splash of color and whimsy into your home. This craft not only allows for artistic expression but also harnesses the beauty of natural sunlight to transform your space. As the sun rays filter through your creation, they will cast vibrant hues across your walls and floors, creating an enchanting atmosphere. Whether you’re a seasoned crafter or trying your hand at something new, this project is enjoyable for all ages, making it a perfect family activity. Ready to dive into this colorful endeavor? Let’s spark some creativity!
Why You’ll Love This DIY Sun Catcher:
- Vibrant Colors: Illuminate your space with beautiful hues.
- Customizable: Personalize with different shapes, colors, and designs.
- Easy to Make: A straightforward project suitable for all skill levels.
- Family Friendly: Fun craft for kids and adults alike; engage together!
- Eco-Friendly Options: Reuse materials from around the house.
- Great Gift Idea: Handmade gifts that add a personal touch.
Materials
- Clear plastic sheets (e.g., transparent lids or overhead projectors)
- Permanent markers or acrylic paints
- Scissors
- Hole puncher
- String or fishing line
- Optional: beads, sequins, or other decorative items
Full Step-by-Step
1. Design Your Pattern
- Use a pencil to sketch out your desired pattern on paper.
- Choose shapes like flowers, stars, or abstract designs.
2. Prepare the Plastic Sheet
- Cut a piece of clear plastic to the desired size.
- Ensure it is clean and free from any smudges.
3. Transfer Your Design
- Place your pattern underneath the clear plastic.
- Use permanent markers or acrylic paints to trace and color your design.
4. Add Decorative Elements
- Once your design dries, embellish with beads or sequins if desired.
- Consider layering colors for a more complex look.
5. Punch a Hole
- Carefully use a hole puncher at the top of your sun catcher.
- Ensure it’s big enough for your string or fishing line.
6. Assemble
- Thread your string or fishing line through the hole.
- Tie a secure knot to create a loop for hanging.
7. Display
- Hang your sun catcher in a window where it can catch the sunlight!
- Experiment with different angles and placements for best results.
Tips & Variations
- Material Swap: Use old CDs or DVDs instead of plastic for a reflective effect.
- Color Layers: Paint both sides of the plastic for added depth.
- Seasonal Themes: Create designs specific to seasons or holidays!
- Nature Inspired: Use real leaves or flowers encased in the plastic.
Frequently Asked Questions
1. Can I use regular markers for this project?
While regular markers might work, permanent markers are recommended for longevity and vibrancy.
2. What if I don’t have a hole puncher?
You can use a sharp object to create a small hole, but be careful to avoid injury.
3. How do I clean the plastic after painting?
If you need to clean the plastic, use a damp cloth. Avoid abrasive cleaners that may scratch it.
4. Can I make this sun catcher outside?
Certainly! Just ensure you have a stable surface and watch out for wind if you’re using lightweight materials.
Suggestions
- Pair your sun catchers with small succulent pots for an added decorative touch.
- Organize a sun catcher-making party with friends; share techniques and ideas!
- Try different sizes for a dynamic display when hanging multiple pieces together.
Final Thoughts
Creating a DIY sun catcher is a therapeutic and rewarding craft that adds beauty to your living space. Don’t hesitate to explore your creativity and make this project your own! We would love to see your versions or hear your experiences. Feel free to leave a comment or share your colorful creations! Happy crafting!
Print
DIY Sun Catcher
- Total Time: 15 minutes
- Yield: 1 sun catcher
- Diet: N/A
Description
Create your own colorful sun catcher to bring vibrant hues into your home while enjoying a fun and engaging craft project.
Ingredients
- Clear plastic sheets (e.g., transparent lids or overhead projectors)
- Permanent markers or acrylic paints
- Scissors
- Hole puncher
- String or fishing line
- Optional: beads, sequins, or other decorative items
Instructions
- Design Your Pattern: Use a pencil to sketch out your desired pattern on paper, choosing shapes like flowers or stars.
- Prepare the Plastic Sheet: Cut a piece of clear plastic to the desired size and ensure it is clean.
- Transfer Your Design: Place your pattern underneath the clear plastic and trace your design with permanent markers or acrylic paints.
- Add Decorative Elements: Once your design dries, add embellishments like beads or sequins.
- Punch a Hole: Use a hole puncher at the top of your sun catcher for the string or fishing line.
- Assemble: Thread your string through the hole and tie a secure knot for hanging.
- Display: Hang your sun catcher in a sunny window to enjoy the colorful effects!
Notes
Experiment with different materials and designs to customize your sun catcher. Consider making it a family activity!
- Prep Time: 15 minutes
- Cook Time: 0 minutes
- Category: Craft
- Method: Crafting
- Cuisine: N/A
Nutrition
- Serving Size: 1 sun catcher
- Calories: 0
- Sugar: 0g
- Sodium: 0mg
- Fat: 0g
- Saturated Fat: 0g
- Unsaturated Fat: 0g
- Trans Fat: 0g
- Carbohydrates: 0g
- Fiber: 0g
- Protein: 0g
- Cholesterol: 0mg

