Introduction
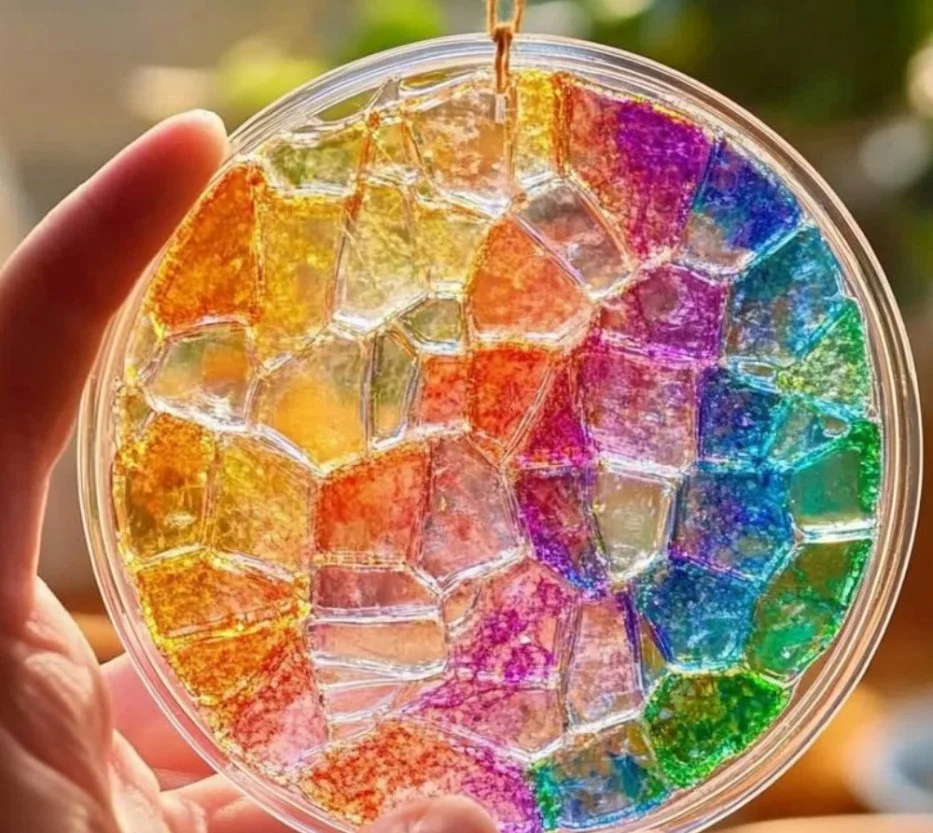
Crafting is a delightful way to express creativity, and one of the most enchanting projects you can undertake is creating a Clear Glue Mosaic Suncatcher. This craft not only allows you to explore your artistic side but also results in a beautiful piece that captures and refracts sunlight, illuminating your space with vibrant colors. Perfect for both kids and adults, this project can be done at home with minimal materials and is an excellent way to bond with family or friends. You’ll find that working with clear glue opens up a world of possibilities as you experiment with colors and designs, making it easy to customize your suncatcher to your unique taste. Get ready to dive into a fun and rewarding crafting experience!
Why You’ll Love This Clear Glue Mosaic Suncatcher Craft:
- Easy and Fun: Perfect for crafters of all ages.
- Customizable Designs: Create unique patterns with unlimited color options.
- Sensory Experience: The texture of clear glue adds an exciting layer to the craft.
- Brightens Up Spaces: Beautifully refracts sunlight, adding charm to any room.
- Great Gift Idea: Handmade suncatchers make heartfelt and personal gifts.
Materials
- Clear school glue
- Colorful tissue paper or colored cellophane
- Scissors
- Cardstock or a sturdy template
- Pencil or marker
- Brush (optional)
- Wax paper or a plastic sheet (for easy removal)
Full Step-by-Step
Step 1: Prepare Your Workspace
- Find a flat surface to work on.
- Lay down wax paper or a plastic sheet to protect your table.
Step 2: Design Your Template
- Use cardstock to create a basic outline of your desired suncatcher shape (e.g., heart, star).
- Trace the outline with a pencil or marker.
Step 3: Cut the Tissue Paper
- Cut colorful tissue paper or cellophane into small squares or shapes.
- Use a variety of colors for a vibrant effect.
Step 4: Apply the Glue
- Using your brush or directly from the bottle, apply a layer of clear glue onto the template.
- Ensure the layer is even but not too thick.
Step 5: Add the Tissue Paper
- Carefully place the cut tissue paper squares onto the glued area.
- Press them down gently, and overlap them for a mosaic effect.
Step 6: Finish the Suncatcher
- Once the template is filled, add another layer of glue on top of the tissue paper to seal it.
- Allow it to dry completely (usually a few hours).
Step 7: Remove and Hang
- Once dried, gently peel off the suncatcher from the wax paper.
- Find a spot to hang your masterpiece where sunlight can shine through!
Tips & Variations
- Customization: Explore different shapes, patterns, or even themes (e.g., seasonal).
- Swap Materials: Use colored plastic bags instead of tissue paper for a more durable option.
- Layering Effects: Experiment with layering different colors of tissue to create depth.
- Mixed Media: Consider adding glitter or beads for extra sparkle.
Frequently Asked Questions
Q1: Can I use regular glue instead of clear glue?
A: Regular glue may not provide the same transparency and finish as clear glue. It’s best to stick with clear school glue for this craft.
Q2: How long does it take for the suncatcher to dry?
A: Drying time can vary, but it typically takes a few hours. For best results, let it dry overnight.
Q3: What if I don’t have tissue paper?
A: Colored plastic bags, construction paper, or even old magazines can be great substitutes.
Q4: Can this craft be done outside?
A: Yes, but be mindful of wind and dust. It’s best done in a calm environment or inside to avoid interruptions.
Suggestions
- Create multiple suncatchers and hang them together for a stunning display.
- Make this a themed craft day, combining it with painting or other crafts to explore various art forms.
- Use your suncatchers to decorate windows for seasonal festivities or holidays.
Final Thoughts
Crafting a Clear Glue Mosaic Suncatcher brings joy and creativity to your day, transforming simple materials into a radiant work of art. We’d love to see your versions! Feel free to share your suncatchers or leave a comment about your experience. Happy crafting!
Print
Clear Glue Mosaic Suncatcher
- Total Time: 180 minutes
- Yield: 1 suncatcher
- Diet: N/A
Description
Create a vibrant Clear Glue Mosaic Suncatcher that captures sunlight and brightens your space, perfect for crafters of all ages.
Ingredients
- Clear school glue
- Colorful tissue paper or colored cellophane
- Scissors
- Cardstock or a sturdy template
- Pencil or marker
- Brush (optional)
- Wax paper or a plastic sheet (for easy removal)
Instructions
- Prepare your workspace by laying down wax paper or a plastic sheet.
- Design your template using cardstock to create an outline of your desired suncatcher shape.
- Cut colorful tissue paper or cellophane into small squares or shapes.
- Apply a layer of clear glue onto the template.
- Place the cut tissue paper squares onto the glued area and press them down gently.
- Add another layer of glue on top of the tissue paper to seal it and allow it to dry completely.
- Once dried, gently peel off the suncatcher from the wax paper and find a spot to hang it.
Notes
Feel free to customize shapes and colors. Explore mixed media with additional materials like glitter or beads.
- Prep Time: 30 minutes
- Cook Time: 0 minutes
- Category: Craft
- Method: Crafting
- Cuisine: N/A
Nutrition
- Serving Size: 1 suncatcher
- Calories: 0
- Sugar: 0g
- Sodium: 0mg
- Fat: 0g
- Saturated Fat: 0g
- Unsaturated Fat: 0g
- Trans Fat: 0g
- Carbohydrates: 0g
- Fiber: 0g
- Protein: 0g
- Cholesterol: 0mg

