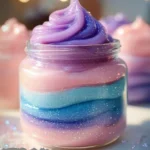
Ombre slime jars are a delightful way to add a touch of creativity and fun to your crafting time! Whether you’re a parent looking for an engaging activity for your kids or an adult seeking a relaxing and satisfying DIY project, these slime jars offer endless opportunities for expression. The gradual color transition in ombre slime not only looks beautiful but provides a sensory-rich experience that can captivate anyone’s attention. Making your own ombre slime is simple and can serve as an exciting experiment into the world of textures and colors. Plus, it offers a satisfying squish that many find therapeutic! Grab your materials and let’s dive into creating a stunning ombre slime jar that will be the envy of your friends!
Why You’ll Love This Ombre Slime Jars
- Creative Expression: Mix and match colors to design your personalized slime jar.
- Sensory Fun: Enjoy the satisfying feel and sound of slime as you stretch and squish it.
- Great for Kids: An easy and enjoyable activity that helps improve motor skills.
- Relaxation: Creating and playing with slime can be a calming and stress-relieving activity.
- Interactive Learning: A fun way to explore concepts of color mixing and measurement.
Materials
- Clear school glue (8 oz)
- Baking soda (1/2 tsp)
- Contact lens solution (1 tbsp)
- Food coloring (3-4 colors)
- Mixing bowls
- Spoon or spatula
- Airtight jars for storage
Step-by-Step Instructions
Prepare the Base Slime
-
Mix Glue and Baking Soda:
- In a mixing bowl, combine the clear school glue and baking soda. Stir well until fully incorporated.
-
Add Contact Lens Solution:
- Gradually add the contact lens solution to your glue mixture. Mix until the slime starts to pull away from the sides of the bowl.
Create the Ombre Effect
-
Divide the Slime:
- Separate the slime into three equal parts in different bowls or containers.
-
Color the Slime:
- Add a different food coloring to each bowl. For the ombre effect, use light colors for one bowl, medium for the second, and dark for the third. Mix until the colors are well blended.
Layer the Slime
-
Create the Layers:
- Start by placing the lightest color slime into the bottom of your jar. Press down gently to eliminate air bubbles.
- Next, add the medium-colored slime. Again, press down lightly to compact.
- Finally, top with the darkest color.
-
Seal the Jar:
- Once all layers are added, seal your jar tightly.
Enjoy!
- Sensory Play: Now you can enjoy your beautiful ombre slime or give it as a charming gift!
Tips & Variations
- Color Mixing: Try mixing different colors for a unique ombre effect.
- Scented Slime: Add a few drops of essential oils to infuse your slime with a lovely fragrance.
- Glow-in-the-Dark: Use glow-in-the-dark paint or powder for a luminous effect.
- Chunky Add-ins: Mix in small foam beads or glitter for extra texture and sparkle.
Frequently Asked Questions
Q1: Can I use white glue instead of clear glue?
A1: Yes, but clear glue provides a better visual of the ombre effect.
Q2: What if my slime is too sticky?
A2: Add a bit more contact lens solution, kneading it until it reaches the desired consistency.
Q3: How should I store my slime?
A3: Keep your slime in an airtight jar to maintain its consistency and longevity.
Q4: Can I make this slime without the contact lens solution?
A4: No, the contact lens solution is necessary for the slime to form properly, but you can try other slime activators if needed.
Serving Suggestions or Pairings
- Pair your ombre slime with colorful snacks like fruit skewers or rainbow cupcakes for a themed activity.
- Enjoy a refreshing lemonade or fruit punch alongside your crafting session to brighten the atmosphere.
Final Thoughts
Creating your very own ombre slime jars is not only a fun activity but an excellent way to unleash your creativity. Whether you keep them for yourself or gift them to a friend, these slime jars are sure to make an impact. We’d love to see your unique versions of ombre slime jars! Share your creations in the comments below or ask any questions you may have about the recipe. Happy crafting!
Print
Ombre Slime Jars
- Total Time: 30 minutes
- Yield: 1 jar
- Diet: N/A
Description
Create beautiful ombre slime jars that are perfect for kids and adults alike, offering a fun and sensory-rich crafting experience.
Ingredients
- Clear school glue (8 oz)
- Baking soda (1/2 tsp)
- Contact lens solution (1 tbsp)
- Food coloring (3-4 colors)
- Mixing bowls
- Spoon or spatula
- Airtight jars for storage
Instructions
- In a mixing bowl, combine the clear school glue and baking soda. Stir well until fully incorporated.
- Gradually add the contact lens solution to your glue mixture. Mix until the slime starts to pull away from the sides of the bowl.
- Separate the slime into three equal parts in different bowls or containers.
- Add a different food coloring to each bowl. Mix until the colors are well blended.
- Start by placing the lightest color slime into the bottom of your jar. Press down gently to eliminate air bubbles.
- Add the medium-colored slime and press down lightly to compact.
- Top with the darkest color.
- Seal your jar tightly.
- Enjoy your beautiful ombre slime or give it as a charming gift!
Notes
Consider adding essential oils for scent or glow-in-the-dark paint for a fun twist.
- Prep Time: 30 minutes
- Cook Time: 0 minutes
- Category: Crafts
- Method: Mixing
- Cuisine: N/A
Nutrition
- Serving Size: 1 jar
- Calories: 0
- Sugar: 0g
- Sodium: 0mg
- Fat: 0g
- Saturated Fat: 0g
- Unsaturated Fat: 0g
- Trans Fat: 0g
- Carbohydrates: 0g
- Fiber: 0g
- Protein: 0g
- Cholesterol: 0mg

