

This post contains Amazon affiliate links. As an Amazon Associate I earn from qualifying purchases.
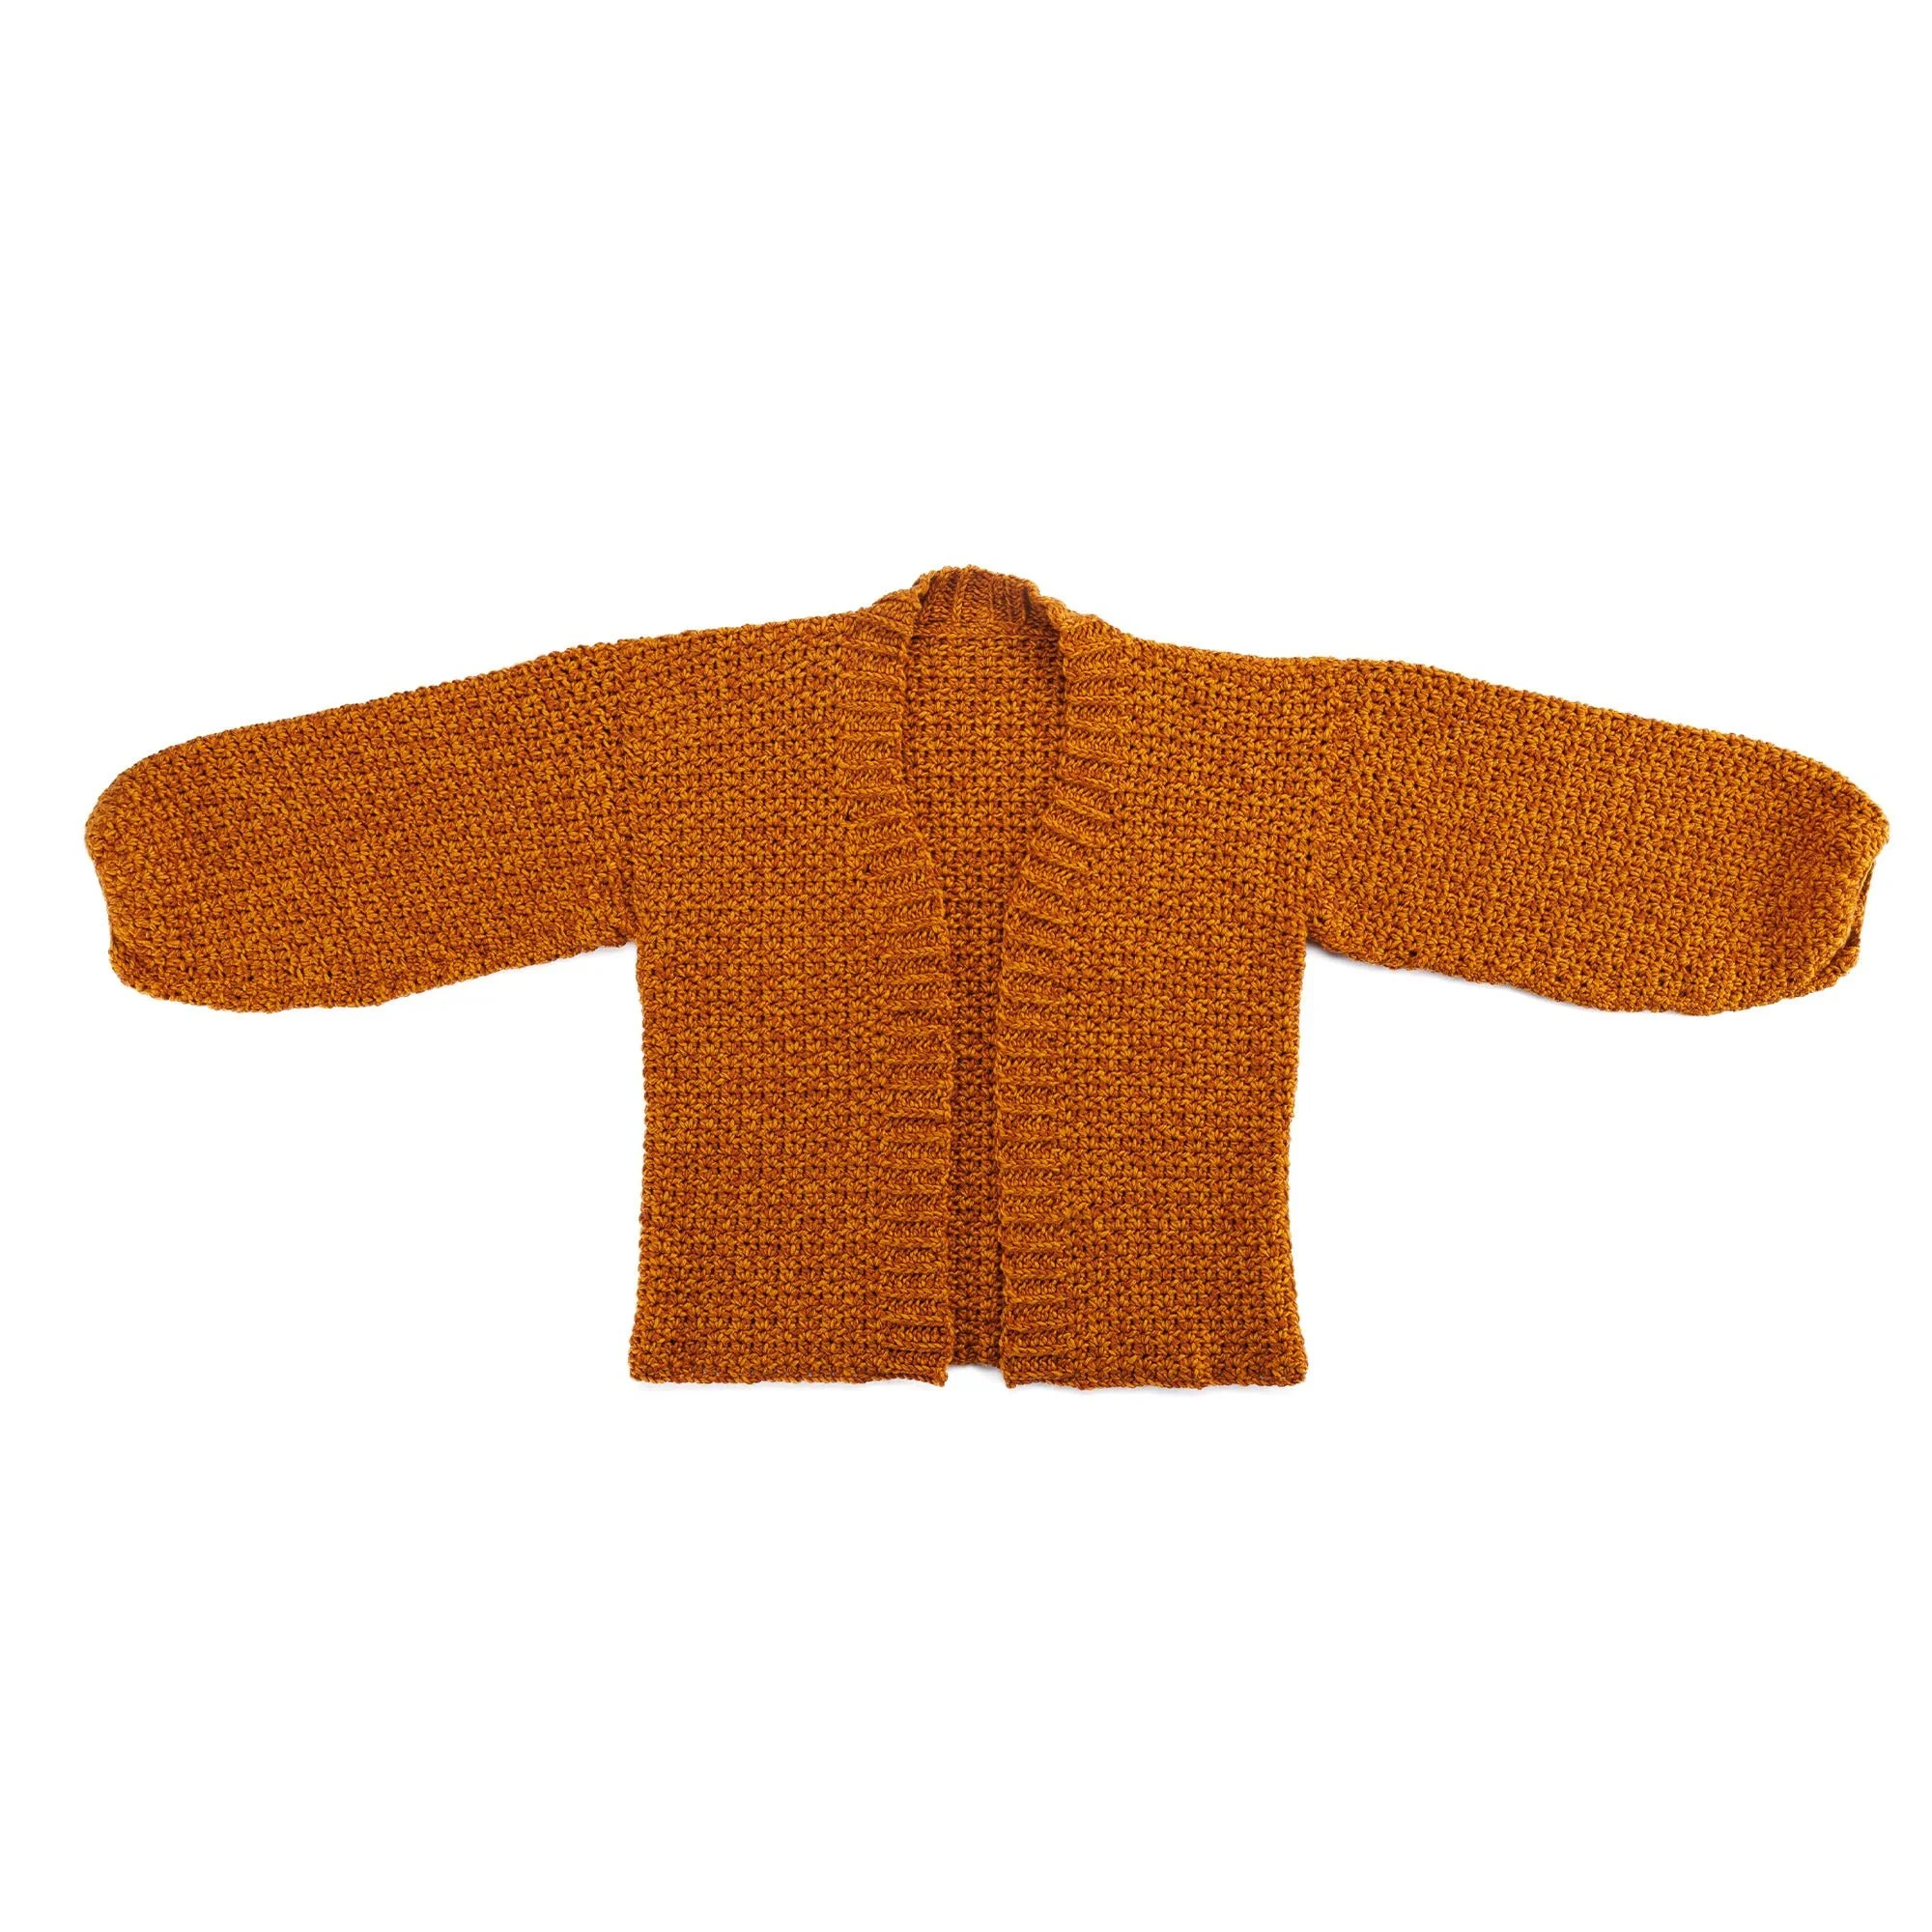
This nice and easy crochet cardigan is a wearable project built from separate body and sleeve sections, then joined with seams and neckband extensions. Its repeating V-stitch pattern gives the fabric a relaxed, decorative look, while the half double crochet (hdc) sections help form the garment’s structure. It’s a satisfying make for crocheters who want to practice garment construction and create a cozy layer for everyday wear, cool evenings, or a thoughtful handmade gift.
Why you’ll love this pattern
The appeal of this crochet cardigan is its combination of a straightforward stitch repeat and practical shaping. V-stitches create open spaces and a pleasing texture without requiring a complicated stitch pattern. Working the body and sleeves as separate pieces also makes the construction easier to understand than a garment worked all in one piece.
This project is a good opportunity to build confidence with garment-making skills, including keeping edges even, shaping a V-neck, and sewing pieces together. Stitch markers can help you keep track of important divisions and shaping points as you work. Once finished, the cardigan is a versatile layer that can be styled with casual clothes or dressed up with accessories.
“The repeating V-stitches made the fabric enjoyable to work, and assembling the separate pieces helped me understand how a cardigan takes shape. I used stitch markers to keep track of my sections, and they made the finishing much less stressful.”
Before you begin
You’ll make a cardigan from separate sections: the body is divided to form the right front, back, and left front, and the sleeves are worked separately. The main stitch pattern combines half double crochet with V-stitches. After the pieces are complete, you’ll sew the shoulder seams, attach the sleeves, and sew the neckband extensions.
The pattern involves more than a basic rectangle, because the front sections need V-neck shaping and the sleeves need shaping as well. It’s most suitable for a crocheter who knows basic stitches and is ready to follow garment shaping instructions. A confident beginner can approach it with patience, careful counting, and a willingness to check the work as it progresses.
The supplied instructions identify a foundation chain of 172 for the body and explain the overall construction, but they do not provide the size-specific chain adjustments, stitch counts for each row, shaping counts, or measurements. They also refer to details “as described” without including the full row-by-row pattern. Use the complete original pattern for those essential counts and exact lengths; don’t guess or substitute shaping instructions.
No reliable completion time can be given without the full stitch instructions and the crocheter’s pace. Plan to work in several sessions, leaving time for measuring and assembly.
Materials you’ll need
- Yarn: Caron® Simply Me Montage™ in Tiger’s Eye or Jasper
- Sizes XS/S: 8 balls
- Size M: 9 balls
- Size L: 10 balls
- Size XL: 11 balls
- Sizes 2/3XL: 13 balls
- Sizes 4/5XL: 14 balls
- Crochet hook: Susan Bates® Silvalume® crochet hook, U.S. I/9 (5.5 mm)
- Notions: Susan Bates® stitch markers and a Susan Bates® yarn needle
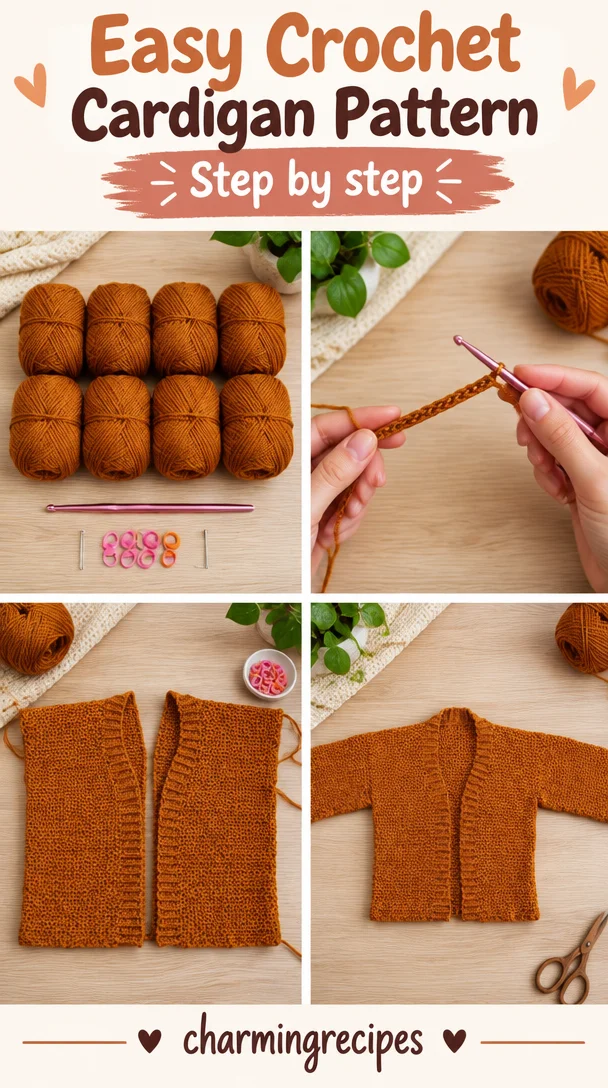
Buy enough yarn for the size you intend to make, and check that all balls are from the same dye lot when possible. Even yarn in the same color can vary slightly between dye lots, which may be noticeable across large garment sections.
The specified 5.5 mm hook is part of the pattern’s sizing and fabric plan. Changing the hook can affect both gauge and drape, so make a swatch and compare it with the gauge instructions in the complete pattern before deciding to use a different size. If you’re considering another yarn, choose one with a similar weight and follow the substitute yarn’s care label. Different fiber content, thickness, or elasticity can change the cardigan’s fit, weight, and finished texture.
Step-by-step instructions
The steps below explain the construction sequence available for this pattern. They are not a replacement for the full pattern: exact size adjustments, row-by-row stitch placement, and V-neck and sleeve shaping counts are not included in the supplied instructions. Refer to the original complete pattern whenever it gives a specific number or placement.
-
Choose your size and prepare your supplies.
Check the size you plan to make and set aside the corresponding number of yarn balls. Read the complete pattern before beginning so you can identify the size-specific foundation chain, section lengths, and shaping instructions. Place stitch markers within easy reach. -
Work the body foundation.
Begin with a foundation chain of 172 as stated in the supplied instructions, adjusting the chain for other sizes according to the complete pattern. Do not assume that 172 applies to every size. Keep the chain relaxed rather than pulling it tight; a tight foundation edge can draw in and make the bottom of the cardigan narrower than the fabric above it. -
Work the first body row.
Start the first row using half double crochet and V-stitch sections in the arrangement given in the full pattern. A V-stitch commonly consists of two stitches worked into the same space with a chain between them, but follow the pattern’s own definition and placement. Check the row as you go, since misplaced V-stitches can shift the fabric pattern. -
Continue the body pattern.
Follow the specified hdc and V-stitch sequence for the required length. Keep track of the right-front division and the point where the body separates into sections. The supplied instructions do not state the exact row counts or lengths, so use the complete pattern rather than estimating how many repeats to work. -
Shape the right front and V-neck.
Continue the V-stitch pattern for the right-front section as directed, then work the V-neck shaping given for your size. Mark the neck edge and follow each shaping instruction in order. Do not add or remove stitches to make the edge look more curved unless the pattern calls for it; unplanned changes can affect the shoulder seam and neckline. -
Work the back section.
Follow the corresponding body and V-stitch instructions for the back. Use the complete pattern’s row counts and length measurements so the back aligns with the front sections at the shoulders. If the right front, back, or left front appears noticeably different in length, pause and compare the sections before continuing. -
Make the left front.
Work the left-front section using the pattern’s instructions. Its shaping will relate to the opposite side of the neckline, so check the directions carefully rather than assuming every step is identical to the right front. Keep the section lengths consistent with the pattern. -
Work the sleeves.
Make each sleeve from its specified foundation chain, adjusting for the selected size as directed in the complete pattern. Follow the sleeve instructions for the hdc and V-stitch pattern and the shaping. The supplied outline does not include the sleeve chain counts, increase or decrease instructions, or finished measurements; don’t invent them. Keep the two sleeves consistent by checking their lengths and shaping as you work. -
Arrange the pieces for assembly.
Lay the body sections and sleeves flat on a clean surface. Confirm that the front and back pieces are oriented correctly and that the neckline is at the top. Use stitch markers to hold matching edges in place before sewing. This makes it easier to catch mismatched lengths or twisted sleeve placement before the seams are closed. -
Sew the shoulder seams.
Use the yarn needle to sew the shoulder seams as instructed. Keep the seam edges aligned and use a comfortable, even sewing tension. Pulling the yarn too tightly can make the shoulder seam pucker; leaving it too loose can create gaps. -
Attach the sleeves.
Position each sleeve according to the full pattern and attach it to the body. Match the sleeve center to the shoulder area if the pattern identifies a center point, and use markers to distribute the remaining fabric evenly. Before finishing each seam, check that the sleeve is not twisted. -
Sew the neckband extensions and finish.
Complete the neckband extensions according to the original pattern. The supplied instructions identify this as a finishing step but do not provide extension length or construction details, so follow the complete directions for the correct result. Weave in yarn ends securely with the yarn needle, then gently arrange the cardigan to its intended shape.
Styling inspiration
Wear the finished cardigan as a comfortable layer over a simple T-shirt, blouse, or lightweight dress. The V-neck shape works well with a collared shirt or a scarf, and the open stitch texture can add interest without needing additional decoration.
This is also a useful handmade gift when you know the recipient’s preferred colors and can choose a size carefully. If gifting it, consider including a small note about the yarn’s care instructions. For craft-fair or handmade-shop listings, photograph the cardigan on a hanger or dress form and include clear information about the fiber, size, and care. Before selling finished items, check the original designer’s usage terms; the pattern information provided here does not state what sales are permitted.
How to care for your crochet project
Follow the care instructions on the Caron® Simply Me Montage™ label. Yarn fiber content and recommended cleaning methods should be confirmed from the label rather than assumed. If the label permits machine washing, use the recommended cycle and temperature, and consider a mesh laundry bag to reduce friction. If hand washing is recommended, use cool or lukewarm water and a gentle wash method.
Avoid wringing or twisting the cardigan, which can stretch the fabric and distort the V-neck and sleeves. Press water out gently with a clean towel, then lay the garment flat to dry. Arrange the body and sleeves evenly while damp, but avoid pulling them longer than their intended shape.
Check the label before using heat or a dryer. High temperatures can damage some fibers or change the fabric’s fit. Store the cardigan clean and fully dry, folded rather than hung for long periods if the garment feels heavy. Hanging can stretch crocheted fabric under its own weight. Keep it away from rough surfaces that may snag the V-stitches, and handle pilling with a fabric comb suitable for the yarn.
Tips for success
- Use the stated hook and check gauge. A 5.5 mm hook is specified, but your personal tension can still change the finished measurements. Make and measure a gauge swatch using the stitch pattern and instructions in the complete pattern.
- Count as you work. V-stitch repeats can make it easy to miss a stitch or place two into the same space accidentally. Check the repeat at regular intervals, especially near the start and end of a row.
- Mark key locations. Use stitch markers for body divisions, neckline edges, sleeve placement, and any points identified in the pattern. Markers are especially helpful when you put the project down between sessions.
- Keep the foundation chain even. Work into the chain gently. If your starting chain is consistently tighter than the following rows, try making the chain with a slightly larger hook only if the pattern and gauge allow it, then change back for the first row.
- Compare pieces before assembly. Lay the fronts and back together before sewing. Check that the shoulders and side edges align according to the full pattern and that the sleeves match each other.
- Check right and wrong sides. The finished fabric may look different on each side. Keep the pieces facing the correct way when joining them, and confirm that the neckline and sleeve orientation match the instructions.
- Sew with steady tension. Use a yarn needle and the recommended seaming method from the complete pattern. Even stitches help create a flexible seam; overly tight sewing can distort the garment.
- Don’t guess at missing shaping. The overview does not contain the counts needed to form the V-neck or sleeves accurately. Keep the full pattern nearby for these steps instead of improvising.
Creative variations
Color is the simplest way to personalize this cardigan. Tiger’s Eye and Jasper are the listed choices, but another suitable yarn color may work if you first check its weight, fiber, and gauge. A different yarn can alter the fabric’s drape, thickness, and finished size, and may change how much yarn you need.
A contrasting border could add definition at the front opening or sleeves if the complete pattern allows an added edging. Any extra edging may change the garment’s dimensions or use more yarn, so make a small test first and avoid adding it if it interferes with the neckband extensions.
You can also personalize the cardigan with simple embroidery or a small appliqué, placed where it won’t interfere with seams or stretch points. If changing the yarn or adding decoration, keep the garment’s intended drape in mind: bulky yarn or dense embellishments can make the fabric heavier, while a lighter yarn may make it more open and less structured. For size changes, use the original pattern’s size and shaping information rather than adding chains or rows without checking gauge and measurements.
Frequently asked questions
Is this crochet cardigan pattern beginner-friendly?
It’s approachable for a confident beginner who knows basic crochet stitches, especially half double crochet, and is ready to follow a stitch repeat and seam garment pieces. The V-neck and sleeve shaping require careful attention. The complete pattern is essential for the exact counts and shaping instructions.
What yarn is listed for the cardigan?
The specified yarn is Caron® Simply Me Montage™ in Tiger’s Eye or Jasper. The amount depends on size, from 8 balls for XS/S to 14 balls for sizes 4/5XL. Check the yarn label for fiber content and care instructions.
How much yarn do I need?
Use the listed amount for your size: XS/S uses 8 balls; M, 9; L, 10; XL, 11; sizes 2/3XL, 13; and sizes 4/5XL, 14. It’s wise to confirm the exact size category in the full pattern before purchasing.
Can I use a different hook size?
The pattern specifies a U.S. I/9 (5.5 mm) hook. A different size may change gauge, fabric density, drape, and finished dimensions. If you need to adjust your hook to meet the gauge in the complete pattern, make and measure a swatch before starting the garment.
Can I substitute another yarn?
Possibly, but choose a yarn with a similar weight and make a gauge swatch first. Fiber, thickness, and elasticity can change the cardigan’s fit and feel. A different yarn may also have different care requirements and may need a different amount.
How long will it take to make?
The available instructions don’t provide an estimated completion time. The total depends on your pace, the size, how quickly you work the V-stitch repeat, and how much time you spend on shaping and assembly. Allow time to check measurements and sew the pieces neatly.
How can I make the cardigan larger or smaller?
Choose the size instructions that match your measurements, and use the corresponding foundation chain and shaping directions in the full pattern. Don’t simply add or remove chains from the 172-chain foundation without checking the pattern’s size adjustments, stitch multiple, gauge, and V-neck shaping.
Why does my cardigan fabric look uneven?
Uneven tension or misplaced V-stitches can make the fabric appear irregular. Check that you’re working into the correct chain spaces, placing the stitches in the intended order, and maintaining a consistent yarn tension. Compare a section with the pattern before continuing if the repeat seems to shift.
How should I wash the finished cardigan?
Follow the care instructions on the yarn label. Use gentle handling, avoid twisting, and reshape the cardigan flat to dry if the label allows. Don’t apply heat or tumble dry unless the yarn label recommends it.
Can I sell a finished cardigan made from this pattern?
The supplied pattern information doesn’t state whether finished items may be sold. Check the original designer’s usage terms before listing or selling any finished cardigan.
Print
Crochet Cardigan
Description
This nice and easy crochet cardigan is a wearable project built from separate body and sleeve sections, then joined with seams and neckband extensions. Its repeating V-stitch pattern gives the fabric a relaxed, decorative look, while the half double crochet (hdc) sections help form the garment’s structure.
Materials
- Yarn: Caron® Simply Me Montage™ in Tiger’s Eye or Jasper – Sizes XS/S: 8 balls, Size M: 9 balls, Size L: 10 balls, Size XL: 11 balls, Sizes 2/3XL: 13 balls, Sizes 4/5XL: 14 balls
- Crochet hook: Susan Bates® Silvalume® crochet hook, U.S. I/9 (5.5 mm)
- Notions: Susan Bates® stitch markers, Susan Bates® yarn needle
Instructions
- Choose your size and prepare your supplies.
- Check the size you plan to make and set aside the corresponding number of yarn balls.
- Read the complete pattern before beginning to identify the size-specific foundation chain, section lengths, and shaping instructions.
- Place stitch markers within easy reach.
- Begin with a foundation chain of 172 as stated in the supplied instructions, adjusting the chain for other sizes according to the complete pattern.
- Start the first row using half double crochet and V-stitch sections in the arrangement given in the full pattern.
- Follow the specified hdc and V-stitch sequence for the required length.
- Continue the V-stitch pattern for the right front section as directed, then work the V-neck shaping given for your size.
- Follow the corresponding body and V-stitch instructions for the back.
- Work the left-front section using the pattern’s instructions.
- Make each sleeve from its specified foundation chain, adjusting for the selected size as directed in the complete pattern.
- Lay the body sections and sleeves flat on a clean surface.
- Use stitch markers to hold matching edges in place before sewing.
- Use the yarn needle to sew the shoulder seams as instructed.
- Position each sleeve according to the full pattern and attach it to the body.
- Complete the neckband extensions according to the original pattern.
- Weave in yarn ends securely with the yarn needle, then gently arrange the cardigan to its intended shape.
Notes
Make sure to check that all balls of yarn are from the same dye lot. The specified hook size is part of the pattern’s sizing and fabric plan; changing it can affect both gauge and drape.