Creating a Lace Lantern fills the room with a gentle glow, transforming ordinary moments into something magical. The soft shapes woven by lace play with shadows, inviting stillness and warmth. As you sit quietly with materials in hand, the delicate texture of the lace slides through your fingers, and the scent of craft glue or candle wax mingles in the air, grounding you. This simple project evokes a delightful sense of calm, allowing your thoughts to drift softly like the light that will eventually dance from the lantern.
Why Make This Lace Lantern
Crafting a Lace Lantern resonates with our innate desire for comfort and serenity. This project encourages a gentle pace, drawing you away from the hustle of daily life into a peaceful state of being. The rhythmic motion of applying lace feels meditative, as each layer invites mindfulness and presence. Glancing at the elegant patterns cast by the lantern gives satisfaction while the flickering light warms your space. This unique piece becomes more than a decoration; it embodies a moment of creativity, inviting reflection and balance.
The Flow of Making Lace Lantern
Before diving into the details, it’s helpful to visualize the flow of the project. Picture yourself gathering materials, moving gracefully from one step to the next. The process begins with preparing the lace, then gliding your brush through soft glue, adhering each piece of lace carefully on your chosen surface. Take a breath as you work; let the textures of the lace and the light sound of your brush dance in the background. As you shape your lantern, you can feel the gentle reminder of your hands creating something special that will fill your space with warmth.
Materials You’ll Need
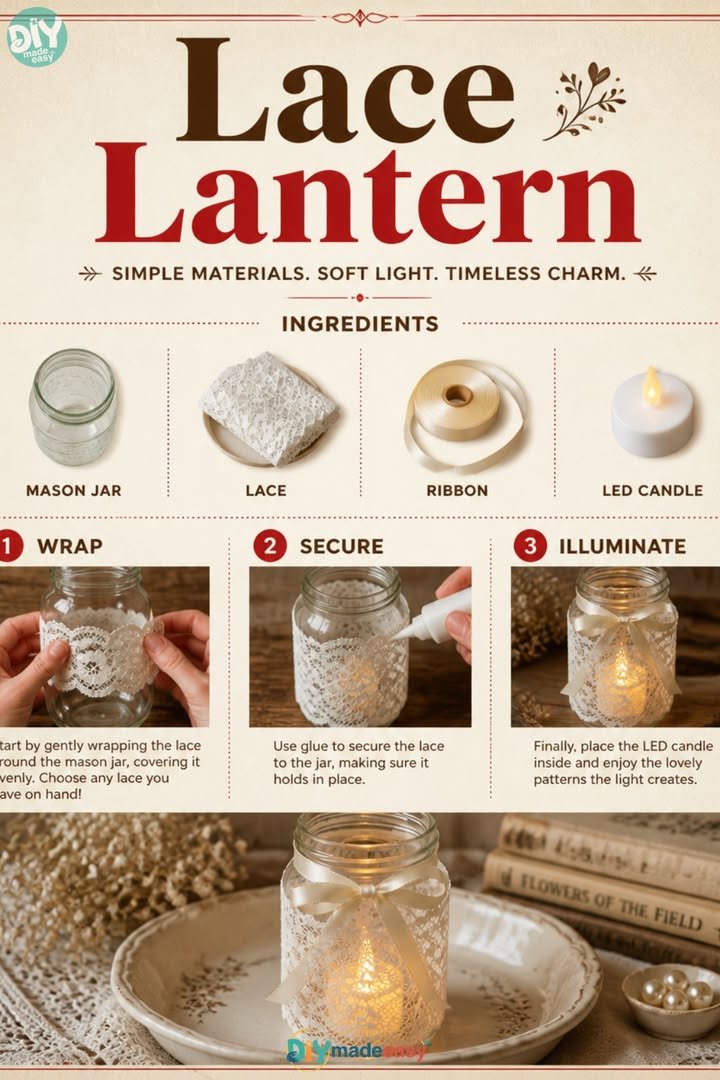
- Lace fabric (easy to find at craft stores)
- A glass jar or a clear plastic container
- Craft glue (water-soluble for easy cleanup)
- A paintbrush (soft bristles for gentle application)
- Scissors (for trimming)
- An LED tealight candle or small string lights (for safety and ease)
These materials come together harmoniously, inviting you to explore textures and forms. The lace acts as a delicate veil, ensuring the light shines softly while keeping the charm intact.
Step-by-Step Directions
-
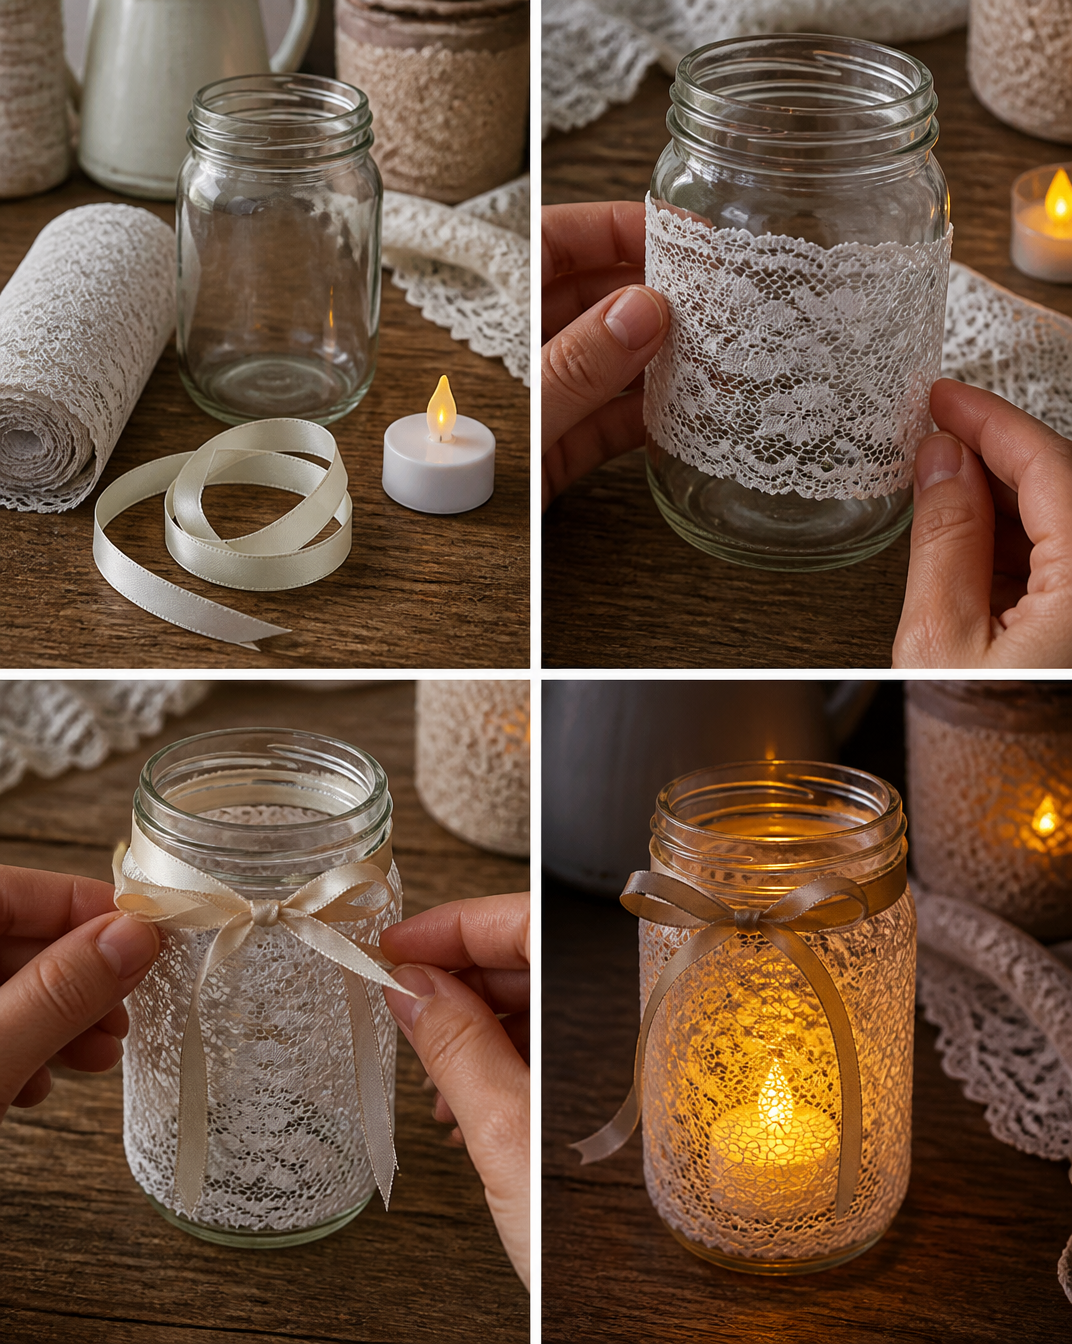
Start by preparing your workspace, laying down a soft cloth or newspaper to catch any drips. This simple setup helps you feel grounded and clear-headed.
-
Cut the lace into manageable pieces. You may choose various shapes or simple strips; just let your creativity guide you. Feel the smooth edges, noticing how they bend slightly between your fingers.
-
Pour a small amount of craft glue into a bowl. Dip your brush into the glue, swirling it gently to gather just enough for the first application.
-
Brush a thin layer of glue on the jar or container where you want to place the lace. The texture of the jar contrasts with the lace, creating a visual dance that adds depth to your work.

-
Begin laying the lace onto the glued area, pressing gently to secure it. Notice how the fabric clings softly to the surface, creating a tactile experience.
-
Continue applying glue and lace around the jar, overlapping pieces as you go. Feel the control in your movements as the pattern takes shape; this portion of the process feels almost like painting with fabric.
-
Once you have covered the jar, allow it to dry completely in a safe space. The gentle anticipation builds as you watch your creation transform.
-
Once dry, place the LED tealight candle inside or wrap small string lights around the inner rim. Slowly turn on the light and watch your lace lantern come to life.
Enjoying the Finished Piece
Your Lace Lantern can add a cozy touch to many areas in your home. Place it on a side table, letting its soft glow welcome guests into your space. Sit quietly with it during evening rituals, or bring it out to create a calming atmosphere for reading or journaling. Lighting it creates a mesmerizing interplay between light and shadow, prompting peaceful reflections and thoughtful moments.
You may even set it on your windowsill, where gentle breezes can carry the whispers of lace to the soft sounds of the outside world. As the light flickers, allow yourself to appreciate the uniqueness of your creation, reflecting the calmness cultivated during the making process.
Keeping It for Later
Storing your Lace Lantern is a simple and gentle process. Keep it in a safe, dry place where it won’t be exposed to moisture or extreme temperatures. If it’s a seasonal decoration, wrapping it in soft cloth can help prevent any accidental damage while stowing it away. When you’re ready to pull it out again, ensure the surface is clean and free from dust.
Since the lantern is made with care, it can last for many seasons. If you find it getting worn over time, a light touch-up with more lace can refresh its beauty, embracing the evolving nature of your journey with this piece.
Gentle Tips & Variations
-
Experiment with layering lace patterns to create different effects. Each layer can introduce a new texture or design, inviting a unique character to your lantern.
-
Consider using different colors of lace or even adding a touch of dye to your glue for an artsy twist. The hues will deepen the sensory experience as they interact with the warm light.
-
Try adding natural elements such as dried flowers or leaves within the jar before sealing it. This addition creates a lovely aesthetic and further enriches the calming, earthy vibe.
-
Incorporate words or small affirmations on the inside of the jar. As the light shines through them, they serve as reminders of peace and love.
-
Transform your lanterns into gifts. Encourage fellow crafters to join you in a relaxed session, sharing ideas and materials while creating together.
FAQs About Lace Lantern
Can I use any type of lace for this project?
Yes, you can choose any lace that feels comfortable for you. Experiment with different textures to see which one resonates most.
Is the glue safe for kids to use?
Water-soluble craft glue is generally safe for kids but always supervise them for extra care.
What if I don’t have a tealight candle? Can I use something else?
Absolutely. Battery-operated lights or even a small string of fairy lights work beautifully and are safe for your lantern.
How long will it take to dry?
Allow at least 1-2 hours for your lantern to dry completely. If you live in a more humid climate, extending that time might be wise.
Can I use this lantern outdoor?
While it’s designed for indoor use, you might occasionally bring it outside for a warm summer evening. Just ensure it is away from direct wind or moisture.
A Gentle Note Before You Go
As you wrap up your time crafting a Lace Lantern, take a moment to breathe deeply and reflect. This project embodies the essence of slow creativity, where each step nurtured your spirit. Let the experience linger, inviting more calm and creativity into your life. Remember, the journey of making is as beautiful as the light that emanates from your lantern. Embrace the quiet joy of creation and find beauty in the simple act of being present.
Print
Lace Lantern
- Total Time: 135 minutes
- Yield: 1 lantern
- Diet: N/A
Description
Craft a beautiful Lace Lantern that fills your space with a gentle glow, perfect for calm evenings and reflective moments.
Ingredients
- Lace fabric (easy to find at craft stores)
- A glass jar or a clear plastic container
- Craft glue (water-soluble for easy cleanup)
- A paintbrush (soft bristles for gentle application)
- Scissors (for trimming)
- An LED tealight candle or small string lights (for safety and ease)
Instructions
- Start by preparing your workspace, laying down a soft cloth or newspaper to catch any drips.
- Cut the lace into manageable pieces, allowing your creativity to guide you.
- Pour a small amount of craft glue into a bowl.
- Brush a thin layer of glue on the jar or container where you want to place the lace.
- Begin laying the lace onto the glued area, pressing gently to secure it.
- Continue applying glue and lace around the jar, overlapping pieces as you go.
- Once you have covered the jar, allow it to dry completely in a safe space.
- Once dry, place the LED tealight candle inside or wrap small string lights around the inner rim.
Notes
Experiment with layering lace patterns and different colors to enhance your lantern’s character. Consider adding natural elements like dried flowers for an extra touch.
- Prep Time: 15 minutes
- Cook Time: 120 minutes
- Category: Crafts
- Method: Crafting
- Cuisine: N/A