DIY Calm-Down Bottles

Jar & Bottle Crafts

This post contains Amazon affiliate links. As an Amazon Associate I earn from qualifying purchases.

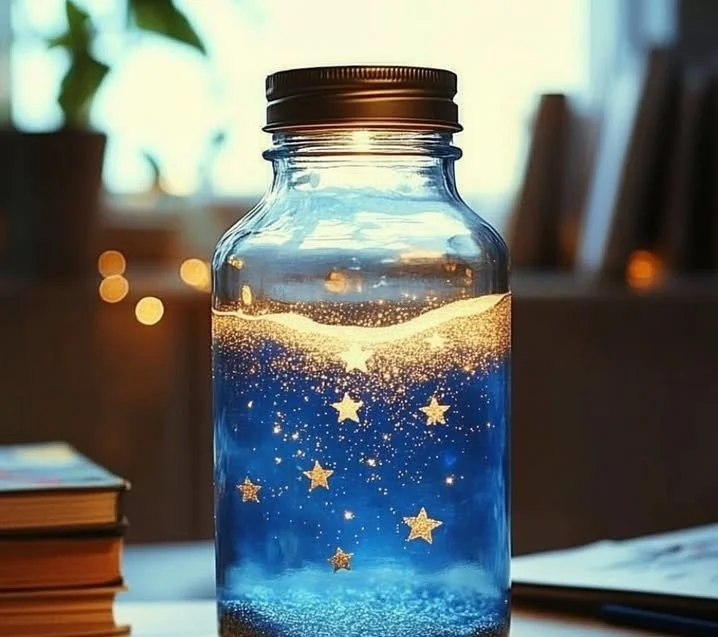
In our fast-paced world, finding effective ways to nurture calmness and mindfulness is essential. DIY Calm-Down Bottles offer an engaging and therapeutic way to promote relaxation and focus, especially for children. These mesmerizing bottles are filled with glitter, water, and various sensory materials, creating a captivating visual experience that can help soothe anxiety and distract from stressful situations. Not only are they easy to make, but they also serve as a fun family activity, encouraging creativity and self-regulation in children. Once completed, these bottles can be used during moments of frustration, providing a moment of pause as the contents swirl and settle. Dive into this delightful craft and discover how to create your very own calm-down bottles!

Why You’ll Love This DIY Calm-Down Bottles:

  • Promotes Relaxation: The soothing movement of glitter helps calm the mind.
  • Customizable: Make it unique with various colors, shapes, and materials.
  • Easy to Make: Requires minimal materials and effort — perfect for a quick craft session.
  • Great for All Ages: Suitable for both children and adults, making it a versatile tool for mindfulness.
  • Reusable: Unlike other stress-relief tools, these bottles can be used repeatedly.
  • Fun Activity: Enjoy quality time making this craft project with family or friends.

Materials

  • Clear plastic bottle or jar with a tight lid
  • Water
  • Glitter (various colors)
  • Food coloring (optional)
  • Glue (clear craft glue or glitter glue for added thickness)
  • Small gems or beads (optional)
  • Funnel (for easy pouring)
  • Measuring cup

Full Step-by-Step

Step 1: Prepare Your Bottle

  • Start with a clean, dry plastic bottle or jar.
  • Remove any labels to make your bottle look neat.

Step 2: Add Glitter

  • Use a funnel to pour in the desired amount of glitter.
  • Experiment with different colors and types for more visual appeal.

Step 3: Mix in Other Materials

  • Add small beads, gems, or sequins for extra sensory stimulation if desired.
  • The combination will create varied textures and enhance the calming effect.

Step 4: Fill with Water

  • Pour in water until the bottle is nearly full, leaving some space at the top.
  • If using food coloring, add a few drops now to achieve your desired shade.

Step 5: Seal the Bottle

  • Add glue around the inside of the cap before sealing to prevent leaks.
  • Twist the cap on tightly.

Step 6: Shake and Observe

  • Shake the bottle and watch the glitter swirl around.
  • Allow it to settle and see the calming visuals that emerge.

Tips & Variations

  • Use Different Liquids: Consider using glycerin or clear corn syrup to slow down the glitter movement, creating a more serene experience.
  • Theme Your Bottles: Create themed bottles (e.g., ocean, forest) with color schemes and decorations to match.
  • Experiment with Thickness: Vary the ratio of water to glue for different flow rates of glitter.
  • Add Essential Oils: For an aromatic touch, a drop of lavender oil can enhance the calming effect.

Frequently Asked Questions

Q1: What type of bottle is best to use?
A1: Any clear plastic or glass bottle with a secure lid is suitable. Ensure it’s not too heavy for children to handle.

Q2: Can I use other materials besides glitter?
A2: Absolutely! Try using confetti, sand, or small plastic figurines for varied visuals and textures.

Q3: How do I prevent leaking?
A3: Applying glue around the lid before sealing helps create a watertight seal.

Q4: What if my child has sensitivities to certain materials?
A4: Always check for allergies before using materials. Adjust your choices based on what your child can tolerate.

Suggestions

  • Create a calm-down corner equipped with various calm-down bottles for a tranquil space at home or in the classroom.
  • Use these bottles as part of a mindfulness activity, allowing time for reflection and discussion.
  • Consider gifting completed bottles to friends or family as thoughtful, personalized stress-relief tools.

Final Thoughts

Creating DIY calm-down bottles is a joyous and peaceful craft that can provide ongoing benefits for relaxation and mindfulness. We encourage you to share your own versions, including pictures or any unique adaptations you’ve tried, in the comments below. Let’s inspire each other to find calm in the chaos!

Print
clock clock iconcutlery cutlery iconflag flag iconfolder folder iconinstagram instagram iconpinterest pinterest iconfacebook facebook iconprint print iconsquares squares iconheart heart iconheart solid heart solid icon
diy calm down bottles 2025 12 24 105150 150x150 1 - DIY Calm-Down Bottles

DIY Calm-Down Bottles


5 Stars 4 Stars 3 Stars 2 Stars 1 Star

No reviews

Description

Create your own engaging and therapeutic calm-down bottles filled with glitter and sensory materials to promote relaxation and mindfulness.


Ingredients

  • Clear plastic bottle or jar with a tight lid
  • Water
  • Glitter (various colors)
  • Food coloring (optional)
  • Glue (clear craft glue or glitter glue)
  • Small gems or beads (optional)
  • Funnel
  • Measuring cup


Instructions

  1. Prepare your bottle by cleaning it and removing any labels.
  2. Add desired amount of glitter using a funnel.
  3. Mix in small beads, gems, or sequins if desired.
  4. Fill the bottle with water, leaving some space at the top.
  5. If using food coloring, add a few drops now.
  6. Seal the bottle by applying glue around the inside of the cap and twisting it tightly.
  7. Shake the bottle and observe the calming visuals as the glitter swirls and settles.

Notes

Experiment with different liquids like glycerin to slow down the glitter movement. Customize bottles with themes for a fun touch.

  • Prep Time: 10 minutes
  • Cook Time: 0 minutes
  • Category: Craft
  • Method: Crafting
  • Cuisine: N/A

Leave a Comment

DIY Calm-Down Bottles

Jar & Bottle Crafts

In a fast-paced world filled with constant stimulation, finding effective ways to unwind and calm down is essential. DIY calm-down bottles are not only visually captivating but also serve as a practical tool for regulating emotions, especially for children. These sensory bottles can help soothe anxiety, promote focus, and foster relaxation by providing a mesmerizing visual experience. Whether it’s the gentle swirl of glitter or the slow drift of colorful beads, these bottles allow individuals of all ages to take a moment for mindfulness. Making your own calm-down bottle is simple, fun, and can be tailored to suit personal tastes and preferences. With just a few basic materials and a little creativity, you’ll have a delightful sensory tool perfect for use at home, in the classroom, or on the go.

Why You’ll Love This DIY Calm-Down Bottle

  • Visual Stimulation: Captivating movement that engages the eyes and mind.
  • Promotes Mindfulness: Encourages a moment of pause, increasing awareness and presence.
  • Customizable: Tailor ingredients and colors to fit personal tastes.
  • Portable: Easy to take on trips for instant relaxation.
  • Cost-Effective: A meaningful project that can be done with inexpensive materials.
  • Fun Project: Great for family bonding or classroom activities.

Materials

  • Clear plastic bottle (empty soda or water bottle)
  • Water
  • Glitter or liquid glitter
  • Food coloring (optional)
  • Clear corn syrup or glycerin (for slower movement)
  • Small items (beads, sequins, tiny toys)
  • Hot glue gun (for sealing the bottle)
  • Optional: glitter glue, essential oils (for added relaxation)

Step-by-Step Instructions

Prepare the Bottle

  1. Clean the Bottle: Ensure your plastic bottle is free from labels and residues. Rinse it with warm soapy water and let it dry completely.

Add Your Materials

  1. Fill the Bottle: Start filling your bottle with water, leaving some space at the top.
  2. Add Glitter: Carefully sprinkle in a few tablespoons of glitter. The more you use, the more sparkly it will be!
  3. Incorporate Additional Items: Toss in your chosen small items like beads or sequins for extra excitement.
  4. Color It Up: If you want a colored effect, add a few drops of food coloring.

Create Movement

  1. Thicken the Mixture: For slower movement, add a tablespoon or two of clear corn syrup or glycerin. This will help the items float and swirl gently.
  2. Seal the Bottle: Use a hot glue gun to carefully seal the cap of the bottle to prevent spills.

Final Touches

  1. Shake and Enjoy: Give your calm-down bottle a gentle shake and watch the magic unfold. Keep it handy for those moments when you need a soothing escape.

Tips & Variations

  • Customize Colors: Use colored water or matching food coloring to fit themes (holidays, favorite colors).
  • Scented Bottles: Add a few drops of essential oils like lavender or chamomile for calming effects.
  • Use Different Containers: Experiment with jars or different bottle shapes for varied experiences.
  • Layered Effects: Try layering different elements that mix and separate to create unique visual effects.

Frequently Asked Questions

1. Can I use other types of bottles?
Yes, you can use any clear container with a secure lid. Just ensure it’s not too small to avoid choking hazards.

2. What if my glitter doesn’t move?
If the glitter sticks to the bottom, try adding a bit more water or ensure your corn syrup isn’t too thick.

3. Can I use different materials besides glitter?
Absolutely! Sparkles, beads, small toys, or even nature items like dried flowers can add a personal touch.

4. How do I clean it if it spills?
If the bottle spills, clean the area with warm, soapy water. Keep it sealed to minimize spills.

Serving Suggestions or Pairings

  • Alongside a Calm Snack: Pair with calming herbal teas like chamomile or mint for an overall soothing experience.
  • Mindfulness Activities: Use the calm-down bottle during meditation or breathing exercises to enhance relaxation.
  • Story Time: Incorporate during quiet reading times to help focus and calm active minds.

Final Thoughts

Creating a DIY calm-down bottle is a delightful and rewarding project that can enhance well-being and mindfulness. Whether you choose to make it a family activity or a personal retreat tool, these bottles invite moments of peace and tranquility into your routine. We’d love to see your creations! Feel free to share your versions or leave a comment about how your calm-down bottle is making a positive impact in your life. Happy crafting!

Print
clock clock iconcutlery cutlery iconflag flag iconfolder folder iconinstagram instagram iconpinterest pinterest iconfacebook facebook iconprint print iconsquares squares iconheart heart iconheart solid heart solid icon
diy calm down bottles 2025 10 10 214517 150x150 1 - DIY Calm-Down Bottles

DIY Calm-Down Bottle


5 Stars 4 Stars 3 Stars 2 Stars 1 Star

No reviews

Description

Create your own calming sensory bottle to promote mindfulness and relaxation.


Ingredients

  • Clear plastic bottle (empty soda or water bottle)
  • Water
  • Glitter or liquid glitter
  • Food coloring (optional)
  • Clear corn syrup or glycerin (for slower movement)
  • Small items (beads, sequins, tiny toys)
  • Hot glue gun (for sealing the bottle)
  • Optional: glitter glue, essential oils (for added relaxation)


Instructions

  1. Clean the Bottle: Remove labels and rinse with warm soapy water. Let it dry completely.
  2. Fill the Bottle: Pour water into the bottle, leaving space at the top.
  3. Add Glitter: Sprinkle a few tablespoons of glitter into the bottle.
  4. Incorporate Additional Items: Add chosen small items like beads or sequins.
  5. Color It Up: Add a few drops of food coloring if desired.
  6. Thicken the Mixture: Add corn syrup or glycerin to slow down movement.
  7. Seal the Bottle: Use hot glue to seal the cap securely.
  8. Shake and Enjoy: Give it a shake and watch the mesmerizing effects.

Notes

Customize with different colors, scents, or containers for unique experiences.

  • Prep Time: 15 minutes
  • Cook Time: 0 minutes
  • Category: Craft
  • Method: DIY
  • Cuisine: N/A

Leave a Comment