Description
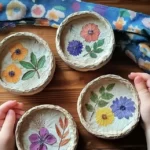
Learn to create charming pinch pots using simple clay techniques, perfect for decoration or practical use.
Ingredients
- Air-dry clay or oven-bake clay
- A small bowl of water (for smoothing)
- A rolling pin
- A craft knife or clay cutter
- A clay sculpting tool (optional)
- Paints or sealants (optional for decoration)
Instructions
- Prepare Your Workspace: Lay down newspaper or a plastic sheet to keep your area clean and gather all materials within reach.
- Roll Out the Clay: Take a portion of your clay and knead it until soft and pliable. Use a rolling pin to flatten the clay to about 1/4 inch thick.
- Shape Your Pinch Pot: Cut out a circle from the clay using a craft knife. Pinch the edges of the circle to form a shallow bowl shape, pressing up from the bottom.
- Smooth the Surface: Dip your fingers in water and gently smooth out any cracks or rough edges for a polished look.
- Let It Dry: Allow your pinch pot to dry completely as per your clay’s instructions (may take several hours to a day).
- Decorate (Optional): Once dry, paint your pinch pot or apply sealants for added design and durability.
Notes
Consider adding textures with natural objects. Adjust sizes for varying pot dimensions.
- Prep Time: 15 minutes
- Cook Time: 0 minutes
- Category: Craft
- Method: Hand-forming
- Cuisine: Crafting
Nutrition
- Serving Size: 1 pot
- Calories: 0
- Sugar: 0g
- Sodium: 0mg
- Fat: 0g
- Saturated Fat: 0g
- Unsaturated Fat: 0g
- Trans Fat: 0g
- Carbohydrates: 0g
- Fiber: 0g
- Protein: 0g
- Cholesterol: 0mg