

This post contains Amazon affiliate links. As an Amazon Associate I earn from qualifying purchases.
This knit headband with a crochet flower combines a comfortable tapered band with a layered, dimensional flower. The headband is worked flat with knitting needles, while the flower is crocheted separately and sewn on at the end. It’s a satisfying project for someone who enjoys mixing crafts, and the button closure makes the fit adjustable. Wear it on cool days, or make one as a thoughtful handmade gift.
Why you’ll love this pattern
This project brings together simple knitting and crochet techniques in one wearable accessory. The headband is shaped with increases and decreases, giving it a wider section for the flower and narrower ends that fasten at the back. The crochet flower adds color and texture without requiring a complicated assembly.
The pattern also offers useful practice. You’ll work with slipped edge stitches, make paired increases and decreases, form buttonholes, and crochet petals in several rounds. If you’re comfortable with basic knitting and crochet stitches, you can take your time through the shaping and enjoy watching the flower grow.
Because the headband is narrow and portable, it’s easy to work on in short sessions. The flower is made separately, so you can finish it at home or carry it along as a small crochet project. In Lime, the flower and band make a cheerful accent; other colors can make the accessory more understated or seasonal.
“I enjoyed switching between knitting the band and crocheting the flower. The shaping gave the headband a nice wide spot for the petals, and trying it on before finishing made it easy to get a comfortable fit.”
How this pattern comes together
First, knit the headband flat from one narrow end. You begin with 7 stitches and work a short section before increasing gradually to create the wider part. After working to the specified lengths, you decrease back to 7 stitches, then make a little more of the narrow section and add two buttonholes near the end.
Next, crochet a flower in rounds. The first three rounds create a base and an initial layer of six petals. The remaining rounds add two more layers, each worked into chain spaces behind the previous petals. This layered construction gives the flower its fuller shape.
The pattern is best suited to a maker who knows basic knit and purl stitches, crochet chains and stitches, and how to join rounds. Newer crafters can use it as a skill-building project, but should be comfortable reading stitch abbreviations and keeping track of increases, decreases, and round joins. The instructions don’t specify a total completion time; the pace will depend on your knitting and crochet experience, as well as how often you pause to check the fit.
Materials you’ll need
- 1 ball RED HEART® “Shimmer™” in Lime
- 5 mm knitting needles
- 4 mm crochet hook
- Yarn needle
- One ¾-inch button
The pattern names a specific yarn but doesn’t provide its fiber content or yarn weight here. Check the ball band for those details and care instructions. If you substitute a different yarn, choose one with a similar thickness and drape. A substantially thicker or thinner yarn can change the band’s width, flower size, and overall fit, and may also change how much yarn you need.
The listed needles and hook are the pattern’s specified tools. Using different sizes may alter the fabric: smaller tools generally make a denser fabric, while larger tools tend to create a looser one. If you substitute, make a small test swatch and check that the resulting fabric feels comfortable against the head.
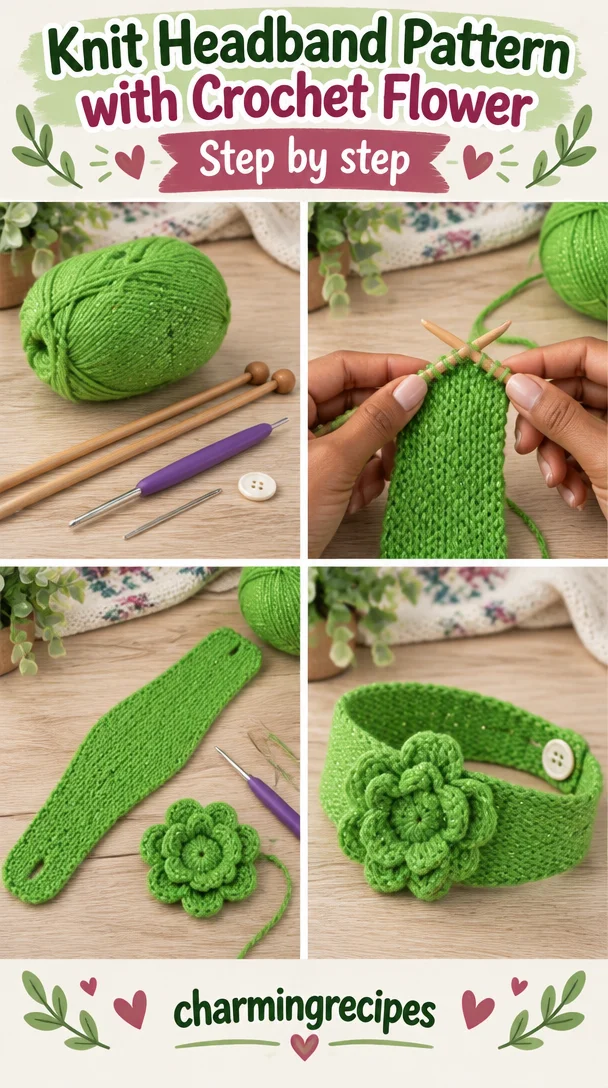
Step-by-step instructions
Knit headband
Abbreviations used: K = knit, P = purl, st(s) = stitch(es), M1 = make one increase, K2tog = knit two stitches together, ssk = slip, slip, knit, yo = yarn over, wyif = with yarn in front.
-
Cast on 7 stitches.
-
Work the first three rows: Slip 1 stitch with the yarn in front (wyif), then knit to the end of each row.
-
Work Row 4, the wrong-side row: Slip 1 stitch wyif, knit 1, purl until 2 stitches remain, then knit the last 2 stitches.
-
Work Row 5: Slip 1 stitch wyif and knit to the end.
-
Repeat Rows 4 and 5 until the piece measures 2 inches from the beginning. Finish this section with a wrong-side row.
-
Work the increase row on the right side: Slip 1 stitch wyif, knit 1, make 1 increase (M1), knit to the last 2 stitches, make 1 more increase, then knit 2. You now have 9 stitches.
-
Repeat the increase row every fourth row 3 more times. You will have 15 stitches after these three additional increase rows.
-
Work even—without increasing or decreasing—until the piece measures 6½ inches from the beginning. Work the increase row once more. You now have 17 stitches.
-
Continue working even until the piece measures 15 inches from the beginning. Finish with a wrong-side row.
-
Work the decrease row on the right side: Slip 1 stitch wyif, knit 1, knit the next 2 stitches together (K2tog), knit until 4 stitches remain, slip the next 2 stitches one at a time as if to knit and knit them together through the back loops (ssk), then knit 2. You now have 15 stitches.
-
Repeat the decrease row every fourth row 4 more times. You will return to 7 stitches.
-
Work even for approximately 2 inches more.
-
Check the fit. Try on the headband and adjust the number of rows at this point if needed. The two ends should barely meet at the back of your neck when the band is slightly stretched. Add or remove rows to suit your fit.
-
If necessary, work one more row so the next row begins on the right side, following a wrong-side row.
-
Make the buttonhole row on the right side: Slip 1 stitch wyif, knit 2, yarn over (yo), knit the next 2 stitches together (K2tog), then knit 2.
-
Work 3 rows even.
-
Repeat the buttonhole sequence: Work one more buttonhole row, followed by 3 rows even.
-
Bind off.
Crochet flower
The flower is worked in joined rounds. “Ch” means chain, “sl st” means slip stitch, “sc” means single crochet, “hdc” means half double crochet, “dc” means double crochet, and “tr” means treble crochet. A bracketed sequence is worked in the space stated, then repeated the indicated number of times.
-
Form the center ring: Chain 5, then join with a slip stitch to make a ring.
-
Round 1: Chain 5; this counts as 1 double crochet and 2 chain stitches. Work a double crochet into the ring, then chain 2. Repeat the sequence in brackets—[double crochet in the ring, chain 2]—5 times. Join with a slip stitch in the third chain of the beginning chain-5.
-
Round 2: In each chain-2 space, work the following sequence: single crochet, half double crochet, double crochet, treble crochet, double crochet, half double crochet, single crochet. Repeat in all 6 chain-2 spaces. This makes 6 petals.
-
Round 3: Hold the petals in front so you can work behind them into the double crochets from Round 1. Work a single crochet into a double crochet, then chain 3. Repeat [single crochet in the double crochet, chain 3] 6 times. Join to the first single crochet.
-
Round 4: In each chain-3 space, work: single crochet, half double crochet, double crochet, 3 treble crochets, double crochet, half double crochet, single crochet. Repeat in all 6 spaces to make 6 petals.
-
Round 5: Hold the petals in front again. Working into the single crochets from Round 3, work a single crochet into a single crochet, then chain 4. Repeat [single crochet in the single crochet, chain 4] 6 times. Join.
-
Round 6: In each chain-4 space, work: single crochet, half double crochet, double crochet, 5 treble crochets, double crochet, half double crochet, single crochet. Repeat in all 6 spaces to make the final layer of 6 petals.
-
Fasten off.
Finishing
- Position the flower on the wide portion of the knitted headband.
- Sew the flower securely to the band with the yarn needle.
- Sew the button to the end opposite the buttonholes. Check that the button passes comfortably through a buttonhole.
- Weave in the remaining ends.
Styling ideas for your finished headband
Wear the headband with the buttoned ends meeting at the back of your neck. Position the flower over the wide section, then adjust its placement so it sits where you’d like it to be seen—near the temple or a little farther back.
The flowered headband can also make a personal handmade gift. Choose a color that suits the recipient, and check the fit before finishing if you’re making it for someone nearby. Since the instructions don’t give a fixed finished circumference, the try-on step is important, especially when you’re making the headband for a particular person.
For a craft fair or handmade shop, it can be useful to show the headband both flat and being worn so customers can see the button closure and flower detail. If you plan to sell finished items, first check the original designer’s usage terms; the pattern information provided here doesn’t state whether selling finished pieces is permitted.
How to care for your headband
Care depends on the fiber in your chosen yarn. Follow the care instructions on the RED HEART® “Shimmer™” ball band, or on the label of your substitute yarn. If you’re unsure of the fiber or washing method, gentle hand washing is the safer choice.
- Use cool or lukewarm water and a mild detergent suitable for the yarn.
- Avoid rubbing or wringing the fabric, which can stretch or distort the knit and the flower petals.
- Rinse gently, then press out excess water between clean towels.
- Reshape the band and arrange the flower petals carefully. Let the piece dry flat.
- Avoid hanging it while wet; the weight of the water may lengthen or distort the band.
- Store it clean and dry, away from direct sunlight. Keep the button and petals from being crushed under heavy items.
If the yarn label allows machine washing, use the specified gentle settings and consider placing the headband in a mesh laundry bag. Remove it promptly and reshape it before drying.
Tips for a neat result
- Keep the slipped edge consistent. Work the first stitch of each row with the yarn in front as instructed. Consistent handling helps create a clean edge that’s easier to sew and finish.
- Count after shaping rows. Check that each increase row adds 2 stitches and each decrease row removes 2. The counts—7, 9, 15, 17, then back to 7—are helpful checkpoints.
- Mark right-side rows if needed. A small removable stitch marker on the right side can help you keep track of which row needs the increase or decrease instructions.
- Measure on a flat surface. Lay the band flat without stretching it when checking the 2-inch, 6½-inch, and 15-inch points. A soft tape measure makes it easier to keep the measurement straight.
- Try it on before making the buttonholes. The instructions specifically allow you to add or remove rows at the narrow end. Use this opportunity to check that the ends just meet when the band is slightly stretched.
- Watch the flower’s round joins. Join where instructed, and make sure the beginning chain is counted as specified in Round 1. A misplaced join can make the center look uneven.
- Keep petals in front for the hidden rounds. In Rounds 3 and 5, hold the existing petals forward and work into the stitches behind them. This creates the spaces for the next layers without flattening the flower.
- Sew the flower on securely. Catch the back of the flower and the headband fabric with small, even stitches. Check that the flower sits flat enough to wear comfortably, but don’t pull the sewing yarn so tight that the knit puckers.
- Secure the button with care. Position it opposite the buttonholes and test the closure before weaving in the sewing thread or yarn ends.
Personalize your project
- Change the color. A different shade can make the headband subtle, bright, or suited to a season. A contrasting flower can stand out, but will use a second color and may require extra yarn.
- Choose a coordinating button. A button that complements the yarn can make the closure feel intentional. Keep the specified ¾-inch size in mind; a much larger or smaller button may not fit the buttonhole properly.
- Adjust the fit at the try-on point. Add or remove rows in the section where the pattern allows adjustment so the ends barely meet when the band is slightly stretched. The finished circumference will vary with your row gauge and the wearer’s preferred fit.
- Make a coordinated pair. Use the same flower color on matching accessories, such as a small crocheted brooch or another headband. These companion pieces are separate projects, so allow for additional yarn and materials.
- Try a different yarn cautiously. A yarn with a similar thickness is the most straightforward substitute. A heavier yarn may make the headband warmer and bulkier, while a finer yarn may produce a smaller, lighter fabric. Either change can affect the flower’s size and the amount of yarn required.
Frequently asked questions
Is this a crochet headband pattern?
It’s a mixed-media pattern. The headband is knitted flat with 5 mm knitting needles, and the flower is crocheted with a 4 mm hook. You’ll need to be comfortable with both crafts or be ready to learn the basic techniques used in each part.
Is the pattern beginner-friendly?
It can suit a confident beginner who knows basic knit and purl stitches, crochet stitches, and how to join a crochet round. The shaping and layered flower require careful stitch counting. Read each section before starting, and use the stitch counts as checkpoints.
How much yarn do I need?
The materials list calls for 1 ball of RED HEART® “Shimmer™” in Lime. The pattern doesn’t state the yardage used, so check the ball band for the amount included. If you substitute yarn or make changes, you may need more.
How do I adjust the headband size?
Try on the headband after working approximately 2 inches beyond the decreases, before making the buttonholes. Add or remove rows at this point so the ends barely meet at the back of your neck when slightly stretched, then follow the instructions for ending with a wrong-side row if needed.
How do I make sure the buttonhole fits?
The buttonhole is formed with a yarn over and a knit-two-together decrease. Use the specified ¾-inch button, then test it through the finished opening. If the button doesn’t pass through comfortably, check that the yarn-over was made and the K2tog was worked correctly.
Why does the flower have several layers of petals?
The flower’s later rounds are worked behind the petals made in earlier rounds. Chains and stitches worked into those hidden base stitches create new chain spaces, and each new layer of petals is built into those spaces. Hold the earlier petals forward so the back stitches remain accessible.
Can I use a different hook or needle size?
You can, but it may change the finished size and feel. Smaller tools usually produce denser fabric; larger tools usually produce looser fabric. If you change sizes, check the band’s fit and make sure the flower remains a suitable size for the wide section.
How should I wash the finished headband?
Follow the care label for the yarn. If you can’t confirm the recommended method, hand wash gently in cool or lukewarm water, reshape the band and petals, and dry flat. Avoid wringing or hanging it while wet.
Can I sell a headband made from this pattern?
The pattern information here does not give permission or restrictions for selling finished items. Check the original designer’s usage terms before listing or selling a headband made from it.
Print
Knit Headband with Crochet Flower
Description
This knit headband with a crochet flower combines a comfortable tapered band with a layered, dimensional flower. The headband is worked flat with knitting needles, while the flower is crocheted separately and sewn on at the end.
Materials
- 1 ball RED HEART® 'Shimmer™' in Lime
- 5 mm knitting needles
- 4 mm crochet hook
- Yarn needle
- One ¾-inch button
Instructions
- Cast on 7 stitches.
- Work the first three rows: Slip 1 stitch with the yarn in front (wyif), then knit to the end of each row.
- Work Row 4, the wrong-side row: Slip 1 stitch wyif, knit 1, purl until 2 stitches remain, then knit the last 2 stitches.
- Work Row 5: Slip 1 stitch wyif and knit to the end.
- Repeat Rows 4 and 5 until the piece measures 2 inches from the beginning. Finish this section with a wrong-side row.
- Work the increase row on the right side: Slip 1 stitch wyif, knit 1, make 1 increase (M1), knit to the last 2 stitches, make 1 more increase, then knit 2. You now have 9 stitches.
- Repeat the increase row every fourth row 3 more times. You will have 15 stitches after these three additional increase rows.
- Work even—without increasing or decreasing—until the piece measures 6½ inches from the beginning. Work the increase row once more. You now have 17 stitches.
- Continue working even until the piece measures 15 inches from the beginning. Finish with a wrong-side row.
- Work the decrease row on the right side: Slip 1 stitch wyif, knit 1, knit the next 2 stitches together (K2tog), knit until 4 stitches remain, slip the next 2 stitches one at a time as if to knit and knit them together through the back loops (ssk), then knit 2. You now have 15 stitches.
- Repeat the decrease row every fourth row 4 more times. You will return to 7 stitches.
- Work even for approximately 2 inches more.
- Check the fit. Try on the headband and adjust the number of rows at this point if needed.
- If necessary, work one more row so the next row begins on the right side, following a wrong-side row.
- Make the buttonhole row on the right side: Slip 1 stitch wyif, knit 2, yarn over (yo), knit the next 2 stitches together (K2tog), then knit 2.
- Work 3 rows even.
- Repeat the buttonhole sequence: Work one more buttonhole row, followed by 3 rows even.
- Bind off.
- For the flower: Form the center ring: Chain 5, then join with a slip stitch to make a ring.
- Round 1: Chain 5; this counts as 1 double crochet and 2 chain stitches. Work a double crochet into the ring, then chain 2. Repeat the sequence in brackets—[double crochet in the ring, chain 2]—5 times. Join with a slip stitch in the third chain of the beginning chain-5.
- Round 2: In each chain-2 space, work the following sequence: single crochet, half double crochet, double crochet, treble crochet, double crochet, half double crochet, single crochet. Repeat in all 6 chain-2 spaces. This makes 6 petals.
- Round 3: Hold the petals in front so you can work behind them into the double crochets from Round 1. Work a single crochet into a double crochet, then chain 3. Repeat [single crochet in the double crochet, chain 3] 6 times. Join to the first single crochet.
- Round 4: In each chain-3 space, work: single crochet, half double crochet, double crochet, 3 treble crochets, double crochet, half double crochet, single crochet. Repeat in all 6 spaces to make 6 petals.
- Round 5: Hold the petals in front again. Working into the single crochets from Round 3, work a single crochet into a single crochet, then chain 4. Repeat [single crochet in the single crochet, chain 4] 6 times. Join.
- Round 6: In each chain-4 space, work: single crochet, half double crochet, double crochet, 5 treble crochets, double crochet, half double crochet, single crochet. Repeat in all 6 spaces to make the final layer of 6 petals.
- Fasten off.
- Position the flower on the wide portion of the knitted headband.
- Sew the flower securely to the band with the yarn needle.
- Sew the button to the end opposite the buttonholes. Check that the button passes comfortably through a buttonhole.
- Weave in the remaining ends.
Notes
The pattern is best suited to a maker who knows basic knit and purl stitches, crochet chains and stitches, and how to join rounds.