

It begins with the gentle feeling of soft, warm colors as you hold a tiny bouncy ball in your hand, its surface smooth and inviting. You can almost imagine the sparkle of fairy dust nestled within its cheerful texture. As you knead, blend, and shape, creativity flows through your fingers. The simple act of making Fairy Dust Bouncy Balls provides an opportunity to pause, breathe, and savor the moment, giving life to a project that is just as joyous to create as it is to play with.
Why Make This Fairy Dust Bouncy Balls
Creating Fairy Dust Bouncy Balls encourages you to tap into your playful essence. As you immerse yourself in the process, the world around you quiets, allowing you to be fully present. There is something utterly soothing about mixing vibrant colors, feeling the smooth mixture in your hands, and observing the transformation from separate ingredients to a cohesive, lively ball.
The tactile nature of this DIY promotes mindfulness. Each roll of the ball brings you closer to a moment of joy. You feel your body relax, your thoughts settle, and your heart lighten. The simple act of creation—mixing, rolling, and shaping—grounds you. The sparkle of fairy dust reminds you of lightness, childhood wonder, and playful curiosity, drawing you into a lovely moment where serenity reigns.
A Gentle Look at the Process
Making Fairy Dust Bouncy Balls blends various textures and colors, creating a visual rhythm that pairs beautifully with soothing sounds. As you prepare, you may hear gentle patting and squishing, which adds to the calming ambiance. Imagine the soft rustle of materials, the warmth of your hands as you smooth the mixture, and the glimmer of colors coming together.
Gathering each material is like preparing for a cozy moment of creativity, where no rush exists. You begin with simple ingredients that meld seamlessly, harmonizing into delightful shapes. The process flows like a gentle stream, guiding you through each step with ease and joy.
Gathering Your Materials
You will need the following materials to create your Fairy Dust Bouncy Balls:
- 1 cup of white school glue (easy to find)
- 1/2 cup of liquid starch (available at grocery stores)
- Food coloring (optional for custom colors)
- Glitter or colored salt (for the fairy dust effect; optional)
- Mixing bowl (for blending)
- Measuring cups (to ensure proper proportions)
- A clean workspace (to enjoy the process without interruptions)
Each of these components contributes to the magic of your project. It all feels accessible and inviting, encouraging you to begin with a sense of wonder.
Step-by-Step Directions
-
Gather your materials in a cozy space where you can focus. Let the sight of the colorful supplies inspire your creativity.
-
Pour the glue into your mixing bowl. As the glue cascades out, enjoy the soft, smooth texture and watch it swirl.
-
Add the liquid starch slowly. The transformation starts here. Mix the two together gently with your fingers or a spoon, feeling them combine.
-
Incorporate a few drops of food coloring if you desire a specific hue. Allow the vibrant color to swirl into the mixture.
-
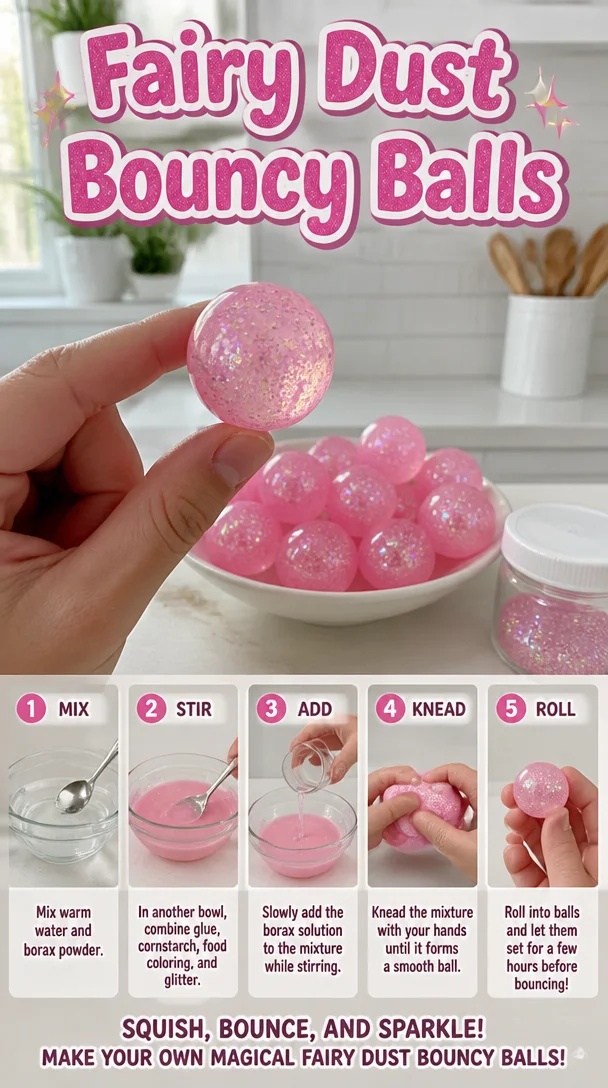
Knead the mixture with your hands until it becomes a smooth ball. Feel the textures meld together. If it feels sticky, you can sprinkle in a touch more liquid starch.
-
Add the glitter or colored salt for that magical fairy dust effect. Mix thoroughly once more. Notice how the sparkles catch the light, creating a dreamy effect.
-
Roll the mixture into small balls. Enjoy the coolness and roundness as you shape each piece gently.
-
Set aside your bouncy balls and allow them to dry for an hour or so. Take a moment to savor the space around you, feeling relaxed as you await the result of your creativity.
Enjoying the Finished Piece
After they have dried, your Fairy Dust Bouncy Balls become a source of joy and whimsy. You can keep them in a cozy spot in your home, letting their colors add a playful touch to your space. They can be little treasures to hold in your hand, reminders of the creativity you cultivated.
Imagine sharing them with friends or family, bouncing them back and forth, reminiscent of carefree days spent outdoors. Placed in a bowl, they serve as charming decorations, catching the eye with their sparkle and inviting curiosity.
How to Store or Reuse Fairy Dust Bouncy Balls
Keeping your Fairy Dust Bouncy Balls fresh and playful is easy. Store them in a cool, dry place, away from direct sunlight. A small cloth bag or a decorative bowl works well, providing a cozy home for your creations. You can also reuse these balls by simply reshaping them if they lose their bounciness—just give them a little love and refreshment.
If you notice any wear, you can always create a new batch, invigorating your space with new colors and sparkles. The beauty lies not only in the making but also in the ability to create more joyful experiences whenever inspired.
Gentle Tips & Variations
Feel free to explore and make this DIY uniquely yours. Here are some gentle suggestions:
- Experiment with different types of glitter or even natural materials, like dried flower petals, to create unique textures.
- Try using essential oils in the process to add a calming scent, enhancing the sensory experience.
- Consider creating themed bouncy balls for different occasions—maybe vibrant pastels for spring or deeper hues for cozy winter months.
- You could even create a bouncy ball gift set, personalized with favorite colors or scents for friends and loved ones.
Each of these small adaptations can add a layer of personal touch, inviting you to deeply connect with your craft.
FAQs About Fairy Dust Bouncy Balls
How long do the bouncy balls last?
With proper care and storage, your bouncy balls can last several weeks or even months. If they start to lose their shape or bounce, just reshape them or refresh with a small amount of liquid starch.
Can I use something other than glue?
While white school glue works particularly well for this project, you may experiment with other types of glue if you wish, though results may vary.
Is it possible to make them larger or smaller?
Absolutely! Feel free to adjust the size according to your preference. Just remember that the drying time may vary with larger pieces.
What if I want more colors?
Mixing your own shades is a simple joy. You can combine different food colorings to create a wide array of beautiful colors, enhancing the sensory experience.
Are they safe for kids?
Yes, these bouncy balls are safe for children under supervision. Just remind them not to swallow any pieces and to enjoy their creations mindfully.
A Gentle Note Before You Go
As you finish making your Fairy Dust Bouncy Balls, take a moment to appreciate not only the colorful creations in your hands but also the time you spent in the process. Each ball carries a little piece of you, a reminder of your creativity, calmness, and playful spirit.
Let this experience encourage you to embrace making with a gentle heart. Whether you bounce, display, or gift your creations, remember that it is the journey of creativity that holds the most sweetness. So, slow down, breathe, and enjoy the quiet moments that crafting brings.
Print
Fairy Dust Bouncy Balls
- Total Time: 75 minutes
- Yield: 4-6 bouncy balls
- Diet: N/A
Description
A playful DIY project to create colorful bouncy balls filled with fairy dust-like sparkle.
Ingredients
- 1 cup white school glue
- 1/2 cup liquid starch
- Food coloring (optional)
- Glitter or colored salt (optional)
- Mixing bowl
- Measuring cups
- A clean workspace
Instructions
- Gather your materials in a cozy space.
- Pour the glue into your mixing bowl.
- Add the liquid starch slowly and mix.
- Incorporate a few drops of food coloring if desired.
- Knead the mixture until it becomes a smooth ball.
- Add glitter or colored salt and mix thoroughly.
- Roll the mixture into small balls.
- Set aside to dry for about an hour.
Notes
Store in a cool, dry place away from direct sunlight. You can reshape and refresh them if they lose bounciness.
- Prep Time: 15 minutes
- Cook Time: 60 minutes
- Category: Crafts
- Method: DIY Crafting
- Cuisine: N/A